-
Please only use these forums for blogs, they are not a discussion forum
You are using an out of date browser. It may not display this or other websites correctly.
You should upgrade or use an alternative browser.
You should upgrade or use an alternative browser.
Noddie's K11
- Thread starter Noddie
- Start date
OP
OP
:O £30 jammy git, is it gas?
yeah, but it uses those silly little bottles that cost a fortune.
OP
OP
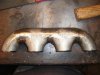
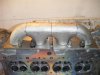
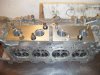
Finnished the timing bracket, fitted it and finnished installing the wideband controler and sensor today.
the car runs, but its ecu is caliberated for a map sensor (which i have) so il fit that tomorrow hopefully and it will run better. I have it in closed loop constantly atm so load sensor is not important.
couple of pics:

the car runs, but its ecu is caliberated for a map sensor (which i have) so il fit that tomorrow hopefully and it will run better. I have it in closed loop constantly atm so load sensor is not important.
couple of pics:
Attachments


OP
OP
excellent ed (Y) is the map more suited than a maf on your setup ?
cheers guys
! Well, the ecu came off a turbo micra in oz which was running a map (which came with the ecu) which from what i have read is better for turbo set-ups (but Ed may dissagree?)
Im considering selling my pistons to fund the rest of the build, which should speed up proceedings
but not completely sure atm.
OP
OP
Quick update, i take it back, the car is not 'running'! it was running VERY rich as the load sensor (MAF and then MAP) are reading well loads of load init!!! no good atall. had a go at recalibrating the map sensor but the car has now run out of fuel (probably because its been drinking it at george bests best rate) so il get some more juice tomorrow and try AGAIN!
love this stuff!! il say it even if i dont mean it.
just hope i havent ** the wideband sensor with the over rich mix.
love this stuff!! il say it even if i dont mean it.
just hope i havent ** the wideband sensor with the over rich mix.
OP
OP
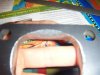
Sensor will be fine. Thats a strange timing wheel just one tooth per rev?
BTW I prefer MAP on turbo cars. You have to have a AIT sensor too but they are generally better once setup right.
Ed
good(Y) think there is somthing wrong with the controler atm as its reading 14.8 all the time (think its a common prob with the TE controlers by the look of their forum:S) hopefully it will just need recalibrating.
Its two teeth per rev mate, the one on the bottom is a bit hidden in the pic maybe?
OP
OP
14.8 means your sensor is cold usually.
Still two teeth is really uncommon, Can the ecu not use something like 36-1? May be too late but the system would be much more precise then.
apparently not, yeah, i understand what you mean because then it could count down to tdc better eh? it doesnt reconise the missing tooth either.
OP
OP
Hope you get all sorted, would be nice to see it running strong
Your telling me!!
anyway, this now deffinately a nightmare lol!
this is the problem im up against atm... (sorry for masive pic but when i tried to re-size the text went all funny)
basicly, there is a 'Volts V Load' calibration table for the MAP/MAF sensor, but there is also another one for the 'Load':S
if the MAP table was 'Volts V Pressure' then that would make much more sense to me, because the load (when using a MAP sensor) is worked out with much more than just the MAP voltage reading. so how can the volts directly relate to load??
But then whats the 'Load' table all about eh??
all this makes me think that it may be better to fit a MAF sensor (where volts are derectly linked to load)...
anyway, if thats atall interesting to anyone then im glad i wrote it (its good to put things in writing
)Attachments

OP
OP
The old owner of that ECU cant send you the ROM he used? BTW check your inbox... lol
By ROM do you mean the settings he used? I dunno, iv had no luck contacting him. but btw that screen shot is not with the ecu connected, its just what you get when you load the softwear (hense all the 0's).
I checked my PM but there isnt one from you? was it full? iv deleted some now(Y)
Edit, Replied baguete(Y)
baguete
Site Supporter
By ROM do you mean the settings he used? I dunno, iv had no luck contacting him. but btw that screen shot is not with the ecu connected, its just what you get when you load the softwear (hense all the 0's).
I checked my PM but there isnt one from you? was it full? iv deleted some now(Y)
Edit, Replied baguete(Y)
Yes, the settings he used on his car, maybe you could use them and then tune it to fit your mods...
Replied back
OP
OP
Yeah, but im not sure that the setting were all that good tbh, it was supposed to be setup for that MAP sensor but it was reading 40% load at idle:S I did save the ignition and fuel maps (turbo) that it came with though so that might give me a helping hand when i bolt that blower on(Y)Yes, the settings he used on his car, maybe you could use them and then tune it to fit your mods...
Replied back
Yeah, gave him a quick bell today! top lad!! thanks for that mate! That Nistune sound pretty good!have you been in touch with phil yet Ed?
And Ed, I couldnt see the K11 micra on the nistune website, are you using a primera doughterboard with k11 maps??
baguete
Site Supporter
Type 4 board. Im ordering some more soon if you want one.
Thats the board im using, very easy to tune...
OP
OP
good(Y) think there is somthing wrong with the controler atm as its reading 14.8 all the time (think its a common prob with the TE controlers by the look of their forum:S) hopefully it will just need recalibrating.
Its two teeth per rev mate, the one on the bottom is a bit hidden in the pic maybe?
The constant 14.8 reading turned out to be a dodgy cable so TechEdge are sending me a new one
Manny
Ex. Club Member
The constant 14.8 reading turned out to be a dodgy cable so TechEdge are sending me a new one
thats good you found out the problem. (Y)
OP
OP
Basicly im getting no where with the ECU atm, but i have enlisted the help of Wolf who made the ecu (to the sum £30 for a month :S) so should get somewhere soon.
been doing a bitta messing around in the meantime:
Gave fiberglassing a bash to adapt my glovebox so that i can put the ecu and wideband controler in it. I painted it white and black because the paint fumes have gone to my head and im feeling all 'arty' but also because it helps conver the terrible finnish i got on the f/g and filler:
re-painted the lid to my dash insert because it had got hot in the sun and boubbled up a bit.
I have also fitted that japanese lower din panel i got off AMY (thank you very much mate! great service!) and fitted my radio there so that i could put my boost gauge into the place that the radio normaly sits. also fitted a vaccume manifold i got off a volvo in a breakers yard. Il get pics of that stuff when i get chance.
been doing a bitta messing around in the meantime:
Gave fiberglassing a bash to adapt my glovebox so that i can put the ecu and wideband controler in it. I painted it white and black because the paint fumes have gone to my head and im feeling all 'arty' but also because it helps conver the terrible finnish i got on the f/g and filler
:
re-painted the lid to my dash insert because it had got hot in the sun and boubbled up a bit.
I have also fitted that japanese lower din panel i got off AMY (thank you very much mate! great service!
) and fitted my radio there so that i could put my boost gauge into the place that the radio normaly sits. also fitted a vaccume manifold i got off a volvo in a breakers yard. Il get pics of that stuff when i get chance.Attachments


OP
OP
vaccume mannifold???? show meeee
i got the brace sorted to it looks the muts! i think im going to make the same one for the front too. there big and bulkey and look the biz
It doesnt look much mate, but seems to work ok
il get a pic up when i get chance Yeah! i wonna see some pics of it! big and bulkey eh? what would frank say??


OP
OP
nice one Ed, looks a bit to messy for me.....i like things nice a neat
im still having trouble getting pics on my laptop f'n windows 7 but as soon as i sort it i'll send you the pics of the injectors and the brace
lol, cheers mate, nah, i know it does look a bit messy, but it works fine and cost me nothing.
PM'd you (well, i will once i have writen this)
OP
OP
Little Update
Thought it was definitely about time I updated.
I'l let the pictures do most of the talking.
Still loads to do, car is sitting out on the road on axle stands, the plan is to get everything all bolted up and working, actuator disconnected so its not making boost, then work from there. its my daily so things have to be done a bit at a time...
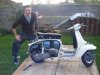
Oh, and the last pic is my cousins lambretta that im fixing up for him, nearly there...
Thought it was definitely about time I updated.
I'l let the pictures do most of the talking.
Still loads to do, car is sitting out on the road on axle stands, the plan is to get everything all bolted up and working, actuator disconnected so its not making boost, then work from there. its my daily so things have to be done a bit at a time...
Oh, and the last pic is my cousins lambretta that im fixing up for him, nearly there...
Attachments
-
 DSCF3326 (Small).JPG57.3 KB · Views: 549
 -
 DSCF3325 (Small).JPG67 KB · Views: 539
 -
 DSCF3015 (Small).JPG37.7 KB · Views: 520
 -
 DSCF3014 (Small).JPG34.1 KB · Views: 538
 -
 DSCF3013 (Small).JPG35 KB · Views: 535
 -
 DSCF2996 (Small).JPG49.2 KB · Views: 539
 -
 DSCF2985 (Small).JPG46.4 KB · Views: 534
 -
 DSCF2978 (Small).JPG54.2 KB · Views: 530
 -
 DSCF2960 (Small).JPG40.1 KB · Views: 533
 -
 DSCF3002 (Small).JPG60.3 KB · Views: 518
 -
 DSCF3337 (Small).JPG53.5 KB · Views: 519
 -
 DSCF3340 (Small).JPG57 KB · Views: 528
 -
 DSCF3339 (Small).JPG54.1 KB · Views: 557
 -
 DSCF3335 (Small).JPG39.9 KB · Views: 522
 -
 DSCF3334 (Small).JPG55.7 KB · Views: 532
 -
 DSCF3330 (Small).JPG45.9 KB · Views: 518
 -
 DSCF3329 (Small).JPG50.8 KB · Views: 512
 -
 DSCF3328 (Small).JPG56.2 KB · Views: 537
 -
 DSCF3327 (Small).JPG71.5 KB · Views: 524


will_halligan
Buy & Sell Member
haha. i like the progress. keep it up mate! (Y)
that is so awesome, manifold looks cool, well done. what material did you use? is it stainless? Keep us updated mate. we wanna see whats happening.
i should get from the computer. its like im the only one on the site writing. lol
i should get from the computer. its like im the only one on the site writing. lol
OP
OP
cheers man, nah didnt get that far had to go work on that scooter, got the stock mani off (without breaking any studs) which is the hard part, snapped one of the cat-downpipe bolts though so gotta do somthing about that, drill the bolts out and use new bolts i guess, il get there.
just ordered myself on of those peter lloyd exhausts, should be good.
just ordered myself on of those peter lloyd exhausts, should be good.
sleeper_ss
Ex. Club Member
Good to hear some progress..& like the Lambretta.
Not had time here,it's gathering dust :wasntme:
Not had time here,it's gathering dust :wasntme:
OP
OP
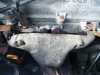
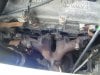
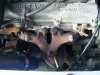
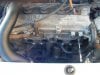
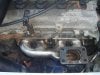
Did a bit more today, fitted the turbo manifold on, finished both oil lines, trial bolted the turbo up to check for the intercooler route, i wanted to go strait down but its looking like il have to to over the top (like stani's setup).
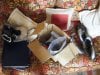
Also my new exhaust arrived a couple of hours ago, could have been packed better but other than that its looked pretty promising.
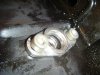
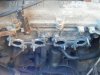
First of all i cleaned out the stud holes with a tap
Then in when new studs (cut to specific lengths to clear the manifold.
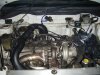
then i stuck the manifold on, with plenty of exhaust paste and a new gasket
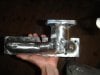
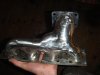
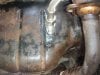
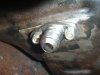
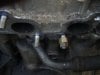
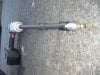
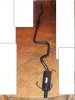
This is one way to get that dam little grub screw out that you tap into for the oil feed to the turbo.
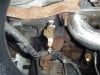
this is the oil feed 'T' is will need to be turned around because its fowling the exhaust off the turbo
plonked it all together for a pic
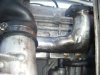
and this is my new system, its a good feeling when all the bits you have been making are starting to come together!
Also my new exhaust arrived a couple of hours ago, could have been packed better but other than that its looked pretty promising.
First of all i cleaned out the stud holes with a tap
Then in when new studs (cut to specific lengths to clear the manifold.
then i stuck the manifold on, with plenty of exhaust paste and a new gasket
This is one way to get that dam little grub screw out that you tap into for the oil feed to the turbo.
this is the oil feed 'T' is will need to be turned around because its fowling the exhaust off the turbo
plonked it all together for a pic
and this is my new system, its a good feeling when all the bits you have been making are starting to come together!
Attachments
-
 DSCF3342 (Small).JPG48.1 KB · Views: 508
 -
 DSCF3343 (Small).JPG37 KB · Views: 469
 -
 DSCF3344 (Small).JPG52.2 KB · Views: 488
 -
 DSCF3345 (Small).JPG54.6 KB · Views: 499
 -
 DSCF3347 (Small).JPG48.1 KB · Views: 504
 -
 DSCF3349 (Small).JPG53.7 KB · Views: 492
 -
 DSCF3353 (Small).JPG55.8 KB · Views: 487
 -
 DSCF3354 (Small).JPG63.3 KB · Views: 490
 -
 DSCF3355 (Small).JPG37.3 KB · Views: 487


OP
OP
Cheers mate, I wouldnt call it pro though, its not going to be blingin engine bay, it will work though. the pipe is just IC piping i picked up in a breakers yard including some i got from a cop carlooking very professional ed (Y)
, gonna use a stock saab bov, imo there isnt much point in buying new when there is plenty of turbo cars in the breakers yard with lots of the bits you need, the only thing is it doesnt look all new and shiney.I did however spend nearly 40quid on engine oil!!! it had better be really ######ing good!