-
Please only use these forums for blogs, they are not a discussion forum
You are using an out of date browser. It may not display this or other websites correctly.
You should upgrade or use an alternative browser.
You should upgrade or use an alternative browser.
EBBdude`s : Micro Micra project
- Thread starter EBBdude
- Start date
- Status
- Not open for further replies.
It is time to do some more work on the Micro Micra project.
We are now going to look some more at these things

Will show some work on them to see if we can tweek some more out of this little fellow here.
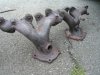
The OEM ex-manifold didnt interest Nissan any much at all.
Rather poorly designed and very small passages internally , specially in the “neck “ area of the manifold.
The cat is also very often showing up to be a pain in the a…
This one also with a not so good bolts in it that I am going to fix.
My goal is just to find out if the manifold , via very simple approach , can be reworked to give us some more ompa ompa.
Nothing professional , just plain and easy understandable stuff.
Oki , lets find some stuff to work with here:
I have some junk pipes laying around and I will find something here to improve the manifold with.
I will try to cut the oem manifold open like this:
A couple of swift cuts with a angle grinder and voila :
Here you can se the internals of the manifold and the small passages inside it.
My approach is quite simple and straight foreward.
Cut , add & weld !
But since i am a workaholic i thought i start doing this :
Strap it onto my milling machine and mill the heck out of it
When it is finished it looks like this:
Some grinding i did too innside.
Cut some pipes and dont know what…
Basically I just swapped the cut out part with these parts:
I pre-heated the hole lot on a cooking plate , Tig-welded the lot in a jig and it was only about 0.3 mm out of shape after it was finished.
That I just shimmed in my surface grinder like this :
Put a couple of layers of some heat paint over it :
Presto !
Now it hopefully will work some better.
Before ;
You can see that i also welded in a new place to put the 02-sensor in.
After ;
The Cat got some bolts repaired and I ripped out the internal web of cat-material that was all melted rock hard
Put some paint just for fun on that one as well:
In the car it looks like this :
Have put in a new o2-unit as well.
Jihaaa,,,,now for todays quiz :
WHAT HAPPENED ON THE DYNAPACK NOW THEN ?
Good or bad you think ?
Lets hear it folks !
We are now going to look some more at these things


Will show some work on them to see if we can tweek some more out of this little fellow here.
The OEM ex-manifold didnt interest Nissan any much at all.

Rather poorly designed and very small passages internally , specially in the “neck “ area of the manifold.
The cat is also very often showing up to be a pain in the a…

This one also with a not so good bolts in it that I am going to fix.
My goal is just to find out if the manifold , via very simple approach , can be reworked to give us some more ompa ompa.
Nothing professional , just plain and easy understandable stuff.
Oki , lets find some stuff to work with here:

I have some junk pipes laying around and I will find something here to improve the manifold with.
I will try to cut the oem manifold open like this:

A couple of swift cuts with a angle grinder and voila :

Here you can se the internals of the manifold and the small passages inside it.
My approach is quite simple and straight foreward.
Cut , add & weld !
But since i am a workaholic i thought i start doing this :

Strap it onto my milling machine and mill the heck out of it
When it is finished it looks like this:

Some grinding i did too innside.
Cut some pipes and dont know what…

Basically I just swapped the cut out part with these parts:

I pre-heated the hole lot on a cooking plate , Tig-welded the lot in a jig and it was only about 0.3 mm out of shape after it was finished.
That I just shimmed in my surface grinder like this :

Put a couple of layers of some heat paint over it :

Presto !
Now it hopefully will work some better.
Before ;

You can see that i also welded in a new place to put the 02-sensor in.
After ;

The Cat got some bolts repaired and I ripped out the internal web of cat-material that was all melted rock hard

Put some paint just for fun on that one as well:

In the car it looks like this :

Have put in a new o2-unit as well.
Jihaaa,,,,now for todays quiz :
WHAT HAPPENED ON THE DYNAPACK NOW THEN ?
Good or bad you think ?
Lets hear it folks !
I think there will be a pretty healthy gain but im not sure.
i go with that----a healthy gain
frank
Club Member
hasn't frank already done this with a oem mani fwn several times and i'm pretty sure it's been proven to be a worth while mod......?
here,s one of mine eh karl :grinning: showed a 6 hp gain on a modded 1.3 (with a slightly optimistic dyno) so i would guess 3 to 4 hp on a 1.0
Attachments
i go for 5 bhp and i think its gonna improve torque at high end.
here,s one of mine eh karl :grinning: showed a 6 hp gain on a modded 1.3 (with a slightly optimistic dyno) so i would guess 3 to 4 hp on a 1.0
I like that Frank. Thats neat.
Well , here are the result of the home “adjusted “ manifold :
RESULT = + 3,5 HK ( @hubs )
So we are now up to:
55,8 HK / 6280 rpm
78,4 Nm / 3520 rpm
In a scale from 1-5 in how this can be felt it must be a 4 points on that.
Now it revs more freely and more easy reaches the top rpms on the Dynapack and on the street.
We are now in a situation where we have got 16 + more HP out of the engine by just easy stuff and that is a tod over 38 % increase in power !
And that without any gizmos or exspensive stuff whatsoever. Add a good decat ex-system and your looking at even more power.
I have done some other modifications to OEM manifolds later but htat just brought more complexitiy into the equation of being a DIY project , even though they added more power.
Oki , now the Micro Micra project is going for this :
I am going to rip some parts out of this donor car that has a 1,3 liter engine.
Will rip something in here and show you afterwards what the results were :
Keep looking and you will find out more…
RESULT = + 3,5 HK ( @hubs )
So we are now up to:
55,8 HK / 6280 rpm
78,4 Nm / 3520 rpm
In a scale from 1-5 in how this can be felt it must be a 4 points on that.
Now it revs more freely and more easy reaches the top rpms on the Dynapack and on the street.
We are now in a situation where we have got 16 + more HP out of the engine by just easy stuff and that is a tod over 38 % increase in power !
And that without any gizmos or exspensive stuff whatsoever. Add a good decat ex-system and your looking at even more power.
I have done some other modifications to OEM manifolds later but htat just brought more complexitiy into the equation of being a DIY project , even though they added more power.
Oki , now the Micro Micra project is going for this :

I am going to rip some parts out of this donor car that has a 1,3 liter engine.
Will rip something in here and show you afterwards what the results were :

Keep looking and you will find out more…
euro_micra
Matt :)
Been following this blog from the start and got to say there's some very good info here, especially the bits where almost anyone can do to there own micra for some easy gains.
Cannot wait for this 1.3 bit though!:laugh: I'm hoping for a test with just cams first as it's something alot of people have done including me, andthen do crank n rods after(Y)
Cannot wait for this 1.3 bit though!:laugh: I'm hoping for a test with just cams first as it's something alot of people have done including me, andthen do crank n rods after(Y)
EBBdude,
Do you do requests?
Id like to see the difference with almera ga14de airbox and cold air feed and a high flow air filter. Cheap easy modification for people if it works. My favourite mods are not free ones but good value ones from the local scrap yard
Do you do requests?
Id like to see the difference with almera ga14de airbox and cold air feed and a high flow air filter. Cheap easy modification for people if it works. My favourite mods are not free ones but good value ones from the local scrap yard
3.5bhp gain.....thats nice
Would love to see that done to a 1.3 engine.
- The sparkplug cables
- Bosch Super 4 spark plugs (will order them soon)
- Maybe GA16 throttle body
- Maybe 1.0 pistons, same thing done to the manifold.....and so on
That would be interesting (Y) (Y) My mate from the Slovenian forum said your thread is one of the best ones he is reading at the moment hehe Owned a 200sx S13 @Stage 2, and 100NX GTi (SR20DE) with redtop cams (Y) Sold them both and drives a Clio RS 182 :laugh:
Would love to see that done to a 1.3 engine.
- The sparkplug cables
- Bosch Super 4 spark plugs (will order them soon
)- Maybe GA16 throttle body
- Maybe 1.0 pistons, same thing done to the manifold.....and so on
That would be interesting (Y) (Y) My mate from the Slovenian forum said your thread is one of the best ones he is reading at the moment hehe
Owned a 200sx S13 @Stage 2, and 100NX GTi (SR20DE) with redtop cams (Y) Sold them both and drives a Clio RS 182 :laugh:@damienga15
I have done that from a dead stock K11 with 1.0 engine and that didnt bring about more then 1,5 Hp increase.
On a 1,3 the box alone with decent "ram-air " filter arrangement line it was worth about 2 Hp.
But these arrangements are almost not measurable on a Dynapack or a rolling road ( i have access to that as well ) when the car i standing still WITHOUT proper and HUGE fans that will simulate the air flow path and strenght of the passing air in a moving vehicle. Then it is measurable at all.
The thing that gives the most positive result is the Air-horn that you can see in my thread earlier up here and that is because the airodynamic characteristics it presents instead of how big the cutout or hole in the air-filter box is og if you have this or that air-filter.
Something like this on top of the throttle body works great :
These are actual loudspeaker parts that is easy available , comes in different dia and shapes / lenghts and is well suited to do a better job than any air-box /filter line etc.
Just use a K&N air foam mat on top , strip it on and you are ready to have some fun.
The fact that they will add a wild and furious sound to the engine is also cool...
@alexzaki
Thank you for positive feedback on the thread
In my " Maxi Micra " project, with a 1,3 liter engine , that im doing as well for the moment , the ex-manifold will also be tested there as a direct bolt on modification with a modified throttle body , a alu.spacer & air-horn.
Read more here if you like :
http://www.micra.org.uk/threads/40439-quot-Maxi-Micra-quot-project....by-EBBdude.
I have done that from a dead stock K11 with 1.0 engine and that didnt bring about more then 1,5 Hp increase.
On a 1,3 the box alone with decent "ram-air " filter arrangement line it was worth about 2 Hp.
But these arrangements are almost not measurable on a Dynapack or a rolling road ( i have access to that as well ) when the car i standing still WITHOUT proper and HUGE fans that will simulate the air flow path and strenght of the passing air in a moving vehicle. Then it is measurable at all.
The thing that gives the most positive result is the Air-horn that you can see in my thread earlier up here and that is because the airodynamic characteristics it presents instead of how big the cutout or hole in the air-filter box is og if you have this or that air-filter.
Something like this on top of the throttle body works great :

These are actual loudspeaker parts that is easy available , comes in different dia and shapes / lenghts and is well suited to do a better job than any air-box /filter line etc.
Just use a K&N air foam mat on top , strip it on and you are ready to have some fun.
The fact that they will add a wild and furious sound to the engine is also cool...
@alexzaki
Thank you for positive feedback on the thread
In my " Maxi Micra " project, with a 1,3 liter engine , that im doing as well for the moment , the ex-manifold will also be tested there as a direct bolt on modification with a modified throttle body , a alu.spacer & air-horn.
Read more here if you like :
http://www.micra.org.uk/threads/40439-quot-Maxi-Micra-quot-project....by-EBBdude.
Eliot
Ex Super S Owner
here,s one of mine eh karl :grinning: showed a 6 hp gain on a modded 1.3 (with a slightly optimistic dyno) so i would guess 3 to 4 hp on a 1.0
Wanna make me one Frank?
frank
Club Member
Wanna make me one Frank?
sure eliot :grinning:
Eliot
Ex Super S Owner
sure eliot :grinning:
hah really?
frank
Club Member
hah really?
yeh, best not jack ebb,s thread tho eh :wasntme:
Eliot
Ex Super S Owner
yeh, best not jack ebb,s thread tho eh :wasntme:
I was about to put that.
sorry ebb, carry on with this thread mate its epic!
No worries , its just fine to let others see more alternatives in how to do things and Franks manifold is excellent
I have started the work with making a genuine 4-1 manifold with a laser cut collector and will show that later in another project so people can have a look at that as well.
Will post some more later today...
I have started the work with making a genuine 4-1 manifold with a laser cut collector and will show that later in another project so people can have a look at that as well.
Will post some more later today...
superls
K10 Tuner
speaking of alternative manifolds, i made the one below out of mainly prebought pipe sections, i made the flanges myself.
http://www.micra.org.uk/threads/39508-exhaust-manifold-tinkering?highlight=
http://www.micra.org.uk/threads/39508-exhaust-manifold-tinkering?highlight=
superls
K10 Tuner
yep thats what its all about, i was going to make another of my hand crafted 4-2-1 manifolds, but i wanted to keep the front cat, (even tho it is knocked out) next up when the weather warms up is to make a front cat back system out of 2 inch pipe and free flowing silences. ready for boosting next year if all goes to plan, i want to do as much ground work before, to try and spread the costs a little bit.
Shaun
***StaGGeRed***
You should also make manifolds for other members..... :blush:yep thats what its all about, i was going to make another of my hand crafted 4-2-1 manifolds, but i wanted to keep the front cat, (even tho it is knocked out) next up when the weather warms up is to make a front cat back system out of 2 inch pipe and free flowing silences. ready for boosting next year if all goes to plan, i want to do as much ground work before, to try and spread the costs a little bit.
We are going to transplant these to camshafts from the 1.3 engine into the 1.0 engine of our Micro Mica project.
Some measurements shows that this is going to work quite easy without to much fuzz.
And no , there wont be bent valves or anything after we`re finished.
So then , lets go straight to the point :
Changing over the 1,3 camshafts to the 1.0 engine is not that complicated at all and I will show a rough way to how to do it.
( First check all your valve clearanceses before doing anything . Use a Haynes manual or likewise )
First you place your cylinder no 1 in TDC ( top dead center ) and then the camshafts will look like this in the cylinderhead:
Made some reference marks that you can see at the 2 bottom lower circles and note how the camshafts lobes are positioned in the upper 2 blue circles.
In that way you have some additional reference marks when you put them into the 1 liter engine.
You can make similar markings on your 1.0 liter before you rip them out.
Down at the lower crank pulley you will see the corresponding markings for the right position here at the blue circle
After that you will detach the 2 pc of 12 mm ( head measurement)at the dizzy and just push it out about 10 mm.
( blue circle )
You can mark the 2 cam sprockets as i did and you have even more references of how to put stuff back together( red lines )
When that is done , loosen the 2 pc of 22 mm bolt-heads in front of the camshafts at their sprockets
You can hold the camshafts by the 6-points marked with blue circle.
The chain tensioner is next and you can detach that by unscrewing the 10 mm bolts.
You can access it by removing the left front engine mount and removing the front cover of the engine.
Just compress it gently together when you take it out.
Now you can remove completely the pair of 22 mm bolts at the sprockets.
Then you detach all of the camshafts carriers
Keep track of them and have them in a orderly manner on your bench.
If we take a closer look you can se the mechanical lifter buckets that transfer the camshafts lift onto the valve stems.
You can also see the lifter bucket shims that takes care of the right valve clearance.
The 2 camshafts of the 1 liter engine is now out and I have just machine washed them nice and clean.
Lets have a look at the 2 pairs of camshafts and compare a little bit just for fun.
Inletcams in compare ; 1.0 to the left and 1,3 to the right.
Bring out a caliper and you will find out that there is difference in lift
1,3 camshaft
1.0 Camshaft
2 mm more lift on the 1,3 then…
Good stuff , more is better , right ?
Ok , then we just put the ripped 1,3 camshafts into the 1 liter then:
Assemble all in reverse with a check of all our previous marked details for control of putting everything back on right.
The tensioner just screws back into its housing so that it will go back into its lowest position so that you can put it in again.
Covers and everything back to where it were before
The valve clearences will need to be checked to 0,40 mm at both sides to make sure everything is ok.
Note ; if everything, regarding clearences is ok with your own 1 liter engine , then it is almost 99 % for certain that the clearences that you had will do for the new 1.3 liter camshafts.
I have done more then 20 changes and NEVER needed to change the shims on any of them so far with this procedure.
Then everything is in place
More runs on the Dynapack will now follow and todays quiz is :
DID THAT HELP OUT ON POWER AND IF IT DID HOW MUCH ?
Back with more soon….

Some measurements shows that this is going to work quite easy without to much fuzz.
And no , there wont be bent valves or anything after we`re finished.
So then , lets go straight to the point :
Changing over the 1,3 camshafts to the 1.0 engine is not that complicated at all and I will show a rough way to how to do it.
( First check all your valve clearanceses before doing anything . Use a Haynes manual or likewise )
First you place your cylinder no 1 in TDC ( top dead center ) and then the camshafts will look like this in the cylinderhead:

Made some reference marks that you can see at the 2 bottom lower circles and note how the camshafts lobes are positioned in the upper 2 blue circles.
In that way you have some additional reference marks when you put them into the 1 liter engine.
You can make similar markings on your 1.0 liter before you rip them out.
Down at the lower crank pulley you will see the corresponding markings for the right position here at the blue circle

After that you will detach the 2 pc of 12 mm ( head measurement)at the dizzy and just push it out about 10 mm.

( blue circle )
You can mark the 2 cam sprockets as i did and you have even more references of how to put stuff back together( red lines )

When that is done , loosen the 2 pc of 22 mm bolt-heads in front of the camshafts at their sprockets
You can hold the camshafts by the 6-points marked with blue circle.

The chain tensioner is next and you can detach that by unscrewing the 10 mm bolts.
You can access it by removing the left front engine mount and removing the front cover of the engine.

Just compress it gently together when you take it out.
Now you can remove completely the pair of 22 mm bolts at the sprockets.

Then you detach all of the camshafts carriers

Keep track of them and have them in a orderly manner on your bench.
If we take a closer look you can se the mechanical lifter buckets that transfer the camshafts lift onto the valve stems.
You can also see the lifter bucket shims that takes care of the right valve clearance.

The 2 camshafts of the 1 liter engine is now out and I have just machine washed them nice and clean.

Lets have a look at the 2 pairs of camshafts and compare a little bit just for fun.

Inletcams in compare ; 1.0 to the left and 1,3 to the right.
Bring out a caliper and you will find out that there is difference in lift

1,3 camshaft

1.0 Camshaft
2 mm more lift on the 1,3 then…
Good stuff , more is better , right ?
Ok , then we just put the ripped 1,3 camshafts into the 1 liter then:

Assemble all in reverse with a check of all our previous marked details for control of putting everything back on right.

The tensioner just screws back into its housing so that it will go back into its lowest position so that you can put it in again.


Covers and everything back to where it were before


The valve clearences will need to be checked to 0,40 mm at both sides to make sure everything is ok.
Note ; if everything, regarding clearences is ok with your own 1 liter engine , then it is almost 99 % for certain that the clearences that you had will do for the new 1.3 liter camshafts.
I have done more then 20 changes and NEVER needed to change the shims on any of them so far with this procedure.
Then everything is in place

More runs on the Dynapack will now follow and todays quiz is :
DID THAT HELP OUT ON POWER AND IF IT DID HOW MUCH ?
Back with more soon….
loads of people done that. cool that we'll finally see weather its really worth the hassle or not.
Good stuff guys !
Thank you for participating with your time...
Nice to see other enthusiasts get involved in guessing ( or calculating ) what the results will be.
Thought I keep you on your toes about the results for the camshafts a little bit longer and see if more people will give some feedback on the camshaft results ?
Meanwhile I show you something that I did , which is the ONLY bling thing I did to the car.
Have my own powder coating equipment so I wanted to bling the valve-cover just for fun.
First I cleaned it properly :
Then i dust on the powder:
“Red metallic stardust” is the colour I chose. Have more than 50 colours somewhere here….
Then it goes into the oven for hardening and when that’s done it looks like this :
Will be assembled in the future sometimes….
All done in best DIY style , just as we like it !
Is that BLING or what ?
Thank you for participating with your time...
Nice to see other enthusiasts get involved in guessing ( or calculating ) what the results will be.
Thought I keep you on your toes about the results for the camshafts a little bit longer and see if more people will give some feedback on the camshaft results ?
Meanwhile I show you something that I did , which is the ONLY bling thing I did to the car.
Have my own powder coating equipment so I wanted to bling the valve-cover just for fun.
First I cleaned it properly :

Then i dust on the powder:

“Red metallic stardust” is the colour I chose. Have more than 50 colours somewhere here….
Then it goes into the oven for hardening and when that’s done it looks like this :

Will be assembled in the future sometimes….

All done in best DIY style , just as we like it !
Is that BLING or what ?
sleeper_ss
Ex. Club Member
You got snow over there already EBB?? BBBbbbrrrrrrrrrrrrr
Good stuff guys !
Thank you for participating with your time...
Nice to see other enthusiasts get involved in guessing ( or calculating ) what the results will be.
Thought I keep you on your toes about the results for the camshafts a little bit longer and see if more people will give some feedback on the camshaft results ?
Meanwhile I show you something that I did , which is the ONLY bling thing I did to the car.
Have my own powder coating equipment so I wanted to bling the valve-cover just for fun.
First I cleaned it properly :
Then i dust on the powder:
“Red metallic stardust” is the colour I chose. Have more than 50 colours somewhere here….
Then it goes into the oven for hardening and when that’s done it looks like this :
Will be assembled in the future sometimes….
All done in best DIY style , just as we like it !
Is that BLING or what ?
i may have virus and cannot see photos on your post their
maybe replying with quote might help me?
- Status
- Not open for further replies.
Similar threads
- Replies
- 441
- Views
- 106K
- Replies
- 133
- Views
- 2K