• Please only use these forums for blogs, they are not a discussion forum

Micra Urban Van.

Just finished changing out the gaskets, cleaned up the filter and started up to see if it's okay.
Has a bit of a wacky idle but seems not to bad probably will settle out OK.
 
Might try with scan tool and see if that works. Not sure if it's possible but I think good chance it will be.
The other method requires alot of key turns and pedal pressing etc.
So if the above does not work I will revert to the manual method.

Idle air volume learning.
This option is asking for 12v plus and something about covering the intake then goes on to say the car should not stall.
I need to charge the Battery to perform this successfully.

Target idle revolution speed adjustment.
This is saying to wait for coolant to lower temps.
I think this was slightly high idle speed before any changes were made I say this because on start up I get 1.5 rpm this was lowering when up to temp at bellow 1 thousand.
Tryin again in a mo..

I warmed it up for the first process and both need it to be operating temp so not sure why 51c is to high

I have since started the engine and it did seem better but does a little hesitation sounds very slight I can hear it through the chassis.

Alright its down to 45 now and still saying wait a while.
Maybe i should just charge the Battery and come back in a while. ?

On the upside I do not notice any major leaks or any codes at all so that's nice.
I will check the plugs shortly oh and I didn't swap the top box air filter is still the same one for now as I don't want to change too much at once.

Wondering if I can recharge the battery with another none lead acid via the cigarette port. Would maybe need to make up a cable or buy one that will be suitable but this might help to make life easier and allow me to top it up when needed.
Its just a tool box I made into a portable power supply for 12v/usb
Can be handy but would definitely be great for restoring the voltage.
 
Last edited:
Does anyone know a way to obtain 12v at the cigar adapter when the key isn't present in the ignition.
I'm asking because I wish to charge the battery via the cigar port.
Also I'm looking for a quick way to get round the problem of this being disconnected.
So I can directly charge up without loosing my settings and or the battery being removed.
If you have any info please share.
I will be looking into this for a temporary solution only.
I do not intend to have constant power to the cigar lighter after charging.
If this does not work please let me know also.
 
Find a permanent live (yellow behind the stereo i think, but can check wiring diagram later) and run a wire down to the lighter to replace the switched live.
Only suitable for trickle charge from something like a solar panel, if you are charging at more than 500ma(ish) then put a connector on the battery instead.
 
It's dropped below 30 and still not allowing the adjustment to take place.
Yes I'm trying again..
I'm not sure if it wants it to be warmer or colder at this point I'm guessing it would have been better to try from cold.
At least I know the temp sensor is working ?

The panel is a tiny 12v says 30w but I already know that it's way lower since it won't charge or struggle to charge especially when it's cloudy.
Just found the wire and it seems to not want to work with the cigar socket on the micra.
Seems to want to pop back out and not stay in place so that's probably not going to work very well.

Just had another go and still says same thing I decided to warm the engine up its at 77c I'm thinking it's maybe done while the engine is warmer.


IMG_20220823_173901.jpg
IMG_20220823_173912.jpg
 
Last edited:
Seems to have done it now I guess the other one before might be important as its not perfect like it was before still.
The rpms look okay tho but I was expecting it to be lower on the tacho.
IMG_20220823_182040.jpg
 
Today I'm recharging the battery.
First image is my solar charge this can charge a car battery it would take along time my point being the diesel car battery was dead.
As far as I know it would not take or hold a charge..
Next one is on the original charge method battery still dead.
Third my cars battery probably not far from being dead but still works and worth charging back up.
I know I can charge them via solar with a controller it's much fun.
And all summer my bike has been powered from solar it does work for me.
I have also been charging all my power tool battery's via this method.
The current charge I use is this controller this is what powers my bike and I'm making 240v and can run upto 300w from this unit.
The last image is my mini power bank project box I like how this is portable and works a charm however it doesn't always recharge from the tiny panel and the solar controller volt meter is inaccurate.
 

Attachments

  • IMG_20220420_161740.jpg
    IMG_20220420_161740.jpg
    3.4 MB · Views: 74
  • IMG_20220427_113608.jpg
    IMG_20220427_113608.jpg
    3.1 MB · Views: 73
  • IMG_20220824_113903.jpg
    IMG_20220824_113903.jpg
    2.3 MB · Views: 78
  • IMG_20220504_184802.jpg
    IMG_20220504_184802.jpg
    3.1 MB · Views: 75
  • IMG_20220823_191823.jpg
    IMG_20220823_191823.jpg
    2.4 MB · Views: 81
Had a few tries again done what it asked cover the Inlet.
No stall Idle returned to normal.
Said it failed so retry took me to the other menu showing the rpms.
Just looks the same as was before.
Got a bit of water out the exhaust again not Suprised tho since it's not been moved in a few weeks.
Sounds nice again didn't think it would work but it has.
 

Attachments

  • IMG_20220824_155600.jpg
    IMG_20220824_155600.jpg
    3.7 MB · Views: 81
  • IMG_20220824_155614.jpg
    IMG_20220824_155614.jpg
    5.1 MB · Views: 88
  • IMG_20220824_155621.jpg
    IMG_20220824_155621.jpg
    4.3 MB · Views: 80
  • IMG_20220824_162233.jpg
    IMG_20220824_162233.jpg
    2.3 MB · Views: 83
I don't think lending that is possible.
Would be nice for it to get more use tho. ?
Doubt I saved that much fuel either.
Not gonna be doing the pedal pressing step by step although that did seem like it would be a challenge.
 
This is about what it idles at and does move very slightly.
Another thing I noticed was the rpms didn't match well on the dash while viewing the screen.
 

Attachments

  • IMG_20220824_183846.jpg
    IMG_20220824_183846.jpg
    5 MB · Views: 82
Does anyone know a way to obtain 12v at the cigar adapter when the key isn't present in the ignition.
I'm asking because I wish to charge the battery via the cigar port.
Also I'm looking for a quick way to get round the problem of this being disconnected.
So I can directly charge up without loosing my settings and or the battery being removed.
If you have any info please share.
I will be looking into this for a temporary solution only.
I do not intend to have constant power to the cigar lighter after charging.
If this does not work please let me know also.
sparky2018!
"I do not intend to have constant power to the cigar lighter after charging.", why not?:unsure:
I have fed 12V from battery via fuse box/fuse, directly to cigarette lighter, permanently!
My car has had this function since factory, I did same to Micra vehicle.
Now I can charge, example my "camera equipted portable personal multi-media device, whitch even has a phone build in it" or other modern day nessecities, without having iginition on! ;)

And I have used cigarette lighter plug to charge battery, without opening a hood (= bonnet).
 
Last edited:
Today I check on the plugs all seems to be dry no messy oil around or inside it was a little bit on the pack but this was left over from before I've dryed this up better now.
Also I checked the top air filter box and the bottom half's are identical so a quick swap and all my bolts now hold it much better.
Along with swapping over the Inlet rubber gaskets.
Afterwards I gave the car a good wash and wax.
Checked all my lights etc.
I have one problem of tyre has cracking in the groove of the tread.
Overall so far I'm happy that I have solved the minor oil leak.
 
Hi mika, I'm looking into how to wire my dash cam into the fuse box or similar to reduce the usage of the cigar connection.
This would then be more convenient as the unit would just remain connected and will work as soon as the key is turned.
Rather than having to plug it in manually each time.
After some googling I found that it's possible to use a piggy back fuse although these are not the best option.
The other method is to use the obd2 port and use a switch that is able to be used in both positions of the key such as when it's removed even.
For the cigarette lighter I'd like to be able to send power to the battery and not need to lift hood or bonnet as we call it here in England.
My power bank is around 8Ah that I would try to send power to the battery under the hood.

Could work to send power from the wire of the stereo to the cigar socket I would think though that that some vehicles you can operate the radio without the key but in my case this isn't possible.
Not sure If that would make a difference.
I think the best method though would be to dedicate a wire to the fuse box directly as mika is suggesting as this would make more sense.
 
Radio has 2 live feeds. One is switched one is permanant live. It would forget its radio presets otherwise.
Do not take a live feed from the OBD2 port, if you **** that up it can cause all sorts of issues as it feeds from the canbus.
If you want a port to feed power back to the battery then run one through a fused cable directly from the battery to the cabin, you should really put a diode in to stop high amps backfeeding to your devices in the cabin. Dash cam, what's the current draw? If its half amp then go to the internal light for live feed that shuts down when you take the key out and open the door. Also puts it up high and means you dash cam can sit behind the mirror out of the prescribed area.
 
Not sure of the voltage the unit sits over the mirror tho and my wires are routed around the vehicle already behind the interior trim.
The voltage I would assume is very low I will have to look into that.

Something else I keep forgetting to try is a small voltage meter that can be used otg.

With the obd port I was meaning you can get connector with such a USB on the end and also one with crocodile clips these could be useful for those wanting to save the settings I know this must frustrate alot of folks when settings get lost.
Not saying people should use that but the position maybe convenient.
In my case the wire is really long so not limited to placement.
Have not decided what I'm gonna do yet but plan on using just a cigar socket placed neatly in the glove box or maybe behind dash.
 
Looks to be this they usually have a step down of some sort and I would say it's similar to usb as that's what's on other end.
 

Attachments

  • IMG_20220831_110344.jpg
    IMG_20220831_110344.jpg
    1.9 MB · Views: 80
It's a basic capacitive dropper that takes 12v and drops it to 5v. assuming 5v output then it's drawing ~0.5amps at 12v (ohms law, this doesn't account for loses in the circuit, but they should be fairly marginal).

you'll be fine on the light circuit.
to be honest, it's well below the OBDII port's capability, but it's still a terrible idea to take it from there.

Just for information, pin 16 is a fused 12v feed on the port, pin 4 is a chassis ground and pin 5 is signal ground. if you take ground from pin 5 you will mess stuff up. seems like a bad idea to me and the fuse box is right there, fuse 8 is a permanant live for the radio, fuse 12 is a switched live to the radio. a piggyback is fine and easy to deal with. looks neater to.
 
I think I will go direct to the fuse box i will get some wiring next.
These are the items I will use well the first one this way I may not have to cut the connector off but may decide to later.
A piggy back fuse maybe still needed.
The connecter on the cam has a light in the cigar adaptor not sure what that might do other than let you know power is available.
This second image I want one of these so I can monitor the car and possibly the other one for battery status as I have no idea what's going on and expect the other might be low.

This connector I got may not seem a good idea but if I want to send power it might be ideal for that purpose to charge.
Couple options might help I'd prefer tidy hidden away but accessible.
Also I do not wish to add too much as I know it can only handle so much power. The battery is really small..

If it's possible a short wire to the interior light might be ideal as that would shorten the wire from meters to a few centimetres.
I think the device has a battery inside its an azdome camera I probably listed it in my blog.
Should have gotten the bigger screen tho ?
 

Attachments

  • Screenshot_20220831_113305.jpg
    Screenshot_20220831_113305.jpg
    111.3 KB · Views: 68
  • Screenshot_20220831_113318.jpg
    Screenshot_20220831_113318.jpg
    83 KB · Views: 73
Last edited:
I have the PG-02 installed atm

nearest version on the page is the first one its diffrent tho

This is the kit or kits that are available to buy

After searching for a moment i came up with this the item has the mini usb that would fit directly to the cam, assume this would step down to the correct volts.
Only down side to this is its boxy something to hide and wire length.
if this work saves messing about with kits that are probably a good birds nest of wires..
will then still have to figure out where its gonna be powered from cause im still undecided with that.

This item is around 4 to 5 pounds.

12V Step down to 9/5/6V 2A/3A 15W Mini/Micro/Double USB Power Adapter Converter

Okay so i will just get this and can simply heatshrink the wire if needed to extend.
says its 3A 5V would have been nicer at 1A but i doubt this is going to make much diffence as the unit does have back up battery to charge?
The back up battery does not seem to charge but i once seen bars lit up on screen when the car was in motion.

My only gripe would be cutting the end off the wire for the dash cam, 5v is definitly fine for this purpose the 3A max however sounds high but that would be its max range and probably wont effect the device.
 

Attachments

  • mini usb.jpg
    mini usb.jpg
    82.2 KB · Views: 77
Last edited:
the module is tiny. Smaller than a box of matches. I have one for running an arduino in the car (previous car it did a few clever bits around monitoring temps and random inputs to the head unit). dead easy to hide away.
camera will only draw what it draws, so you'll be fine with 3a.
I hate when things come with built in plugs like that.
 
Long as I'm able to see the battery volts and the cam works should be great.
The rear cam ect is built into the unit and wired to the reverse light so that bit can remain with no changes.
 
Hi mika, I'm looking into how to wire my dash cam into the fuse box or similar to reduce the usage of the cigar connection.
This would then be more convenient as the unit would just remain connected and will work as soon as the key is turned.
Rather than having to plug it in manually each time....
Well...
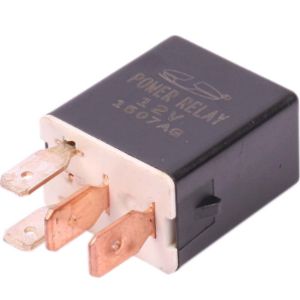
How about small automotive relay, 12V from battery via fuse box.
Coil feed/trigger wire from from cigarette lighter socket positive.
Some kind of socket/plug/connector to some where on dash...?:unsure:;)

Mikrorelay 12V/25A 4pin+resistor 48-1966

4AD3C712D7AEA22C6F1C79D9AA7C877C3580FC91
 
Nice I heard that a relay is the best way to connect to the battery for various devices and connections.
I've just got 2 mini piggy pack fuse wires and I already have fuses.
Will keep the relay in my notes and probably get one next.

For the moment tho my magnetic plug for the sump has arrived.
M12 x1. 25 thread.
I cannot guarantee this will fit because it didn't say compatible however I think it should I also got crush washers on the way and few other items that are needed for this.

With power for my camera I was thinking about unused slots such as heated mirrors I do not think I got those but that might be an open fuse slot. It would be best for this to use the lower end size fuses that won't be loaded all the time and I'd prefer if it's only got one item on the line.
I do have a test light and multimeter so will be able to find a positive wire that will be suitable and active when needed.
 

Attachments

  • IMG_20220901_111946.jpg
    IMG_20220901_111946.jpg
    991.3 KB · Views: 87
Back to the diagnostic machine today I was going to do another relearn to see if that would settle the idle speed as it seemed high after swapping the bottom area of the air intake.

Now I didn't manage to complete either but was idle much better.
Getting a code reading U1001 Can Comm. (This was before running anything)
Looked this up and it could mean the wire is loose or no connected.
I doubt that as it worked fine last time.
Also says it can be because a service is due and that would be correct bit service warning is disabled on the centre Console.
Not sure if it was saying misfire I didn't capture that screen tho and it was misfire ever slightly on idle.
The code cleared and didn't show back up so could have just been a software error due to plugging it in incorrectly dunno.
The exhaust is not blowing as much as it were it seems alot less at idle now and was dry but smell ls pretty horrid with standing.

Plan was to re do the idle throttle relearn since removing and replacing that bottom half.
Then on to doing the bolts for suspension.
After that wait and see if it pass for mot at end of year so not to be wasting my time.
I'm also gonna do the service myself this time and just just this cause I don't think it'll take much to do.

Edit :- Just read up says clean the grounds and the battery terminals often solves this I'm guessing it's nothing other than that since I had no codes before.
Also I noticed the first coil does not sit right.
I expect that means the heat has damaged this so plan is replace them as a set shortly.
 

Attachments

  • IMG_20220904_172204.jpg
    IMG_20220904_172204.jpg
    5.8 MB · Views: 86
  • Screenshot_20220904_174955.jpg
    Screenshot_20220904_174955.jpg
    48.2 KB · Views: 73
Last edited:
Ordered a set of ignition coils used I plan to just change one and then see if this works.
I figured it's best to do this as I can then test without spending too much on a new set that would be around 80 pounds.
Plus I will have 3 spares.
The one that I'm suspecting is bad does not fit right it pops back up I think that means it's warped and proably not working as it should..
 
Just tried the replacement coil for ignition.
The car sounds probably just the same.
Would it matter if the part was a different number.
I put it in start run for a while still sounds the same does still judder very slightly same as before occasionally not very noticeable.
Anyways I got on other one coming shortly.
This set I just got I'm not happy with but now I'm thinking this isn't the cause might be something else.
And yes I only changed the one I think it was since that's where the oil was.

I think it might be injector possibly could do with a good run.
And or the wiring loom I'm thinking it's that it needs the good run though.

Part numbers ending in 7G and 7H.
The boots are slightly different hardly concened with that.
But the boots on the ones I just got have metal all stuck to them this isnt ideal and I'm not happy to put them near my car.
So only one seemed any good.
 

Attachments

  • IMG_20220907_133635.jpg
    IMG_20220907_133635.jpg
    3.3 MB · Views: 76
  • IMG_20220907_133617.jpg
    IMG_20220907_133617.jpg
    2.8 MB · Views: 72
Last edited:
This is what the ignition coils looked like what came from ebay..
So today I used some tape and pulled all the metals off.
I think it's metal anyhow.
Have not yet figured out why I got the com port error but could be simple.
The other thing that was replaced was the spark plugs so that plug may want cleaning again as oil might have gotten down into the pot?
Could also be air intake related and I was thinking when the air filter comes to swap that out.
The plugs are bosch and tips are very different from what was in those have a very pointed tip.

Edit :- I'm now thinking I should lift the plugs out and check them as since replacing the gaskets and plugs I did not check them as yet.
 

Attachments

  • IMG_20220908_102934.jpg
    IMG_20220908_102934.jpg
    2.3 MB · Views: 71
Last edited:
Tested my voltage check device today it was reading 12.8 - 12.9v in acc mode and 14 - 13.9 ish while running
The autel always shows 14.4 at running and my experience with those plug in adaptors or similar is they ain't always very accurate.
The 12.8 to 12.9 though I'm happy with since I only charged the battery for a few hours like 2 twice it seems decent enough.
 
Dash cam wiring direct started to put these two items together it's not soldered but I have heatshrunk/crimp connector method.

I find this makes for a nicely finished join without any need for soldering.
Its okay to solder and really I should but for ease of any changes to be made later this is the best method for me.

I need to workout my next joins as the wires to the cam are way more fragile and may require soldering to give better connections that won't come loose.
I'm using a 5amp fuse this is the lowest I have in this type other wise I would have gone down to around 3amps.
However a 5amp is sufficient and safe for this purpose imo.
I have added a longish black wire because I don't know if this will be long or short but if I can it will be short as possible.
The fuse seems really tight with this connector.
My next tasks will be to decide where the fuse will connect and how to route my cable if it does need re-routing.
And then test I was going to test this off the car but I think I'm just going to go directly as the piggyback fuse is mini and my other fuse box off the car are full sized fuses.

Will be continued soon.

I have wired to the fuse I'm using the mirror fuse this seems to be working okay.

The radio won't pick up stations so gonna look for that magnet and see if it really works or not.
Here is something to explain what I mean by the ferrite wrapping.
My calling it a magnet is not correct but lots of usb cables have these installed on them as standard for certain applications.
So the word of the day is ferrite not magnet.. ? oops
Now I must find one ?.

As far as I know the wire has no shielding on this camera that's probably not the best thing.
Anyhow I found a ferrite from an old wire for audio video so should be correct match its actually from a PlayStation 1 if any one remembers those.
Only problem with it is I will have to slot the wire in as it does not half when opened.
The other I cannot find was this style and is more friendly to not having to disassemble again. ?


Tested this out no different can sort of hear a different fuzz sound I'm gonna google this as its annoying me.

Even though the test one didn't work I have decide to get clip on ones and my plan is to add on to the rear cam.
Then one at front.
It may not arrive quickly.
The other option is to check the antenna and look at the ground spot as I've not really checked this up at the top.
I do have some cleaner tho so can try giving the antenna port a good clean this has worked in the past.
 

Attachments

  • IMG_20220914_130354.jpg
    IMG_20220914_130354.jpg
    3.3 MB · Views: 79
Last edited:
Pulled the console off at bottom it's a cup holder, rerouted the wire.
Signal worse then better then none..
While I'm tucking wires in tuning now all of a sudden every one of the stations work again.
While the panel got removed I find one bolt..
I do not recall dropping one down behind here.
This panel not been removed once while I had the car.
It looks like an earth bolt.
Was looking for where it would go behind the radio.
While here I check the wire for antenna it was not flat but pulled to side.
I cleaned it was dusty.
Now I'm interested to find what this bolt came from so I can put it back I'm sure it's been lost before and dropped to floor behind the trim.

Was trying to inspect the antenna wire under the roof removed cabin light no joy started to try and lower the head liner but then decided a re-route for the wires was making the radio work just by moving it off the driver side front A pillar.
I would have liked to get a look at the condition of that.
The radio at rear the connection wire looks fine but what it plugs into does look slightly warped.
After moving the wire to a spot to stop the wire pulling when radio goes back in this will ensure its plugged in and not pulling out at one side.
I need to add a 10mm earthing ring crimp and it will be completed maybe shorten the earth wire a little.

Edit :- Just found the original aerial whip the spiders had hidden it I been cleaning the connecting end until it shines again I won't install it yet but am glad to have this back as I thought it had gone.
 

Attachments

  • IMG_20220915_145359.jpg
    IMG_20220915_145359.jpg
    3 MB · Views: 76
  • IMG_20220915_145414.jpg
    IMG_20220915_145414.jpg
    2.6 MB · Views: 74
  • Screenshot_20220915_181347_com.ebay.mobile_edit_1003380807825016.jpg
    Screenshot_20220915_181347_com.ebay.mobile_edit_1003380807825016.jpg
    137.1 KB · Views: 63
  • IMG_20220915_175237.jpg
    IMG_20220915_175237.jpg
    2.2 MB · Views: 71
Last edited:
I got my oil filters kit.
Not gonna change it yet but need to do this shortly.
Waited weeks for this to arrive.
Was ment to be done ages back.
Don't think fully synthetic is needed.
Should be compatible.
 

Attachments

  • IMG_20220916_134223.jpg
    IMG_20220916_134223.jpg
    3.2 MB · Views: 79
While removing the stereo I was looking at what's available for options on the stereo to steering wheel Controls.
I was aware that a special loom might be needed.
After checking I see only two wires and the remote port at back is just a 3.5mm jack.
Now it's got me thinking could I just wire that in myself and test the controller on the steering wheel.
An adapter is 6.99 and a connects 2 is 39.99 I can't see how this is required tho as these look to be more suitable for a double din with more functions.
I did see some guides showing tapping wires but the remote port would make things much more simple if it does work.
The head unit is pioneer I will take a photo when I go back to this and see what option I have in the mean time I will sort a 3.5mm jack out that I can test with.
I do have some wire clips that can tap the wires but I would rather avoid this if possible.
Im only interested in next track previous and volume control would be great if those function.
 
Here is the two wires on is remote control other is mute I've just tested it with a jack and I got message mute on screen no buttons worked.
The other image shows the connector that has those leads on them.

I tested using the blue one and ground with other this does nothing.
Stereo has no diagram on the lid that's disappointing I expected to see one.the only other thing that I think might work is the jack ground to the black wire that might then allow the button functions to pass through I may try this another time as I ran out time now.

Edit :- Just found this that shows what I'm trying to do it has diagram for nissan not sure if it's same but it might work.
Should this match I then only need to work out what colors mean grey is ground so that my black then it's just red and white to convert to purple and green.
If this will work its cost me one wire I already had and bit of time searching.
⌚??
The link says that the box isn't required although I do understand how the resistors may vary between makes and models of cars and stereo equipment.
I see how it's important in a double din to have that's loaded with buttons options.

Should work but no actual proof that it will, I can also understand how the difference may cause error or malfunctions if the hifi does not see whats expected.

The last two images are diagrams for lhd vehicles I don't know if pin outs are the same but it does show what the jack wire names and colours so that may be of help.
I also read somewhere the buttons or function buttons as they are probably are named can be auto learned.
With the jack tho now I'm able to determine the two wires without guessing. As they will most likley be orientated the same.
 

Attachments

  • IMG_20220916_151439.jpg
    IMG_20220916_151439.jpg
    1.8 MB · Views: 72
  • IMG_20220916_151701.jpg
    IMG_20220916_151701.jpg
    2.3 MB · Views: 70
  • Screenshot_20220916_170216_com.android.chrome_edit_1030488434997962.jpg
    Screenshot_20220916_170216_com.android.chrome_edit_1030488434997962.jpg
    305.4 KB · Views: 83
  • 3.5mm connector audio contol pinout.jpg
    3.5mm connector audio contol pinout.jpg
    74.1 KB · Views: 75
  • Micra AV-34.jpg
    Micra AV-34.jpg
    97.9 KB · Views: 74
Last edited:
steer control works by pulling one of two wires to a common 5v ground at a specific resistance to provide a specific voltage. hence 3 wires, one is output at 5v the other two are pulled to ground through a resistor behind the button. it should be white, blue for sensor wires and black for 5v ground.

seek up will pull the white to ground at 165ohmm, to give 1.68v
mode will pull white to complete ground, no voltage
vol up will pull white to 652ohm, 3.34v
seek down will pull the blue wire to ground at 165ohm, 1.68v
vol down will pull the blue wire to ground at 652ohm, 3.34v
when nothing is pressed the radio expects 5v, i.e. no resistance

it would be worth checking what the pioneer remote pulls to ground but it should work in the same manner, perhaps a different resistance value.

the connect 2 has a processor in it (basically and arduino) designed to take the info above and parse it out to something else depending on the headunit manufacturer, this could be pulses, specific resistance values, little dancing pixies.......

it's a clever bit of kit that for 30quid is worth it, if you can program an arduino you can make your own (assuming you know what the head unit is expecting).
 
Just put the old antenna on that I cleaned the thread on in baking soda and vinegar.
Now I'm getting 5 bars and 4 in some cases this has improved alot now.
Absolutely no drop outs or interference..
 

Attachments

  • IMG_20220917_112437.jpg
    IMG_20220917_112437.jpg
    2.2 MB · Views: 77
Oil filter and oil change done.
The driver side drive shaft is what I'm hearing the inner it feels like.
Oil filter was a real challenge to remove oil looked not that bad actually.
The boche air filter tho hmm it didn't want to go on so I decide the borg one was still bran new. ?

Drive shaft tho when I pull on it toward me it moves in and out and sounds just like what I was hearing.
Don't know if I want to be chewing about with it but we will see how it goes.
 
Looked up my options I could get new either side replace as a whole. Unlikely to happen..
I could buy a used one and try that to see if it makes a difference.
Other thing I may try might be to replace the parts this seems to be possible but I don't know what side is causing the noise can only guess its the (inner part) but is it ment to have movement?
I seem to recall the other side didn't move like the drivers side slight movement in and out with a kind of clicking/clunk noise.
This I can hear if I rock the car and the placement seemed in that area.
I did try rocking the car while sat inside this lead me to figure where it was coming from a little better as when doing it from outside it was hit and miss meaning it would do it once then I was unable to recreate the clicking or clunking sounds.
Anyways I also think it's time to tighten up the belt I had recently changed.
My mot is coming up and this far I have found the other tyre is cracking in same place rears seemed okay tho the two fronts have the same type of cracking in the tyre.
I need to take a break this month. fingers crossed it gets a pass on the mot. ?
 
There should be lateral play in the drive shaft, about 1-2mm. It's to allow the shaft to change length over the suspensions travel (which prescribes an arc not a straight line that isn't centred on the gearbox flange).

Could be an inner cv that's fecked though, if its moving more than a few mm in any direction it's goosed, change the joint.
 
Might be about 2-3 ish mm didn't care to measure this tho.
I will try and replace it shortly I can hopefully grab a discount on a used part the only thing with that is well they may not last very long as 75k miles is about the average life span of them.
Its not a huge problem just a very slight click.
I have the seals someplace I think as I was intending to renew both sides a while back.
I think this is the culprit of what I was hearing over pot holes.

BTW the oil change went really well apart from the filter wrench kept slipping and wanted to break without any sign of loosening up the filter.
I was worried it would be very messy but was quite Suprised at how easy it would be if the filter wrench worked properly.
In the end I just had to keep tightening it up as much as possible then try to move it a bit then re-adjust.
Didn't use the magnetic sump plug I decided that I was not sure the thread was the same it did fit but wasn't convinced it would hold so stuck with the previous and added the crush washer.
 
Last edited:
Just been reading up on vvt solenoid valve,
I removed this and attempted to clean it was much cleaner afterwards but one whole tin of cleaner just about and it still didn't seem completely clear.
Anyhow I'm trying to figure out the slightly rough idle and something is pointing me to this little but important part.
Should I try clean it again maybe be more thorough and try to reuse or just replace the item.
I'm not sure if this is definitely the cause but it may improve fuel economy.
Also was not able to find much information here on the forum but did just read a great informative write up from a vehicle technician from hyundia.
 

Attachments

  • Screenshot_20220923_002032.jpg
    Screenshot_20220923_002032.jpg
    71.2 KB · Views: 72
Had its test today and fails on breaks and quite a list of other things.
Rather alot of items quite Suprised but not that much..
This is probably my last post here.
Dangerous :-
Brake ferrule corrosion 4 sides.
Break pipe corroded.
Major :-
Breaks binding.
Battery insecure.
And a few advisorys..
The engine and emissions are all good.

I'm glad I chose another garage to test the car this time as I've got a different view and can see what would need doing.
Will see what I get quoted for the items that need doing but it looks like I may have to get replacement car soon if this doesn't happen.
Quite sad but saftey way more important than anything.
 
Last edited:
Cleaned up the rear drums removed all the rust that was causing the binding sounds.
They are free and spin easy now took a while to do both.

The front drivers caliper piston was stuck freed this up and rewind back tested again felt more freely but front wheels are hard to spin.
Pretty much same on passenger side.

Not really sure about break lines I have looked and some of them do want changing the rear passenger side looked okay though fronts defo need replacing as they are kinda crusted.

Took me about an hour and a half to free up the wheels to what I would call acceptable the fronts do have slight resistance not sure why this would be atm.
I have ordered a battery clamp to hold the battery in place.
Thought I might as well do all these things while it's here.
The brakes worked okay as far as I have tested today.
I also need to find a new fuel filler neck and the tyres are all starting to perish so need replacing shortly.

Interestingly I think the binding was the noises that I've heard previously as that's the only major defects that were found at garage.

Here is the battery holder I will get shortly
 

Attachments

  • Screenshot_20220924_121938_com.ebay.mobile_edit_1276400924955750.jpg
    Screenshot_20220924_121938_com.ebay.mobile_edit_1276400924955750.jpg
    63.7 KB · Views: 67
Last edited:
Looking at what might be needed to do a brake repair/renewing required parts.
Trouble is I don't know much about this so I'm just going to see what I can get for now.

The part I think would most struggle with is pipe sizes and also what I need to replace or leave in place.
Didn't take any photos today that might have been handy.
I think at best tho the calipers want taking off and a good brush down with the intention of replacing the piston inside them on both side obveously that would require me to clean them up to a reasonable condition that will prevent corrosion happening quickly again otherwise its pretty pointless doing.

I have been looking at how to make the lines to the flexible hoses but this is where I need to know what type of pipe and connection joint to use.
Also the size of the pipe would be handy to have.

Any info regarding this would be handy.
 
brake pipe is pretty much all one size unless you've got some weird american thing. 3/16". go with cuprinickle. should cost about a tenner for 25ft which is more than enough.
you'll need a flaring kit. about 16 quid.

no idea what size the ferrules are as I haven't looked but would assume metric at m10x1, otherwise they might be imperial 3/8x24. you'd have to pull one off and check.
you bend the pipe to suit, I have a bender but normally will just pull it over my knee.

if you look on Ebay you might find a pre cut and flared set of pipes for your can for cheaper than you can do it yourself (you'll still have to bend them to fit).

I normally give the lines a once over before MOT and a coat of grease as I go, the hook on a bottle opener is the correct size to scrape them clean.

if you are doing the pipes you will need to do the hoses too.

battery insecure is a daft one you should have spotted, but we all miss something. I once got an advisory for the colour of my car :)

brakes binding will be because it's left standing, a good hillybilly tune up before the MOT would have sorted that (ride the brakes so they get hot, slam them on a couple of times, on a private road, obviously).

nothing in your list is more than a few quid and some time to sort, certainly not car scrapping levels of work needed.

mine is in for it's test next monday, I might change my tune after that. :)
 
For check I just done my usual I checked the lights and all the normal items didn't really think to check the brakes tho they always had seemed to work pretty well but standing and all seems to take a toll on that sort of thing.
The battery was kinda over the top I thought as it is bolted in the same as it always had been its not the best and I did feel it could be better.
But after shaking and pulling side to side I was happy it wouldn't fallout.
I didn't look yet but it must have to be firmly secured maybe others have had the problem of the battery tipping or falling but for me I have not had that happen before.

For the brakes I'm going to have a go at doing them myself because it seems if I dont I'm only going to be disappointed that I know other items might have to be replaced.
I think it definitely would benifit from new pistons seals ect.
Doing the brake lines I looked at how to videos and it does look something I may enjoy doing so thats a good thing.
I will do a list of items and try not to miss anything out.

Today's clean up went well I can test them for working but not at speed it would have been nice to check that.
I do think tho that the calipers have a chance of sticking again so might as well renew the pistons it will be nice to have a tidy set again up front as they are badly crusted.
I think my goal will be to remove one and do a all round brush down as just a light brush won't really tidy them up enough.
The first time I done them they looked pretty tidy I still thought they needed more work tho at that point.

You probably won't need it goodluck tho with your test
 
Last edited:
This is what im using to find the parts via part numbers the rear ones seem to give same name as front tho so thats confusing


These items should be enough to sort out the dangerous issues and then i will also still need to repair the lines further up
The last two i would say are still an issue also as the ( Front ) wheels did not spin up as freely as i would like.
The rear were just as bad but i managed to free those up very well..


Looking at these items but unsure with the lenghts some seem longer and shorter I have no idea whats needed as they are not in hand.

DELPHI Brake Hose Front Axle, Left, 620mm, M10x1 Int SF

DELPHI Brake Hose Front Axle, Right, 620mm, M10x1 Int SF

JP GROUP Brake Hose Rear Axle, 280mm

  • Offside Brake pipe excessively corroded short rear (1.1.11 (c)) (will assume this means the copper nickel piping at rear)
  • Nearside Front Service brake excessively binding (1.2.1 (f))
  • Offside Front Service brake excessively binding (1.2.1 (f))

 
Last edited:
Going for face-lift lights to replace the old as they have became a advisory for deterioration.
Next thing I want to do is replace Pistons on front calipers and replace all the seals.
And while this is being done take photos of what needs doing to the brake lines/hoses if anything.
The Pistons are ready for replacement however I did want to try and clean them up first to see if they are as bad as they appear.

My aim is to combat every fail on the mot.
The lower crossmember should also be replaced later on.
 

Attachments

  • Screenshot_20220929_171940_com.ebay.mobile_edit_1388241047310559.jpg
    Screenshot_20220929_171940_com.ebay.mobile_edit_1388241047310559.jpg
    227.4 KB · Views: 65
Last edited:
This is the item I got to make the flares for pipes hopefully this can do the type needed to rebuild them.
Says does double and single flares and has 10 pcs.
I won't open it till I see what type are required.
Kit looks decent quality for price 15.

Just need the rest of items to arrive I think should also get a one man brake bleed kit as that might be needed later.
 

Attachments

  • Screenshot_20221003_143032_com.ebay.mobile_edit_1461867611397761.jpg
    Screenshot_20221003_143032_com.ebay.mobile_edit_1461867611397761.jpg
    276.6 KB · Views: 75
Back
Top