• Please only use these forums for blogs, they are not a discussion forum

Micra Urban Van.

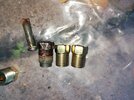
you want a double flare, that kit is fine and identical (excluding the box) to the clarkes kit I've been using for 20 odd years.
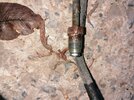
practice on a bit of pipe before you do it in anger for the first time.
use the pipe cutter (massively oversized for brake pipe, I have a dinky one that's perfect for it) the make sure you deburr the pipe with the deburrer on the back of the pipe cutter before you attempt to flare it. make sure you tighten the pipe clamp evenly (both ends) or you will crush the pipe and have to start again.
 
I'm just going to try my best and hope for something that is close to original as possible.
They were locked up again today but managed to free up for now.
I think they need bleeding tho.
Will have to do some tests first as good fittings will be key.
 
If they are seizing up then you most likely have corrosion round the piston seals that's stopping the pistons backing off. You need to strip the calipers and clean. It's not a major job but it is stressful if you haven't done it before. you will have to bleed the brakes after you're done.

Rears seizing up is the same but also making sure your handbrake is set correctly.
 
Going with new piston and seals kit.
Could try with cleaning them up but they look like wants replacing.
With the rear not sure if needs anything but did bind and was told slight imbalance.
 
Install led lights I got em in eventually ?wait no they are halogen with led side light lol.

Started first stage of sand and buff for the originals because if its got life left in it we try to reuse or refinish them.
They do have a broken tab on one side.
I think they came up better off the car then the have done in the past on the car.
Its taken about an hour they ain't perfect and could do with a wash still.
The next stage I want to try 2k clear coat on them if possible at some point.
For now tho I'm going to say they worth keeping as they don't look terrible.
Also after looking at them I'm wondering why I bothered replacing now ??
Used 2000 2500 grit two passes by hand then metal polish with waffle foam pad on drill using just about the full battery between both.
Couple cloths and water.
 

Attachments

  • IMG_20221004_125501.jpg
    IMG_20221004_125501.jpg
    2.4 MB · Views: 96
  • IMG_20221004_151344_edit_1492094562045231.jpg
    IMG_20221004_151344_edit_1492094562045231.jpg
    2.4 MB · Views: 98
Last edited:
Coupon for auto doc. Invite code
Hi anyone want to get £10 discount coupon use this code. (For new user accounts)
AC88750370

Thank you and enjoy
 
Last edited:
While replacing the UFOs noticed some crustation on the crash bar at passenger side where the bolts connect it to frame not sure how bad this might be but didn't look very good.
For now I'm not gonna worry about it but if I can it will need removing and tidy up repainting ect..
I was trying to notice what the problem is with the lower radiator support but failed to notice any reason why that area was a previous mot advisory even though I did take the wire brush to it and clear the rust off then under coat it.
Imo it looked alright but maybe I'm missing something it did look okay tho.
The crash bar however I would say is rather alarmingly rusty but might just be the paint flaking..
 
Was looking for a guide of somesort for changing the brake lines pretty much nothing as per usual for K12
This diagram might help me identify what lines am on at least I think that all i will need.
Will start once brake clean comes i also need to order another flexy for rear as i only got one for some reason.
I have all the other component i think that I might possibly need.
 

Attachments

  • Hydraulic circuit diagram.jpg
    Hydraulic circuit diagram.jpg
    110.8 KB · Views: 97
PM me your email address.


DONT ATTACH ANYTHING permantly until you've got the entire pipe run.

trailing arm pipes (rear brakes) are the easiest to do, so I'd suggest you start there if you are replacing the whole system.

oh and get a brake flare nut spanner, do not use an open end spanner, you will not get the sodding things undone.
 
I won't disconnect any till I have them all pre made.
Need to be able to move the car at least once to enable the other car it's freedom.
 
This is what I see at rear will try upload more later
 

Attachments

  • Screenshot_2022-10-10-13-51-01-1_edit_463744591594.jpg
    Screenshot_2022-10-10-13-51-01-1_edit_463744591594.jpg
    213 KB · Views: 87
  • Screenshot_2022-10-10-14-12-49_edit_795680941023.jpg
    Screenshot_2022-10-10-14-12-49_edit_795680941023.jpg
    93.7 KB · Views: 91
  • Screenshot_2022-10-10-14-16-25_edit_892419198821.jpg
    Screenshot_2022-10-10-14-16-25_edit_892419198821.jpg
    237.4 KB · Views: 94
  • Screenshot_2022-10-10-14-14-48_edit_907266071735.jpg
    Screenshot_2022-10-10-14-14-48_edit_907266071735.jpg
    191 KB · Views: 94
right, now I can see it, the only thing that's a fail on there is the hoses are shot at the union. the ferrules look a bit iffy but will clean up. The pipes are in ok condition bar the trailing arm pipe where it joins the slave cylinder (about 1" of corrosion, the rest is perfect still).

Change the hoses and clean up the ferrules (the nuts on the pipes). give the pipes a quick rub back with emery paper then a splash of paint.
as you've bought the kit you might as well replace the trailing arm lines although they don't need it, they are the easiest to do and are only 500mm ish long with no complex bends.

the hoses, they are shagged, replace them. :)

have you got the spring clips as they will snap as you remove them.


sooooo, yer this is good news, you've just saved yourself a full brakeline rebuild. not a bad win for a few pictures. let's see the fronts.
 
Here is an after shot of that area again.
And the fronts
 

Attachments

  • IMG_20221010_160128.jpg
    IMG_20221010_160128.jpg
    2.8 MB · Views: 93
  • IMG_20221010_160118.jpg
    IMG_20221010_160118.jpg
    2.8 MB · Views: 89
  • IMG_20221010_160826.jpg
    IMG_20221010_160826.jpg
    2.9 MB · Views: 87
  • IMG_20221010_160832.jpg
    IMG_20221010_160832.jpg
    3.1 MB · Views: 85
  • IMG_20221010_160840.jpg
    IMG_20221010_160840.jpg
    3.2 MB · Views: 86
  • IMG_20221010_160938.jpg
    IMG_20221010_160938.jpg
    3.1 MB · Views: 78
Last edited:
Changes nothing. Hoses are shagged pipes are solid. Need to see union between pipe and hose on the front but from mot list I'd say its just hoses and a good clean of ferrules needed. Your live is much easier now than this morning. It could go back to **** when you undo the unions but take it easy and you should be fine. Plenty of spray and em em soak before you try to undo them.

Calipers are crusty as ****. Clean em, wire wheel em and paint em. Not orange though.
 
Are these the spring clips you mean if so how many of these as I thought to see what's left of the ones I remove.
The front ones at the shocks went back on alright last time but id rather just renew them
 

Attachments

  • Screenshot_20221010_170156_com.ebay.mobile_edit_6261032287064.jpg
    Screenshot_20221010_170156_com.ebay.mobile_edit_6261032287064.jpg
    83.8 KB · Views: 93
Thing it's 4 for the rears and 4 for the fronts but could be wrong. They look right, I've not had to replace them in a nissan for a long time and VW are different design.
 
Here is the binding sounds seems at the most rear seems to not wat to move back and forward.
Bleed nipple has snapped off.
I thought if I loosen it up it might free the drum pad.
 

Attachments

  • IMG_20221011_131102.jpg
    IMG_20221011_131102.jpg
    3.1 MB · Views: 83


Binding at rear..
I have removed the drum and cleaned all the dust and rust out as best I'm able to. Brushed the points of contact 4 areas brushed all around cleaned with brake cleaner afterwards.
Greased the bearing.
(Broke the bleed nipple trying to loosen.)
are those hard to remove it was gonna brake anyways they are like 7mm and feel like is made of alloy..
I have some for the front 2 but dunno are they identical or not they look same.
I need 2 more tho either way.
It sounds like it's binding at the most rear pad top area that's where the scrape sound is.
As you can see tho it is spinning freely other than the rubbing sounds.

Oh yea I sanded down on the inner of the drum it could have done more I guess but I'm thinking the cause is more the shoe isn't moving back and forth.
Only one seems to move the one that doesn't is the furthest rear back one.
These easy outs claim to work but my thoughts on these and past experience says they don't work at all..
Been looking for them but must have threw them into the lost location that most items seem to end up in ?
My other method or idea is to use a torque bit tap that in.
Could also try a chisel or perhaps hacksaw a line to give a screwy ago.
I'm gonna return to this tommorow again as I do have the spares already without knowing it was in the box..
Will give these a try they may work I'd rather not be messing about drilling them. Plus they may come in handy later.
Did think the twist ones might but unable to find them as yet..
 

Attachments

  • Screenshot_20221011_155945_com.android.chrome_edit_30123607071964.jpg
    Screenshot_20221011_155945_com.android.chrome_edit_30123607071964.jpg
    129.5 KB · Views: 76
  • Screenshot_20221011_182200_com.ebay.mobile_edit_33117474255883.jpg
    Screenshot_20221011_182200_com.ebay.mobile_edit_33117474255883.jpg
    132.9 KB · Views: 73
Last edited:
Pmd you but here is better now I've seen the vid. That isn't binding anymore, it should rub a little bit. With the qheel back on it should spin easy with a bit of rub like that.

Nipple is locked at the base of the thread, change the slave cylinder or drill it out. Don't bother with easy outs. If you want to be clever then use a left hand drill bit, it will drill it out or it will grab and undo it.
Didn't realise you'd had the drum off so ignore that bit in the pm.
 
So new cylinder or drill out.
The method I seen was to just remove it that way its possible to take into the workshop area and drill out.
I was unsure if drilling it would be wise on the car as it introduces unwanted fragments.
I only took off the drum because when I turn car around it was making a loud squeek at that side so I then knew I had chance to find the problem better.
The bit I was looking at was corrosion on the pipe so near to the cylinder this was making me think maybe it's corroded inside causing a one way valve.
I don't know yet if that is possible as I didn't test by pressing brake just the hand brake.
But will certainly check that as well because I'd like to see what it's actually doing before changing item's.

The original plan was to start at that wheel. As that's the furthest from the master.
 
Second attempt at double flare.
Just testing at this point and probably not making anything great yet.
But yea it looks like a double flare now.
The first one was reversed. ?
I think the second one would hold but it needs to be good to hold the pressure right.
The outside is pretty rough not happy about that bit.
 

Attachments

  • IMG_20221011_232458.jpg
    IMG_20221011_232458.jpg
    4.4 MB · Views: 85
  • IMG_20221011_232542.jpg
    IMG_20221011_232542.jpg
    1.6 MB · Views: 90
that's fine, tha face needs to be good the rest can look like crap. it's a swaged fitting, which means you squash the pipe on to a cone to make a seal, only bit holding pressure in the taper of the cone, so as long as that's clean and smooth the rest doesn't really matter. where you clamp has been on the outside can be cleaned up with a bit of emery paper if you want, but you won't see it once it's fitted so it doesn't really matter (it will be inside the ferrule).
 
After watching a guide I was wondering is this type of pipe actually the right material.
I guess it shows it ain't pure copper that is good.
The colour was not like that on the outside.
Another person with a Toyota said the mot places don't like the plastic sleeved pipes.
But from what I'm seeing they seem to be holding up well.
I understand it's harder to notice if the pipe has problems but in the same sense it would show when it's corroded because it bubbles and flakes off.

And yes it will be covered by the fitting.
Maybe if I wrap something around the end this will prevent that happening.
If not I will try in a vice as this will help steady things out and reduce that.

I have ordered some cylinders last night so can replace those with new I think this is best measure as I want the car to stop properly when needed.
Today I should probably see what the hand brake does in terms of how hight it lifts as I don't usually let the thing click but instead lift with button pressed in.
 
kuprinickle is the best stuff, it isn't used by manufacturers because it's prohibitively expensive, steel is cheaper and can be formed in a press off the car. it isn't copper, it's a copper nickle alloy so it doesn't work harden in the same way as copper which would fatigue and fracture on a car. design life of steel pipes is 12 years, after that manufacturers don't care anymore the car is to old to give a damn about and the stop making parts for it anyway. it will last longer with the right care but thats the owners issue.

seriously, don't fret about the clamp damage, every swaged pipe out there has it there is no way to avoid it unless you have an autoswage.
from what you've shown you are only going to be replacing 1 or 2 pipes, seriously don't do the others if you don't need to. the last car I repiped (with kuprinickle) was 30 years old when I did it, and I only did it because I was rebuilding the entire car anyway, most of the pipes were still solid.
 
Well today I gave up for now just on lifting the car.
I'm going to wait till the cylinders arrive as then I can remove the pipe back to the flexy and have every item on hand.
My plan today was measure the line to the flex.
Would it be better to remove the pipe to copy the bends.
After looking it seems are only a few and are quite short.
It probably going to take a while but once I get going it should be easy enough.
 
So far I'm upto here nothing has been easy so far.
The lines are all connected still.
I got all the clips out at middle, none broken and am dipping em in some vinegar to see if they can be reused.
I think for now I'm going to stop till the cylinders arrive.
This way its holding the fluid still and if I needed to it could still be moved.

Would like to get the pipes off today and start re making.
Only problem I'm seeing is that the flare nuts don't want to move and are roundening.
This is no big deal at the cylinders as I'm replacing them.
But in the image this area I want to try and keep original if possible.
Or remove little as possible if they do happen to not come off.
At least that's my plan ?
Takes a pause for the magic rust liquid to do something.
I'm not sure but the last clips were 5 pounds I'm not paying that much again for these bigger ones might need 2 tho..
Got um bubbling now in the sun apparently that removes the rust better.
Last time when I was testing this out it was freezing it worked but took longer.
One of them has a bit of damage off the vice gripping it must be really soft or just pure rusted.
BTW in first image the bracket is really rusted at first I try to loosen that off it was loosened all the way but didn't really help.
After looking at it tho when it does come off the car I intend to treat that and paint it.
As far as I can see this is what causes all that corrosion to start in first place most likley.
It will look much nicer finish if I do tidy that part up.
The other lower one is welded to axle so I assume it would be best just brush that down and paint it.
Might help things last a bit longer ?
I think the flare nuts are a size down from my flare spanners on fits but loose the other is close but wont go on.
I was told to try the crowfoot I have not tryed yet but that is what I shall test when removing the lines.
I I'm worried it will break or rounded what ever I decide so am giving it some thought first ?
Wondering if I have one that will fit if not I need another flare spanner.
The crow foot is nice tho cause it works with the ratchet.

Saved 3 of the spring clips I already bought some so will just replace those now but last image shows how they would have eventually restored might be okay with a bit of paint on them.
I thought the ones I got new were smaller for another area but nah they same..
Just test fitted the flare nuts with my crow feet the 14mm a few don't fit maybe some are not metric?
Or they just cheap not made to specifications unsure.
The crows feet don't go down Bellow 10mm so the smallest cannot use for.
 

Attachments

  • IMG_20221013_122504.jpg
    IMG_20221013_122504.jpg
    3 MB · Views: 74
  • IMG_20221013_122517.jpg
    IMG_20221013_122517.jpg
    3.7 MB · Views: 93
  • IMG_20221013_123249.jpg
    IMG_20221013_123249.jpg
    2.8 MB · Views: 84
  • IMG_20221013_151616.jpg
    IMG_20221013_151616.jpg
    3.6 MB · Views: 81
  • IMG_20221013_152801.jpg
    IMG_20221013_152801.jpg
    3.1 MB · Views: 87
  • IMG_20221013_165033.jpg
    IMG_20221013_165033.jpg
    6.1 MB · Views: 74
Last edited:
Okay so since the line wrenches ain't fitting I have had to get imperial ones.
Otherwise I don't see me getting them off right and I dont want to be under the car more than I need to be.
I'm also looking at the chance I have to install the suspension in the rear while this happens so it gets another job done while this one is in progress.
Will be back on this next week time out till the wrenches arrive ?
 
One more thing the flare nuts that are in the packet are metric and the ones I'm trying to remove are imperial.
The two in the middle that connect to the flex hose I was going to ask will those thread properly into the flexy pipe or might they differ in thread size as well.
This question is because I'm trying to save those two to make re fitting more easy.
The thought came to mind today when I had to get metric line wrenches ?

I seen you can just cut em off and use a socket but that isn't really an option or at least I don't think so.
 
The metrics don't fit right a 10 won't fit on and an 11 is loose fitting the 11 did fit but not snug and the 10 won't go on even if I tap it after alot of brushing so I must assume 7/16 for the nut size.
I don't want to round them off so wait for next items.
Also I just seen something says use canned air to freeze them giving better chance of them loosen off.
I'm only concerned about those two because would be awkward to replace if they don't loosen off without problems.

Perhaps they have been replaced in the past or just they rusted and lost size not really sure but it's common for me to find things don't fit when removing bolts ect in the past on this car.
A snug fit would be really important on these ferrules.
Not sure why they aren't 14mm to be honest that way they would be more robust.
 
Today the cylinders arrive they look nice.
Before they got here I have since sprayed down the items I plan to remove. (best to keep the reactions active)
And I now have my eye on the rear dead axle bushes coil springs and shocks that are still sitting around doing nothing just taking up space ?

After reading up it should be a 10mm I'm not convinced tho as I've been sand papering them for a while now and the wrench doesnt feel as tho it's gonna fit on.
I can't say it will hurt to keep wire brushing and adding more wd40.
Getting the drill brush into this spot is awkward so I'm using a miniature hand brush.
The process is slow but I can almost see the threads.
Probably my chances of removing the two at top are low.
Im not going to try to loosen em off with anything other than the line wrenches when those arrive.
In the meantime finding a guide to show what the different types look like.
Maybe measure it with digital calipers to see if they are above 10mm as it shows no signs on any of them of even almost fitting over.
 
Last edited:
Right got em off bending the pipe now for drive side.
The hose bit and the nut won't fit.
I got em off with 11mm

One of the nuts too loose the other barely wants to screw in.

Seems kinda odd that because the one that is bigger I assumed would fit.
Middle size the biggest is way too big and the smallest doesn't catch the threads properly.

The defo don't fit
Okay now I got one in hand the look like the br205.
The kit with the pipe doesn't have any of those as far as I can see...

The wind is blowing really badly now so I was unable to check what the ones I'm going onto are but I think the all the same type.
Dunno why none of them are fitting that's kinda funny to give you something that won't fit 3 types of ?
Looks like I needs some of these then cause I don't fancy running with loose fitting on my rear brake drums ?
 

Attachments

  • IMG_20221017_153450.jpg
    IMG_20221017_153450.jpg
    3.5 MB · Views: 78
  • IMG_20221017_153502.jpg
    IMG_20221017_153502.jpg
    3.9 MB · Views: 72
  • Screenshot_20221017_153648_com.android.chrome_edit_205282654943674.jpg
    Screenshot_20221017_153648_com.android.chrome_edit_205282654943674.jpg
    256.4 KB · Views: 77
  • Screenshot_20221017_154405_com.ebay.mobile_edit_205726020082669.jpg
    Screenshot_20221017_154405_com.ebay.mobile_edit_205726020082669.jpg
    209.8 KB · Views: 78
Last edited:
M10x1, fairly sure I've said it in this thread but I'll say it again, the ferrules are M10x1mm pitch.

also look at the end of the pipe, it's a din flare, so you only need to flare it once not twice (flared with the die in place).
 
I got the cylinder in the pins on the drum brakes are rotten tho along with spring clip everything else seems okay in here.
Apart from its dark and I ran out of time so had to abandon for now.
They are m10. 1 but ain't fully threaded.
 

Attachments

  • IMG_20221017_170642.jpg
    IMG_20221017_170642.jpg
    3 MB · Views: 83
all looks right except for your inner bearing race being stuck on the stub axle, what's that about?

my shoe pins and clips look just as rotten, easy enough to replace at a later date.

looks like it's gotten toasty in there at some point though, the auto adjuster is normally silver. :)
 
I have no ide what that is doing it likes to sit on the axle it ain't stuck tho I just forgot to remove it this time round.

I have now ordered the fitting kit to hold the shoes as the one on the side I was saying was rubbing was proper rotten the spring and the pins not far behind so pretty good job really cause that was ready to drop off ? lucky I guess ?
Just wasted a good hour swearing as it was not going back together I'm sure I can do it when it's light tho ?

Since that last shot I've wire wheeled it all down the inner part of the drum as its full of crusty cruddy's..
Im still confident that it will work again.

My aim here was just get the cylinder in but failed with the springs and shoes can't win em all tho in one day eh.
The shoes have some material left on them so that's a good sign lol ?
I did think the auto adjuster was damaged as it had two different size parts where it meets the shoe plates.
But the thing spins fine cause I was trying to make it easy to get it back on for now.
Can confirm other than the colour doubt that matters they are the same and nothing looked broken or missing at this side apart from them spring clips and pins that I expected to have to buy but dropped them thinking I might get away with reusing ? no chance of that tho haha
The clips have to be the last cost as I spent up awhile ago and been buying things since that I probably won't need.

Looking forward to getting those brake lines installed I've made them roughly and left the end I cut off.
One is okayish shape wise the other may want re doing not sure yet.
The bearing will have to wait till the thing is ready to roll I have some races ect the kit so can replace it just ain't got one to put in yet.

Will get em soon also I forgot to mention I plugged the lines as best I could and press the brake in this has stopped the liquid from dripping.
The next thing I have done is removed a fuse to disable the rear light as I don't fancy returning to a flat battery.
I used some gloves as the tape didn't seem to be working for me.
 

Attachments

  • Screenshot_20221017_185955_com.ebay.mobile_edit_207906888442753.jpg
    Screenshot_20221017_185955_com.ebay.mobile_edit_207906888442753.jpg
    176.3 KB · Views: 77
  • Screenshot_20221017_191810_com.ebay.mobile_edit_208771368181684.jpg
    Screenshot_20221017_191810_com.ebay.mobile_edit_208771368181684.jpg
    165 KB · Views: 69
Last edited:
Painted that ugly bracket with a quick coat of black.
I removed as much rust as possible off that but to be honest this rust looks like welds ?
So I've flattend it down as much as possible.
My thoughts are do this and it will keep those flexys tidy and might give a better look when installed.
A few mins worth while I would say.
 
Test fit flex pipe.

This is what I'm doing for the flares I assume the crush when tighten up in fittings.

Okay so I will return to put the cylinder on passengers side.
Drivers is done the shoes want putting back on tho.
 

Attachments

  • IMG_20221019_113919.jpg
    IMG_20221019_113919.jpg
    4 MB · Views: 75
  • IMG_20221019_115215.jpg
    IMG_20221019_115215.jpg
    3.6 MB · Views: 80
  • IMG_20221019_115203.jpg
    IMG_20221019_115203.jpg
    2.6 MB · Views: 80
  • IMG_20221019_121835.jpg
    IMG_20221019_121835.jpg
    4.9 MB · Views: 90
  • IMG_20221019_153839.jpg
    IMG_20221019_153839.jpg
    3 MB · Views: 75
  • IMG_20221019_153845.jpg
    IMG_20221019_153845.jpg
    3.6 MB · Views: 76
  • IMG_20221019_153905.jpg
    IMG_20221019_153905.jpg
    3.9 MB · Views: 85
  • IMG_20221019_153912.jpg
    IMG_20221019_153912.jpg
    3 MB · Views: 72
Last edited:
That is a bubble flare I did read what you wrote matey.

So far I have only 1 cylinder left to install. I cut that line so might as well renew em as a pair..
And the brake shoe springs n clips and other items to do inside the drums mainly tomorrow.
Nearly ready to check it's holding pressure ?
I thought stop now cause I struggle with the springs they are not easy to fit on the shoes.

To confirm all the flares are like this one..
I just made that with a cut off to show you thought I'd done that already but must have got side tracked a little ?
It looks bit different but I'm sure that's because it crushes when tightened.

After looking at the images I thing they are in reverse order.
The passenger side wants to be in the bottom clip.

The bit above I cant see so I'm gonna have to check that it's correct back to that area.
Glad I took video now.. This is why it's important to take photos or video in this case.
So the left one in the image goes passengers side...

They want swapping by the looks of it no biggy I guess that's easy to miss tho.
 

Attachments

  • IMG_20221019_163124.jpg
    IMG_20221019_163124.jpg
    2.1 MB · Views: 91
  • Screenshot_20221019_172409_com.skype.raider_edit_248976759944819.jpg
    Screenshot_20221019_172409_com.skype.raider_edit_248976759944819.jpg
    378.8 KB · Views: 84
Last edited:
Ah, OK. That one looks better.
Spring are a bugger. Fit the top spring and adjuster off the car then fit shoes as a set over the cylinder and fit the pins. Pull one shoe over the lower seat and fit the bottom spring, then use a big screw driver the lever the shoe in to place. You can also just pull the lower spring on with a big screw driver using the lower seat as a fulcrum.
 
Ah I got that I will use that method next time.
The bubble flares all looked uniform so they should be fine.
The only problem now is the clips are kinda not holding the pipe securely as one would desire.
And I think I'm just gonna wrap that area of pipe till its a snug fit.
The bearings might be up next ?
 
Trying to put the shows back in I've managed to rip the boot on the cylinder as I struggle to fight the springs into place as its pouring with rain.
I don't think the boot will usable anymore so I'm gonna have to take one from the second.
I've tried with the shoes connected to the springs but it slips about.
The last clip install was when it ripped.
Oh well I try again when the rain stops

Wondering now if I can use a rubber boot from the old one.

Got it in bit the bearing is fubar ?
 
Last edited:
While it's raining buckets I'm trying to get the bearing out slowly progressing with this it does need to be renew so might as well have a try so far the bearing kit hasn't worked..

Rear wheel bearing 0 sparky 1
Down an abs ring tho ?
 

Attachments

  • IMG_20221020_202907.jpg
    IMG_20221020_202907.jpg
    4 MB · Views: 85
Last edited:
I've had them fight back with a 5 ton press on my side, some are just pigs to get out. Resorted to a 10 ton unit at a mates garage last time I got one that wouldn't budge.
 
I got it put by hand ?
But I was trying with the impact so cheated a bit to loosen it off ?
️has a slight gouge in the drum not sure if you can see I don't know if that would deem it to be scrap or not but I do intent to re use it ?

The drum is in the bucket now for a rust removal process over night.
I have noticed much rust still remains that I didn't see before.
Might as well get it all removed while it's off and can dip the other side next.

Today cleaned up the edges that were awful looks bit better now tho.
The inner edge had the worst I had to tap with the chisel and then wire brush the brush did almost nothing so used sand paper as well got most of what was possible problem cause of scraping off.
Bearings arrived so I went ahead and installed that.
I found that I don't like circlips and neither does my inferior pliers have ordered some angle ones that are bigger.

For around 60 quids both sides could have been renewed you still have to install the bearings tho ? may consider that at some time but unsure now the bearing is in.
Now I need to learn how to get the circlip in and not fly away ?

Okay so circlips have a right way up.
The image below shows the angle and this will help when installing.
Basically look from the side for the angle to determine.
This means if someone didn't know they could have installed it upside down and thus cause it to be awkward to remove.
Once you know it's easy but 50 50 chance if you don't to get it wrong.
I don't have circlip pliers and I just got long nose angled pliers on the way hopefully they will work for me.
 

Attachments

  • IMG_20221021_122536.jpg
    IMG_20221021_122536.jpg
    3.3 MB · Views: 67
  • IMG_20221021_141225.jpg
    IMG_20221021_141225.jpg
    2.8 MB · Views: 73
  • Screenshot_20221022_100849_com.google.android.youtube_edit_288546409225239.jpg
    Screenshot_20221022_100849_com.google.android.youtube_edit_288546409225239.jpg
    30.8 KB · Views: 73
Last edited:
Been doing the otherside today..
Its nearly done not changing bearing yet.
I need to get this snap ring in what a pain in the butt. ?
Had to order a pair I thought the angled pliers would be great for this but turns out they are rather larger than expected.
The abs ring is here but without the snap ring in place Im unable to complete every thing.
One thing I'm going to try tho is put the thing on for now an see how she spins.
 
Back
Top