• Please only use these forums for blogs, they are not a discussion forum

Micra Urban Van.

The other side went well and feels okay I need to adjust the auto adjusters both sides.
But starting to feel that it wants new shoes after all this.
Might be okay with out those but I think that will help to give me a better bite at the handbrake.
Circlip pliers seem to be essential ?


Have decided that the end of the road for this micra is coming up as the problems are mounting up most of what I was doing has been done..
So I will be removing as much of the parts I can while I'm still able to do so.
It will be a shame and I will miss being here and the micra.
 
Last edited:
Once the adjusters are set and you've adjusted the hand brake correctly the shoes will be fine.
After it's all finished, roll backwards then yank the handbrake at the same time as braking a few times to adjust out the final bit of slack in the auto adjusters.
 
I'm going whit new shoes but will try what your saying first.
I think I need to adjust other side to match was working in the dark toward the end and it's quite a task with a torch.
Going to have to wait now for the circlip pliers to get here then I can finish up the side I was doing and start to do some tests on the rear drums.
My idea for getting the new shoes may not be needed but I'm thinking this will lessen the extention of the auto adjuster mechs and in turn giving a lower handbrake lift, in theory not sure if it will or not but worth a try it wasn't that high in first place but I did think that the auto adjustment was about toward the end even though the shoes still have a bit of material left.
I would like to be able to compare a new set however to give me a better idea of how much they are actually worn.
Not much driving happening this October so far ?
After all the work I been doing the rubbing ect shouldn't be happening it does concern me because it was still the case when the adjustment was all the way to the most closed position.
Don't expect it to be super silent and spin up freely but it seems to be terrible even after all the removal of build up I thought it would be much nicer yet the other side I made alot less effort is still way better.
 
Last edited:
Send me your old shoes then. They've got more life on them than mine, in fact they look almost new. ? your adjusters, as in your picture earlier, have 10 to 15 more turns on them, they are barely even open yet. With the wheel back on you should be able to make it spin for a while with ease but it should still be audible as a rub. Do the reverse and handbrake trick and it should all settle nicely.
 
That's what I thought as well but maybe they are heat warped or rust damaged.
I will try and get them equally set later today and see how it goes.
Once I get one side done and am happy I will go for the wheel bearing on other side for now tho I'm going to be checking everything over to make sure it's going to function as intended.
I need to be getting it back together within this week so I can move the car.
Would be best though to keep it on the stands and get everything correct first.
I would have liked to have painted the drums to tidy things up a bit I think though this will have to wait until we have some warmer days.
 
Okay I have adjusted the handbrake to what I feel is sufficient for the time being.
However I notice when I tighten the bearing up I experience complete drum frozen and won't move no matter how hard I try to spin it.
Kinda confused at why this would happen.
When I back it off it spins fine with a bit of rubbing.
Anyways while I was doing them I decided to let the brakes at rear gravity bleed for a short moment the topped up master for a few times to replace the loss for time being.
It didn't seem to have much air escape but the liquid was slightly dark compared with the new.
My plan is to slowly replace this as I work on the rear.
I've also checked with the car and didn't show any lights as yet and the pedal feels a bit harder than usual.
I did chance the abs ring now but still need that circlip in place soon.
So my only problem now is binding at the bearing nut when it's tight.

Today I went out on my driving lesson and had the red k11 in front of me and the silver k12 behind was quite interesting to see.. ?

Reading up for what this actually is causing the rubbing found that a rear drum can be out of round this however seem unlikely as the drum seems pretty round still, maybe though now I'm thinking more clearly about this I should try measure the drum from corner to corner on each side.
The bearing went in wrong way up if it has a correct orientation I was unawares it did spin up freely enough yesterday so doubt this .
 
Last edited:
if it's binding once the nuts tight then it's binding on the outer race, I'm going to guess without seeing it that it's able to move slightly without the circlip in place.

air will move to the highest point in the system, so just behind the master cylinder. when you bleed it, you will push it out. gravity bleeding doesn't work, it needs pressure behind it.

yes drums can be out of round, in fact they are rarely round, especially when new, the act of braking wears them round. if it's been seized for a while I'd suspect they are out of round where the shoe sat against the rim, it will need a driving to recut the drum.
 
It does bind once the bearing nut bites down at the drum.
I was unable to move spin it at that stage.
The circlip still need to go on maybe I could have turned the bearing once more time but is very close to the circlip cut out area.
If it's binding on the outter race its hard to tell where or what is happeng once it locks up like that.
Can try cleaning up the axle part again and see if it makes a difference.

With the bleeding I was testing to see if the pipe I had would work or not with the one way valve I shall make a proper bottle with tube tomorrow and proceed to bleed the brakes at rear.
The fluid was moving when pressing pedal and once I topped second or so time the air release as a large bubble up at the res.

Was thinking of how I could spin up the wheel to recut the drum if only it were rear wheel drive it would be possible and have more fun in the corners ?
 
only needs a fraction of a mm to bind tight as a nun. you'll know it's right as the circlip will go in the groove. they will recut themselves easy enough once it's on the road. I have recut bike rear drums on the lathe, car's I've always replaced when worn to a big lip or run them in (a binding rear brake on a bike is a bit more scary).
 
It turns out the bearing was 1mm out so needed to go in one more turn now it spins very smooth compared to how it was. ?
I noticed tho the rubber boot that I replaced isn't very tight not sure why if felt okay before but I don't think it's tight enough to sufficiently keep out the dirt..
Atleast I found the problem I decided to check and compare bothsides.
 
I got replacement coming. Spare set of new cylinders.
Not going to do anymore with them until I'm replacing the shoes I'm thinking it may shrink back abit so will keep an eye on it when I'm doing the circlip I really want that in then I can put wheels on and start to see what is needed at front hopefully I can solve the issue without removing everything and just try to make them work properly again I doubt that will be too complicated as I think the Pistons just want cleaning up and then the pipe replacements installing.
I'm happy with the rear brakes so far it seems to have taken awhile but they are going to be much better now than they were before.
 
Got the circlip installed and wheels back on for testing purposes.
Everything seems fine but the handbrake has an undesirable feel when lifting.
I was trying to adjust it by moving back but not really sure exactly what I'm ment to do for this to happen.
The handbrake feels loose when lifting compared with previous to the work I been doing.
 
Have you tightened up the manual adjuster under the handbrake lever toll you get 16 clicks? Did you set the auto adjusters in the drum till the drum just rubs? (This bit needs a few attempts of putting the drum on and off).
 
I was doing the auto adjuster and had it set to a desirable amount.
When I ran into the problems tho I loosened it back a little.
Probably when the was locked cause by bearing needing more pressing in.
I do get an ever so slight rub but know that it might want a few more turns.
The hand brake it's self I get like a grinding feel while lifting also it doesn't seem to have that tight feel when lifting.
It does hold the car but it's up past the 4th click.
The handbrake adjuster under the handbrake I think I may have turned it back a few also not sure though I'd have to double check it's position.
I want the handbrake to feel smooth tho and it is atm way too loose and feels notchy is the only way I can describe it.
The master had to be topped I was getting a slight drip at the center portion on rear axle so tighten the too one and that seems to have worked so far.
The new shoes have arrived and they don't seem to have a lot more material on them they do look much better tho but will save them for later down the road.
 
16 clicks not 4.
It's an entire system, If even one bit isn't correct it will not work correctly. If it feels crunchy it's probably the cables are still loose.

This is where the service and maintenence manual really helps, its very clear on the setup needed.
 
4 clicks is what I want the handbrake to be at when lifting is what I mean.
As far as I'm aware it lifts 12 clicks or so.
I was using a crows foot and it's tight for getting in at the adjustment under the handbrake.
However it does work maybe tho I was turning it in the wrong direction.
I think I was going clockwise. Possibly.
To the end of travel but did back it up abit.
The auto adjusters could move outwards more also and will do them shortly.
I will just try again with the lever tho and see what happens.
 
12 clicks is correct. Again, read the manual, 4 clicks is effectly the brake on which means the auto adjusters will never work. Do the auto adjusters before you do the manual adjuster, they should take up most of the slack in the shoes to drum with the manual really just to pull slack out of the cable and move the shies a tiny amount.
Edit. Unless you mean the brake doesn't feel like it's engaging till 4 clicks, in which case you adjust the manual adjuster so it starts to bite before it starts to click. But still 12 clicks to full brake.
 
The brakes worked fine fronts want some work next I expect the pipes need flushing to renew the fluids.
And will be starting with the auto adjusters.
I set them slightly loose to make it less of a task as I was taking the drum on and off and it's less of a chore when they slide on and off easy.
I did have the handbrake lever feeling okay with decent tension.
My only gripe was that it was grinding or missing while lifting to about halfway.
The shoes can be adjusted a little bit more.
 
Done the auto adjusters now and the hand brake it hold fine tested a couple of things.
It still has a metal grind sound tho at the lower end of the levers travel usually or more noticeable when lifing.
I was trying to locate but unsure what it might be.
Edit :-
Thinking now to loosen it back and see if the cables are sticking or what, I don't think that's the case.

The only other thing I can guess is I need to remove the nut at the lever and test the cables movement both sides as I recall it was hard going to get them onto the shoes.
This may have been because it was set to the tighter end at the lever.
I do think my best bet is to grab a 10mm deep socket and go from here as I don't have any of those.
Not sure if cable could cause the notchy metal on metal sound at the lever but so far I tested and the lever holds the car at bite point so I know it holds as I cannot recreate a hill so for now that's fine for me.
 
Last edited:
Had a look under the cover for hand brake since I couldn't work out what I'm hearing.
Anyways turns out was 2 penny's and they had some how gotten under the cables that join to the handbrake mechanism this is like a metal bracket and it was scraping.
I'm still hearing it when it's been cleaned out but it's less annoying and doesn't feel not hy like before.
Possibly it may want replacing tho.
The way it works it's kinda strange didn't expect a turning action.

Oh ya and it holds at 6 clicks upwards when I set to the 4th up on the ratchet I ca still roll the vehicle forward backwards.
Not sure if the first cable could have stretch or the longer left n right.
When the adjustment is as far as it will go though it really is about time for new cables.
They do move freely though and dont look as though any corrosion or anything at either end.
 

Attachments

  • IMG_20221107_135525.jpg
    IMG_20221107_135525.jpg
    3 MB · Views: 82
  • IMG_20221107_135515.jpg
    IMG_20221107_135515.jpg
    2.7 MB · Views: 80
Last edited:
Okay that's understandable I just was thinking up a solution and I do see what the negative ones are with this just wanted to see if it were possible.
I do think it may have risk of cutting or breaking the ends off cable or something similar.
I will drop the idea tho since the hand brake has held fine on slight incline so it does work still.
 
Okay hand brake yet again.
So I'm looking at one thread saying about cable stretch..
This seem to look the same.
The cable and outer plastic coating one can see it's not at same level.
I took photo showing the handbrake up and down and what the cable sits like.
One cable moves up and one down.
So the big question is how do i determine what side has possible stretch.
I'm going to assume without any knowledge other than mountain bike cables.
That the drivers side is showing more of the actual cable so possibly that one might be stretched?
For me I don't want to replace the whole cable system as this would be costly and might take a while to complete.
 
more likely to be drum wear than cable stretch (unless you have the arms of a gorilla). or that one side isn't yet adjusted to match the other.

sooooo

Bad idea, Do not do it. Once auto adjuster have cycled s few told me hand brake will be fine.

the point of the cable rocker is to take up any misalignment in the system, both in the cables (5-10mm difference) and in the drum wear and adjustment (couple of mm easy to achieve if car hasn't been driven to set auto adjusters). unless it's completely racked over to one side or the other, this isn't your issue.
when we used to do drum brakes in the garage we'd stick it on the brake tester then bounce on the lever till get the adjusters set afterwards, especially following a pad change where the drums weren't changed as you couldn't set the adjusters by hand to close enough if there was a lip on the brake surface (normally we'd skim the lip off, but not always). this normally settled the rocker back to near centre.

as already said previously, on the micra, you loosen the handbrake cable (under the lever) put the handbrake on 11 or 12 notches, depress the brake pedal a few times then readjust the lever.
 
Does the cable normally twist like that tho it looks as though it's not moving on one side and the other is moving freely.
That seems a bit odd
I think the passenger one was a pig to install onto the shoe like it was really tough a stretch would cause it to be easy but binding would probably make this happen.
 
No, the twist is interesting. Didn't see that.


Cable stretch won't cause that, but the rocker cable might. Out of balance shoe adjustment shouldn't do it either.

Out if interest does one cable hang lower than the other? You might have 2 right hand cables (used to be really common due to bone idle mechys). Not a cause but seems possible.

Loosen the adjuster under the lever and see if you've torqued the cable round as that would cause the rocker to rotate.

Be worth taking drums off again and checking everything is as it should be. Piccies so we can both look over it would help there as something seems wrong.
 
The cables have not been removed by my self at the cabin end.
I was confused when I seen it would turn to one side.
The side it turns to it hits the floor very slightly.
Perhaps the cause might be the auto adjuster is wrong way round or upside down.
I do recall the adjuster wheel seemed different at passenger.
Will take them off shortly as the shoes still want to go in.
And the other side wants the bearing as well.
Once we get a decent day that's raining.
Will have another check.
I just got a socket that will fit last week and didn't use as I had removed the cover.
That twisting then could be me actually spinning the cable as adjustment was made.
I think I will remove the cover fir better view while adjustment is made.
 
Last edited:
This might explain why it feel so rough when lifting the handle
I'm thinking the auto adjusters are not even on both sides.
Time to buy this part as I definitly can't re use a frayed cable.
 

Attachments

  • IMG_20221124_144642.jpg
    IMG_20221124_144642.jpg
    2.2 MB · Views: 78
only sheath is dead, but yes, replace it.
auto adjusters not being even is fine as long as the shoes are the same distance from the drum. that's what they are for and they will adjust to correct location after following procedure described in manual.
 
You can probably imagine how that effected the lift of the handbrake.
I honestly didn't notice that last time but the sharp wires sticking out gave it away.
I've ordered a new one but how does that remove from the metal bracket.
The other two have slots but that one does not.
Picked the one that says not compatible as it was slightly cheaper.
As far as I can see they are identical tho.
 
Okay I have tape up the rip on cable for now so I can have the handbrake hold till it arrives.
It holds on the 5th click now and the cable no longer twists when lever is lifted.

When I drop the lever I can see it sticks more now when at lowest point.
This causes the cable or thread and nut to move forward.
I guess this is what it was doing before only now it's a bit more noticeable.
The upside now is the cable doesn't twist and I have a positive feel that the cable is tight and the car cannot roll forward when it's engaged to the set height. 5th click.
The handbrake light illuminates when lifted and goes off when dropped so that is also a good thing.
This was not a problem before but thought I'd add that I checked it functions as intended.
Edit :- Update
Going to get new calipers for front left and right to help speed things up a bit not sure if I should as won't have much time to replace them.
Its also possible to recycle the old ones making this a more affordable option.
This will render some of my parts unused such the Pistons and possibly the seals.

Front calipers are on the way it should speed things up when I move onto the fronts.
 

Attachments

  • IMG_20221125_113101.jpg
    IMG_20221125_113101.jpg
    4.6 MB · Views: 78
Last edited:
These just arrived got both sides.
Got some rust converter and going to get another fuel neck filler pipe shortly.
Dunno if this will sort the problem. Will probably be back next month to try and sort the rest out. Then see if can get through mot.
Really needs to be dry for this type of task to be done.
I have ordered some cables to help install a solar trickle on the car this will be done once I decide how the connection will be joined as I want it to be quick connect.
The options will be to lift bonnet and connect or have a cigar type adapter and have panel on the dash.
Now I don't feel I will need this but the corsa may benifit from this.
Will have to see if this works and if it makes any difference to the voltage status. I do not expect it to charge just help keep it from dropping.

I'm going to install an original battery holder. Managed to get one ordered. Though it seems a little rough I'm sure it will be more secure this way.
Holding back for the fuel filler and may consider doing it once I'm happy with the other work I've done so far.

Little update :- I pass my driving test last week. The micra is still off the road. I'm going to try and continue with the micra and get it back in order.

So today been looking at the discs at front as they look rusty.
I'm awaiting on some pads for this so I can clean them up.
Only looked on driver side and they look like are only surface rust so this should not take too long to do.
 

Attachments

  • IMG_20221207_172555.jpg
    IMG_20221207_172555.jpg
    3.3 MB · Views: 71
Last edited:
Just had another go at wheel bearing got the near side rear in now it went in pretty easy it's been in freezer so dunno why the other was so awkward before.
My only problems been the abs sensor chipped on removal and circlips are the most annoying things to remove but reinstalling them is a doddle.
So far it's back on 4 wheels.
Im still hearing a bit of rubbing sounds when spun up.
The brake lines need rubbing down and painting.
I didn't get an abs light but will buy one shortly.. 😂💡A sensor not a light 🤔
May consider new drums if I manage to finish the next few tasks.
Want to put the battery holder and bolt back in.
Need to charge it the engine runs mint still.
Just had enough for today.
 
Last edited:
Looked in at wheel arch brushing it down and washing the dirt off, what I'm seeing looks solid it's abit surface rust at the top fuel filler.
Lower down some more this has just brushed off with tooth brush water and a bit of rust converter.
So this isn't as bad as I thought the strut tower looks to have surface rust similar but alittle more that doesn't look too much for a brush n bit of sanding.
I have a converter that I planned on using then the under seal.
Now I'm thinking for what it's like it ain't that bad and could probably get away with not doing it or just light patch the areas that look rough.

I have sprayed it down with hot soap n water and light brush down wheel is still on so I'm not getting right in up at the top.
My plan is to let it dry now and take a shot of what I see.
I thought this was the area but seems its just the fuel filler that was on advice list.
I also needs to air up the tyres as I was unable to get the jack in the usual spot for axle stands.
The battery is charging so I will get the battery holder in later.
The tray wants hoovering out it's full of dust or something.
 
This is what I see now it looks abit worse now I'm using the camera and flash at the fuel filler area but the strut seems solid enough
 

Attachments

  • IMG_20230426_105522.jpg
    IMG_20230426_105522.jpg
    2.2 MB · Views: 63
  • IMG_20230426_105541.jpg
    IMG_20230426_105541.jpg
    2.6 MB · Views: 56
The abs ring arrived today so can fit it in later.
I've been watching guides as to how to set the drums and shoes proper.
The should have at least 1mm gap between em so I'm going to work on getting this 1mm while I'm replacing the speed sensor.
With the aim of no audible rubbing scraping when the wheel / drum is spinning up.

Anyways this is my next task and probably get the springs / shocks in.
Then tidy up the axle also.
The battery holder and bolt I got fits nice happy with that.
 
Today I have been trying to remove the dip stick tube as it always moves around when trying to check levels.

When pulling it up and it will remove around an inch then for some reason it won't pullout?
So I just want to replace O ring if this the case.
Does anyone here ever recall having to repair a loose tube for the dipstick on these k12s.
I gave up in the end after trialing to bolt a bracket on the end Below the yellow handle.
My idea is to have a metal bracket to hold the tube so it cannot move about when removing the stick.
This may or may not work I have it near but it has to not foul on the handle.

What I'm going to test next will probably be a slide hammer can't say it will work but certainly worth a go.
While I'm on I need a stud removal tool to help me gain more space.
Can't see anything else useful information apart someone reccomended a mcguyver method.
Please don't ask who he is as I have no idea.
 
Last edited:
Okay finally it's been removed, try various o ring they don't seem to do as I expect just end up rolling back the oil stick tube still moves around so isn't working.
I could say its the wrong one maybe and this could be why it's been loose.
Doesn't look damaged or broken.
Apart I did curve it a tiny amount at end to remove.

For now I'm trying to cure some paste around the area I think unlikely will work aas it still flops around.
Maybe I just need a thicker Diameter for the bottom half.
I was trying with wrapping the tube then trying to push it home.
I got it nearly with this but want it seated fully.
Slide hammer Wasnt needed but it would have worked for sure.

Did notice some improvement to the tube but still not fixed solid.
My next try will be with some copper tape reluctant to try tho but read this work for another person.
I'm also going to try a bracket to hold it in place this would require tapping a hole for the bracket and as far as I know it almost worked when I was test fitting the bracket.
 
Last edited:
Originals, okay these been pickled for a few days, most of the rust has broken up now,
I'm using a bit of wire wool and a drill pad to try and remove the last tarnished look on fronts.
One is worse than other at the back fronts look not bad now from what they looked like before dipping.
My plan is just to see result and this looks about as far as I'm going today.
Could dip again but that won't remove that blacked look me don't thinks.

These have been stored in humid conditions over a year or so I do not expect them to look much better than they are now.
They are really smooth the bumpy bits are soda. Yes they need to be dried.

So far I'm impressed with the result.

This car has not had any fuel since last year in autumn and it still runs.
The battery just went flat other day.
Yet starts right up even after being left for a week at a time and not moving.
 

Attachments

  • IMG_20230629_135907.jpg
    IMG_20230629_135907.jpg
    4.5 MB · Views: 56
Last edited:
Got a parasitic draw test cable as the battery has drain twice now,
I'm previously removing the reverse camera ect to try and find what's causing it.
Probably wants a new battery just reluctant to get one could do with a spare tho for projects.

Time to learn more on this side of things I won't be posting often but will certainly keep this updated with my findings..

Okay so the bubble or window says battery charged but car is not turning over when key is turned again.
I have order a replacement to help out for now.
Aparently the bubble only shows one of the plates.
I'm not prepared to keep taking battery off and on so this is best solution for me.
It's not as powerful as the old one but I'm sure it will do the job.

Just looking and when I switch the headlights on briefly the computer screen in dash goes off for a split second wonder if that's normal.
The head lights are something I recently changed so I suspect maybe a bulb.

Before I remove battery in acc mode I see 11.6v when I turn on 10.4v
Both seem very low.
And if I wait with key in on its dropping to 9.9v
This is with cigarette lighter guage so I'm not too convinced that has super accurate reading would say it's lower than at the battery.

When I open or lock the vehicle I notice a very weak sound when the mechanisms engage or unlock.
I'm wanting to move the car so I can remove the wheel spacers as these are too good to go if it does end up going to recycle.
I will have a new battery in the next week.
The draw test requires a good battery to give an accuate reading I'm interested to find out if the wiring is in good or bad health.
The manual for this test may take a while for me to figure as step by step translations are not always clear.

Passenger side indicator at front not lit when locking.
I have done a short charge and replaced battery on the light worked after I remove the bulb from housing.
It's not start again and I notice that the power steering isn't light feels heavy and I'm sure before the engine start it goes light but I could be wrong.
Anyways for now I suspect something with the signal light at front.
And interesting the door locks now sound like they are working well as though the battery is fully charged..
The other odd thing is I get like a fan noise after trying to turn the engine over behind the dash that isn't the internal fan.


Instrument cluster indicators, diagnostic connector (DLC)
 

Attachments

  • Screenshot_20230816_185551_com.ebay.mobile_edit_924673442934944.jpg
    Screenshot_20230816_185551_com.ebay.mobile_edit_924673442934944.jpg
    64.2 KB · Views: 41
  • IMG_20230818_020558.jpg
    IMG_20230818_020558.jpg
    2 MB · Views: 38
  • IMG_20230818_020607.jpg
    IMG_20230818_020607.jpg
    2.3 MB · Views: 53
Last edited:
New bat in starts up fine happy now that was getting me down haha

So the old battery has calcium inside and as far as recharging goes I have an old charger and aparently these type require a higher voltage so I was only charging it to 70%.
Not sure if this is correct but would explain why it always seemed to be weak in the cold season.
So now I need a smart charger to replace the old one that is probably pre 90s ish.
 

Attachments

  • IMG_20230819_110259.jpg
    IMG_20230819_110259.jpg
    1.6 MB · Views: 50
  • IMG_20230819_111101.jpg
    IMG_20230819_111101.jpg
    1.5 MB · Views: 52
Last edited:
Today done the wheel speed sensor on rear driver side..
Took most time getting the dust cover off the drum rest seemed to go easy.
I gave the wheel a good spin at end cause I want to get it to not make that scrape sound.
Should be okay now.
Was looking at where the bottom of arch looks like it's starting to rust.
Not gonna bother with body work tho.
The engine started fine and the starter sounds really strong with replaced battery I'm surprised cause I thought I was going to be charging the new battery today.

Next will be the front calipers they might take while longer so will do one side at a time and see how I get on.

Edit :- almost forgot to paint the lines 🎨
 
Last edited:
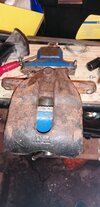
Getting the new caliper on just stuck on the brake line as it didn't want to come off so now it's a new line to be made.
Upload pic later..

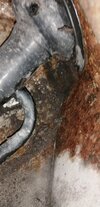
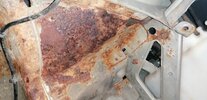
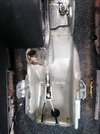
Okay so ignoring the rusty inner arch 🙁 as much as possible 😬
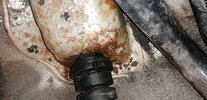
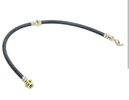
The line had to be hacked off.
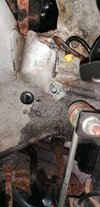
The pipe to abs system is back one.
I'm making up a pipe as we speak.
Not sure how much of a chew the abs fitting will be to remove.
Then it's just a case of curving the cable where it needs to be.
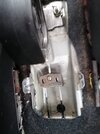
As for the rusty area this is below where its been welded for those who can't ignore it.
And yes I'm concerned but not completely convinced that it's been done well although it does look solid from above. 🤣
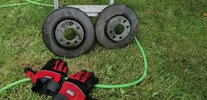
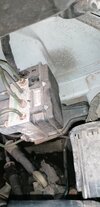
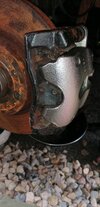
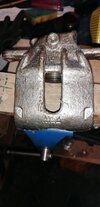
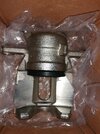
Oh yeah and as you can see the new caliper is in place it moves back ad forth freely.
And the discs have not spun up for as long as almost a year now.
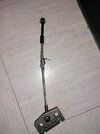
I need to get the flexy pipe in I decided I will do that in situ.
Other than it being an utter nightmare it's actually still enjoyable to do somewhat. 😏
The abs pump and fittings I'm kinda fearing they will be frozen solid and to be honest cannot see that being as simple as it seems.

It's loose that was too easy 😉

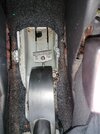
The clips behind the engine however look a bit more of a challenge anyone know how to quickly remove them or the pipe can they pop what is the deal with these.

Ugh they are a pain to get out.
It's off now just to measure the line and feed it in place I guess that part is easy enough vs battling with the line that wants to latch on everything. 😁

The only thing keeping me going is fried brake caliper today 🤣

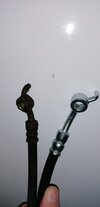
Checking the fittings are correct they don't match from what I have to what was just removed i'm sure the caliper end will be fine but for the abs end its a case of reuse or buy more.
they are 1/4 inch.
not so much a problem as the threads etc look okay still
Could have got away with using unions.

Today got the rest of the line fitted it seems slightly too short tho so not happy with that reason being the fittings that are correct were on a length made up for the rear.
After I found that out I had to shorten the line slightly I had load of spare to play with but after bending the pipe was unable to get the fitting to drop far enough back to give me room to make the flare.
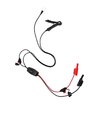
Anyways I just continued with what I had and got got all the air out the system.
It's probably okay as is but I would rather have a nice line and it's kinda tight to the frame at bottom of wheel arch.
So gonna need to get another roll of tube probably but will have to see what's left over.
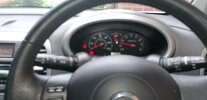
I didn't get any lights on dash but the pedal felt a little soft when started.
Other than this tho I think it should work fine ones I get the line made again.
My plan was to try and make the line curves on the car but this was taking along time and probably not ideal.
 

Attachments

  • IMG_20230825_144333.jpg
    IMG_20230825_144333.jpg
    2.2 MB · Views: 50
  • IMG_20230825_131816.jpg
    IMG_20230825_131816.jpg
    2.2 MB · Views: 52
  • IMG_20230825_131802.jpg
    IMG_20230825_131802.jpg
    2.1 MB · Views: 50
  • IMG_20230825_131750.jpg
    IMG_20230825_131750.jpg
    3.2 MB · Views: 51
Last edited:
So while work is on hold Ive considered getting brake unions to help, After looking at these they seem to not be ideal for mot.. So I'm going to avoid using if possible.
Still got some tho.
I have hacked the pipe and it bent up a bit on removal so now I'm working with guess and try and get the thing in place as near as I can to original.
(Trying to figure where the pipe curves around the arch this part rather puzzled me and I wasn't happy with it touching the frame.)
Think best method is probably to start at the arch and work back to to pump.

I need to clean the carriers up as the bottom one didn't move as freely as top so that will want doing.
I have some new parts that need installing here boots ect.
And I know the discs are looking horrible I have some pads to clean those up as you can see they worked well on the old discs.
Another thing when I removed the brake light fuse I note this fuse looks to be not as clean or might be burn not sure the lights work fine but noted as area to check and test when possible.
Will see how I get on next time I'm going to work at tidying the carrier and disc up and also need to find the spring clips that seemed to have been lost.

Today cleaning up the removed caliper looks a ton better already has now been dipped in a solution to further remove the rust.
I have so far manage to get the banjo bolt out and the bleed valve was stuck so will leave that for now.
So need to take that out and the piston.
I ain't took a shot of it yet can already see its not as bad as it appeared.
Don't intend to use it again but would like to see what happens.
Most of it was just crusty and paint flakes from when I paint them black.

Finally I got the piston out just bleed valve left now. Was not easy to remove the piston looked fine tho.

Trying to get the bleed nipple out I have so far managed to snap off the stud tool inside.
Doesn't seem easy to remove now.
My plan was to rebuild this unit as a spare as I have a new cylinder for it ect.
I was also try to cut a notch to get screwdriver and tap out this however was a fail.
Trying to pick it back out but nothing to hold onto so limited options the drill just spins over the stud remover.
 

Attachments

  • IMG_20230831_211716.jpg
    IMG_20230831_211716.jpg
    2.1 MB · Views: 52
Last edited:
Testing this paint to see if it still looks okay as I'd like to use this on the carrier..
It's hand painted just to tidy up a bit.
Shame I can't get the bleed nipple out or it would have the piston in by now.
And yes it's rough now since I had it in the vice.
Does look slightly better than before tho to me anyhow 👍
 

Attachments

  • IMG_20230907_194118.jpg
    IMG_20230907_194118.jpg
    2 MB · Views: 52
Have a question here regarding the flexy on front calipers.
So the little hook seats in a drilled area.
This wouldn't seem to line up with either of the flexy pipes.
Not sure if I have two of the same side as it was listed on the bay as two right side flexy.
Obv I wanted left and right but seem to think they are same maybe?
Any how when fitting it does not go in and I was wondering what is the importance of this hook.
The trouble now is I can't find the listing so unable to ask a question.
Maybe they are just both passenger side ones and that's why it won't line up.

The photo shows actual and now I'm looking at it the item looks different.

After contact with the seller of this item I was told I can return it for a refund this isn't something that I am willing to do since the item was listed as compatible,
Going to be avoiding them from now on and use a reliable source.
Not prepared to remove it and be left with a draining res while I await refund to buy the correct items.
 

Attachments

  • Screenshot_20230910_210743_com.android.chrome_edit_54324002962022.jpg
    Screenshot_20230910_210743_com.android.chrome_edit_54324002962022.jpg
    42.4 KB · Views: 45
  • IMG_20230910_213517.jpg
    IMG_20230910_213517.jpg
    1.1 MB · Views: 39
Last edited:
Today on the road in front of me a Honda civic was blowing clouds of smoke out of the bonnet it looked like the engine had blown a gasket. Or something.
😮
 
Back
Top