sr20buds project (Y)

haha yeah i wont panic about the pump till i get the mount and loom and other bits sorted.

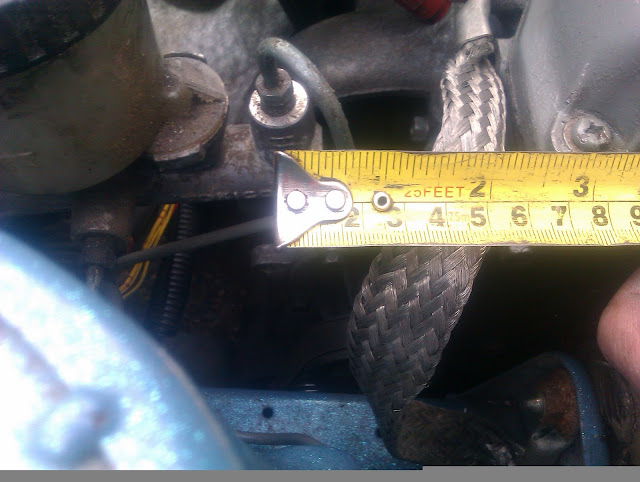
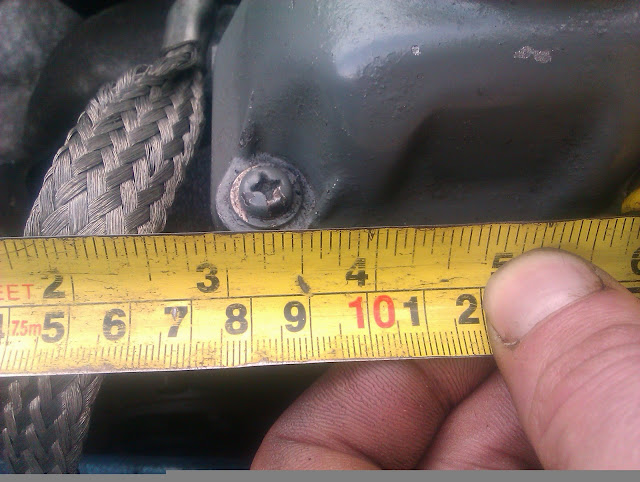
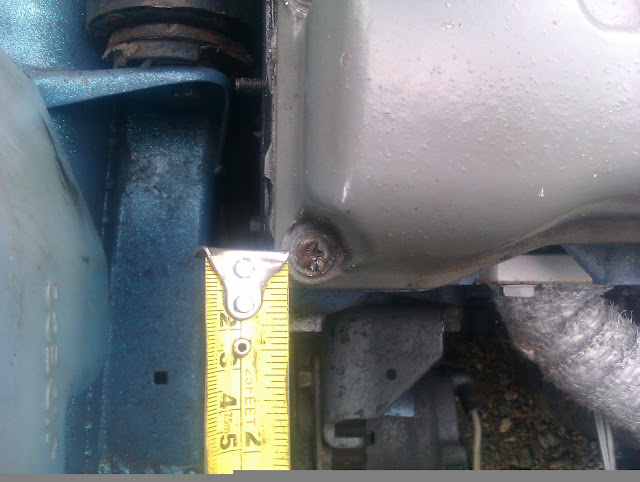
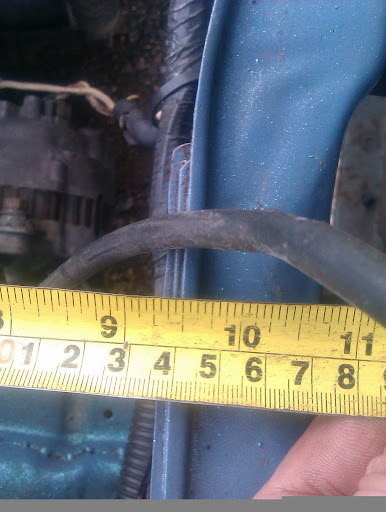
its a possibility that i will be jigging my mount and copying it for pork, could make a couple if i figure out a decent way of doing it. i will take measurements and head down the scrappy too see what i can find and also look for a loom ;)
 
that would be awesome mate id defo buy one mate (Y) might be better actually my local breakers are crap for parts and i can never find jaff all on ebay when i need it :laugh:
 
yeah if the k11 tank looks like it will fit with a shove let us know cause i might just get one i think it would be a better option if it does maybe chuck a sr20 pump in it.
 
got you a rear gearbox/engine mount today. havent got a loom or ecu just yet but he says he does have a few early k11 up at his other site. iam not allowed on his other site but he may bring them down for breaking at some point soon. they are scrappage scheme cars i think :s

i will give the other breakers a buzz.

and regarding engine mount that needs making for driverside. its probably best if i use a standard k10 ma engine mount and mod that same as mine. asll the more modern cars have ally mounts which i cant weld :s
 
alright mate nice one cheers for that (Y) how much is the mount mate? or should i hang on to see if the other bits can be got? how is the ma mount modded on yours? i was looking at my ma mount the other day actually to see if i could do out with it but dint have enough time to figure anything out.

thanks, steve
 
yeah man just hang on abit and ill try get the other bits for you.

theres loads of cg10s down there so if yu need anything like bottom pulleys or non power steering parts let me know!
 
no worries massive thanks again mate (Y) i cant think of anything else at the min but i will go down my garage tomorrow and double check. cheers
 
right been having a massive think cause its coming up winter i might just chuck the carbs on to get it on the road before the snow comes. cause my mams van is useless in the snow and i thought the micra was quite good last year so i will probably need it to get her to the field 7 miles away.

so couple of quick questions what hose can i use for the carbs? i know it needs to be 40mm but finding it hard to come across any that big.

will the carb run ok in winter on the carbs without a choke? as the one on the carbs is jammed right up and wont free off.

Last time I was stuck for some heater hose on my s13 I got some from halfrauds for less than a tenner
 
Go scrappy and look for intercooler joining pipes bits. Mondeo td turbo to cooler pipe is probably close.

For the winter though I would choose injection or the standard ma carb on the cg manifold. Bike carbs will need setting up
 
Go scrappy and look for intercooler joining pipes bits. Mondeo td turbo to cooler pipe is probably close.

For the winter though I would choose injection or the standard ma carb on the cg manifold. Bike carbs will need setting up

ah right nice one well the scrappy's down here are full of mondeos lmao so i will have a butchers this afternoon. still 100% going injection the carbs is just a temp thing till next april/may. if you can still get the loom and ecu i will still have it mate and ill just store it until its time to fit it(Y) plus it will give me a bit of time to get the other bits sorted.
 
well went down the scrappys the other day for some piping but i couldn't find any. lots of mondeo's but no td's just petrol ones so i had a route about and came across a 1994 k11 1.0:grinning: wiring loom intact and ecu and a mount and clutch stay and dizzy. i need to go back down and get the wiring as i dint have loads of time so i will get it tomorrow.
 
WIN

soo glad you found what you need man, fuel injection rapes carbs soooo much.


it should only take you 10mins to remove it, most bits plu into the t/b and dizzy and then one plug for llambda, coolant temp and coolant guage plugs just behind dizzy. and then 3 plugs next to the ecu :)
 
nice one cheers kev (Y) i was gonna ask you if its just the engine bay to cockpit loom i need. do i need the cockpit loom aswell? i was getting confused where the ecu loom splits under the dash into two plugs the goes to the fuse box and ignition ect do i need this part of loom as well? or could i just solder the power supply and ignition wires in.
 
one other thing the mounts on and the engine sits so much better now but i can't see anywhere for the stabilizer to go how did you get around this mate?

cheers steve (Y)
 
the front g/box mount steve ?

no the rear box mount frank i thinks its called a stabilizer bar anyhows :confused: it runs along the gear linkage selector bar and its ment to bolt to the mount somewhere to keep it solid. i cant see anywhere to bolt it up to unless i shorten it?
 
no the rear box mount frank i thinks its called a stabilizer bar anyhows :confused: it runs along the gear linkage selector bar and its ment to bolt to the mount somewhere to keep it solid. i cant see anywhere to bolt it up to unless i shorten it?

ahh gotcha steve :) the k11 rear mount sits on the crossmember/cradle thingy, but the k10 one just bolts to the baulkhead eh
 
yeah i might shorten it as ill have to bring the selector bar home anyway to turn it 90 degrees lol so may as well do it at the same time. i cant really see anywhere i could drill it to unless i welded a plate on the side of the mount.
 
yeah i might shorten it as ill have to bring the selector bar home anyway to turn it 90 degrees lol so may as well do it at the same time. i cant really see anywhere i could drill it to unless i welded a plate on the side of the mount.

personally i would drift the rollpin out of the gearchange rod on the g/box, and drill a fresh hole at 90 deg steve (as long as that outer collar is,nt too hard to drill :)) (under the rubber shroud)
 
was thinking about doing that frank but i couldn't see a roll pin on it it was pretty god damn rusty on the collar so maybe it was hidden?
 
not sure mate i will have a look first thing (Y) whats the best thing for knocking them out frank? a punch or something similar?
 
haha yeah its not much different from the other pics at the min my battery went on my phone the other day so i couldn't get any pics i will promise pics in the next day or so mate (Y)
 
I couldn't see a roll pin either iirc. I cut it and turned it 90*

For the linkage stabiliser I cut the threaded piece from the original k10 mount and then welded it too the k11 mount. Works fine :)
 
:)


Attachments

  • SDC12866.JPG
    SDC12866.JPG
    66.2 KB · Views: 432
Maybe I did see it but couldn't drift it out frank.

For the loom you just need the engine part but you could chop the plugs off of the car loom. Then you could remove the unwanted wires from the plugs leaving the 4 or 5 wires that you need.

There is some pics in my thread of the loom that I got from the scrappy
 
cheers kev ill have another butchers at your blog. i hope its not to hard to drill cause i have no power and me and drill bits don't get on at the best of times haha. if not ill just remove it all and chop and weld it.
 
best bet would be take the fitting off and put it in a pillar drill so you can get it perfect

:doh: why dint i think of that:laugh: hungover like hell lol. if does have a roll pin ill do that. if it doesn't have one is there another way to take the fitting off without ripping the box apart? had a k11 box in pieces before and was a nightmare to put back together.
 
defo no roll pin in my box it came from an R-reg so not sure if that makes any difference. ive been looking at the drivers mount again as i want to re-do it would it be ok to weld the old ma mount to the timing chain cover (the black plate thing)?

some more pics to follow at midnight.
 
couple of piccys i promised with the engine sitting better (Y) note the mount off on the drivers side at the min as im revising it a bit at the min.

149p2l0.jpg
[/IMG]
300y2wk.jpg
[/IMG]
 
just looked at my dizzy i got from the breakers and it has 2 bolts snapped that hold the dizzy cap on i managed to get one out with the pliers but i think the other one will need drilling. i am going to do the dizzy mod today but i only have parcel tape will this be ok or would i have to use electricians tape?

also i am going to paint the cam cover today will black hammerite direct to rust paint be ok or will it just blister under the heat?
 
defo no roll pin in my box it came from an R-reg so not sure if that makes any difference. ive been looking at the drivers mount again as i want to re-do it would it be ok to weld the old ma mount to the timing chain cover (the black plate thing)?

some more pics to follow at midnight.

nah man the cover is too thin and weak, look at the early ages of my blog there is some pics of my mount and its so simple ;) maybe worth msg superls and see if he still has his jig for making the mount ;)

couple of piccys i promised with the engine sitting better (Y) note the mount off on the drivers side at the min as im revising it a bit at the min.

149p2l0.jpg
[/IMG]
300y2wk.jpg
[/IMG]

almost looks just as easy to weld new plates oonto the body of the car to utilise the old cg mount thats already bolted to the engine :)

just looked at my dizzy i got from the breakers and it has 2 bolts snapped that hold the dizzy cap on i managed to get one out with the pliers but i think the other one will need drilling. i am going to do the dizzy mod today but i only have parcel tape will this be ok or would i have to use electricians tape?

also i am going to paint the cam cover today will black hammerite direct to rust paint be ok or will it just blister under the heat?

paint should be fine and so should the parcel tape (Y)

however my rev limiter still cuts in really early, im wondering whether my car is in limp mode from messing around with the beeR rev limiter :doh:
 
could be kev when does yours run out of puff? i managed to melt a old plastic tie wrap over the dizzy hole seems to be ok. the tape was doing my nut in lol it wouldn't stick properly.

also this mount thing i was thinking of that (welding new plates in) but i only have a buzz box lol so it would annihilate the waffer thin metal. i was thinking of asking superls actually i'll send him a pm.

dizzy fitted today. cam cover prepped but couldn't make my mind up wether to paint it or not as it looked like it was going to rain lol. pics at midnight again (Y)
 
some more piccy's as promised note the dizzy mod is melted plastic tie wrap over the square hole :laugh: and the dizzy fitted. cam cover is off for painting.


f1co7t.jpg
[/IMG]
beyafm.jpg
[/IMG]
1252rfk.jpg
[/IMG]
 
well been down today and got the basic wiring done (just need to figure out which is ecu lives and earths now) and cam cover painted so just need to hook up the ecu and get a fuel pump and it should run :grinning: i have put the battery on charge cause im hoping i can get this done tomorrow. i still need to sort a swirl pot but that can wait for now as long as it starts i will be happy then ill sort the rest.
 
defo no roll pin in my box it came from an R-reg so not sure if that makes any difference. .

was yours from an R reg 1.3 tho ? here,s the haynes pic of a k10 one eh (and my pre 98 1.0 has the same rollpin)


Attachments

  • SDC10179.JPG
    SDC10179.JPG
    273.7 KB · Views: 346
all of the ecu LIVES x3 are in this plug. cut them out and connect them to a ignition live source that REMAINS LIVE DURING CRANKING things like the stereo go dead during cranking.
IMAG0145.jpg

i got all 3 wires together and joined them up with the (iirc) green wire from the ballast resistor. one wire from the ballast resistor is 12v live, iam sure its the green wire. this can be pulled back through the loom and ran on the inside of the bulkhead.
IMAG0151.jpg

you can even see the colours of the wires lol iam not recomending the choc block but its working fine for me tempory


the cranking wire is within this multiplug! i dont know if its defo needed but i think it tells the ecu that its cranking at 300rpm and to start. otherwise it would think its idling at 300rpm lol
IMAG0152.jpg

cut it out of the plug and connect it too the starter motor

connect the cranking wire to here, where the black and yellow srtare wire is!
IMAG0154.jpg
 
the EARTHS are all bunched together with a ring terminal on the end. this attached to the cylinder head or inlet manifold. remevber that you need a couple decent earth straps from the engine to the chassis.
 
ECU LIVES ARE
pin no.
38
46
47

and at the white multi plug (iirc) you need yellow and black wire, green and white wire and finally white and green wire.

the white and green wire livens up the coil

STARTER WIRE
pin no. 34 at ecu and green and yellow wire from black plug

My fuel pumps are connected to the same green coil wire, i was concerned about the drain on this wire but it appears to be fine and doesnt get hot. tbh the orignal coil was probably more of a drain anyways :D
 
here are some pics to show the posistion of my engine

from the centre of this union on the master cylinder
IMAG0183.jpg


to the middle of this cam cover bolt is
IMAG0184.jpg

3.25inches

from the centre of this cam cover bolt
IMAG0186.jpg


to the slam panel is
IMAG0185.jpg

9.25-9.5inches depending on where you look
 
Back
Top