• Please only use these forums for blogs, they are not a discussion forum

Blog of the China Blue.

Status
Not open for further replies.

pjg1979

THIS IS MY BOOMSTICK!
Well, I did start a blog before the hack, but I have have to start it again.

Right then, I own a K11 1.4 Activ 16v. When I aquired it off my girlfriend it had the odd dent and I had fitted some angel eyes to him. (mike)

normal_Micra_Stage_1.JPG


Since then which has been over a year I have fitted:

An Induction Filter.
A Breather Filter.
A Hood Scoop which needs painting and fitting.

452148ebe82bcd89d.jpg


^ ^ ^ What a Filthy Engine I know, I'm ashamed ^ ^ ^

452148e14f830e413.jpg


DRL's (Daylight Running Lamps) free from Ring.

452148ebe91310af2.jpg


A new Gearbox gaiter & Nissan Knob.
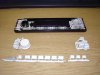
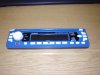
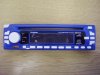
Blue Led's In the dash and foot wells.

452148ebeaec6ed22.jpg


A Cherry Bomb exhaust (Cheers Olly98).
Custom made MSC indicators.
A Ripspeed twin exhaust tip and Side Sills (Cheers Son and Girlfriend).
15" Alloys which I'm currently re-furbing.

452148109f0cc364a.jpg
4521481187d6a123e.jpg

452147f5d857ea62d.jpg


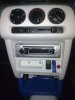
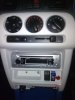
I have also started colour coding the interior to be blue and white, which I have also got blue dragon seat covers and matching floor mats.

Thanks for looking....
 
hehe.

Nice original features!

Nice idea for exhaust!
Not a fan of ripspeed tho :upside:

And get that bay shining!!! Your filter looks out of place!
 
Well I do plan on getting a decent steering wheel one day, I have the boss kit already, If you want it you can have, but not yet.
 
coming 0n well pal love the interior steering wheel would finish it off

exhaust looks well is it actually connected as its quiet high ? but i love how its set in the bumper
 
Yeah his exhaust is connected, but cos it's a custom job the bend is in the wrong place picking it up higher. I think it looks nice through the bumper like that.
 
Well this is how it looked at the start:

452147cd47503a992.jpg


Then a bit of sawing using a bandsaw (lazy I know) and a bit of welding.

452147cd470975315.jpg


I then took measurements of the brackets and bought a steel rod from B&Q and it then looked like this.

452148109dfa77a20.jpg


A little bit of guess work and hey presto. One day I would like to do this:

452147c83ea84e260.jpg


but that's another story.:k11motors
 
Yes it is a CherryBomb, Hopefully I shall be uploading a video tonight with me driving from my mates to work, with a Ministry Of Sound - Garage Classics soundtrack....
 
lol i have both garage classics cds i always blaze them out of my sub :D good choice my friend...by the way my friend has a cherry bomb on his 205...pops like #### lol
 
Didn't do vids as each one was around 17 minutes and got a bit boring, lol.

Anyway some more pics of my motor:

Fitted some Super Bright Blue LED's to my internal light and colour coded at the same time.

normal_Interior_Light.jpg
normal_Interior_Light_%281%29.jpg


I'm currently half way through painting my alloys, don't expect them to be completed by the Potential meet at Ferrybridge.

normal_Alloy_White.jpg
normal_Micra_0708_%282%29.jpg


And a picture what they should look like once I've bought a full under car kit plus under arch kit.

normal_Alloy_Blue_LED_d.jpg
 
The Flick switchs are real, but don't do anything yet....

I'll find out the website in a bit as I can't get onto Yahoo for some reason. The switches and Cover cost about £17.oo for all including P&P. And they also do a range of colours.
 
ok thanks pal as im going to buy some just for the looks :D

wheels look so much better in white

what u do sand primer spray and lacquer ?
 
liking the dash ,im contemplating flocking my dash and i painted my last centre insert white also,looked minted, but just gunna leave it silver i think,we will see

loving that cherry bomb,dont see many of them nowadays,the original bad ass exhaust back box lol

cant wait to see that bad ass micra slammed on its ass,will look good

p.s not a fan of the ripspeed store personally,also i would of gone for a more subtle bonnet vent, but if you like it thats all that counts
 
Well on Tuesday I had ordered off ebay some "edding 750" paint markers, only because I have a blue one at work which did a good job on the test tyre, so today they've arrived and I thought during my lunch hour I'll do some colouring in.

Tyre Before:

452148f74cb59455c.jpg


Tyre After:

452148f74cb5be558.jpg


The pens are relatively cheap, about £2.50 odd. not bad..

Cheers for the comments guys, I know Ripspeed should be called Cheepspeed but some items you can get away with.

I love the cherry bomb myself and I'm wanting to add another one inplace of the 1st silencer.


B47TO, all I did with the alloys was clean them with a Rag and White Spirit, then I used Hammerite, bad I dea I think, unless you have something to spray it with.
 
I just used Plastikote from B&Q or Wilkinsons, there is just 4 screws keeping the centre console on, there's two just underneath the air controls and two near the cigarette tray and lighter.

Once off, the switches etc just pop out with a bit of a squeeze. I used a Plastikote Plastic Primer then Plastikote Paint there is a large range and prices aren't that bad, I personally would have liked to do it in China Blue the same colour as my car but it would cost a fortune I don't have, lol.
 
Did you do any sanding before spraying?

I've got some plastic primer and then red paint from halfrauds and wanna get it right the first time (even tho i'm spraying a spare centre console)

I know some people do and dont sand, just wondering how you did yours as it turned out good.

Loving the car Phil, any more lights and LED's and you'll be driving a bulb :D
 
ahh ok thanks ,just getting together a few ideas before i start mine m8, im liking your car btw wish mine was like that lol
 
LOL, Driving a Bulb, I'm buying an undercar kit and under arch kit Friday won't be fitting it for a while though.

Personally I would sand it first then Primer, then before painting check that the primer has taken to the plastic because sometimes it doesn't, why I don't know but guessing some sort of residue. Going Red then Rob, if I had a Black Micra I would have gone a Light Green, but that's me, lol.

Good Luck to both of you and looking forward to some before and after pics.(Y)
 
How long did you leave between coats? It recommends 24 hours between each coat on the instructions... and frankly i dont have the patience lol
 
I did the painting every lunchtime so I did leave it 24 hours, they garage says to leave it 48 hours before putting the tyreback on.
 
the wheels are looking soo much better,also like what you have done to the tyres looks good

keep up the good work
 
Cheers b,

Though I must say I curbed the back end the other day and it just says stone now, lol.
 
Just drill a couple of holes by using the switch covers as templates. I'll be taking the centre console off soon to build in a Under Car Kit control box.
 
Nah not really, I like the height, Ideally I would like stiffer suspension. If I won lotto though hydraulics all the way, lol.
 
I want to paint my tyres now!!! :D ~Like it!

Ive thought about that before, but if those marker pens work well i might get one, as i just bought new tyres for me sr alloys. Now no money til next week lol.
 
Well if you've got new alloys/tyres you might want to mask the writing off prior to painting. Also it's helpful having the wheel laid on the floor.

Don't forget you can get a range of colours so if you have a red, blue, gold micra you can get a matching paint pen.
 
What Is It ? ? ?

Well Yesterday I fitted something somewhere, where is it?

4521491357c061095.jpg


4521491357c0a8556.jpg


No prizes though, sorry.
 
It is in deed the ashtray, it'll all be finished this afternoon though as I have built in the control box for my Undercar Kit into the Centre Console.
 
UNDER CAR KIT FITTED + Consealed Control Box.

Well after weeks of waiting I have finally got round to fitting my under car kit and building the control box into the centre console.

Control Box Before:
452149158f4bf0a13.jpg


Control Box Gutted:
452149158f4c18d16.jpg


LEDs Prewired for Centre Console Fitting:
452149158f4c4d8cd.jpg


The Finished Job:
452149158e41e6b7b.jpg


452149158e41c4877.jpg


452149158e41a5470.jpg


452149158e41785a3.jpg


452149158e4214c09.jpg


Comments welcome/
 
So you're responsible for all the UFO reports lol, your car looks like a giant ball of light, I like it!
 
Cheers guys, I haven't fitted scoop yet, but found a website that sells China Blue Spray Paint, costs £10.99 per 500ml can, possibly December/January time I guess.

Currently having a nightmare with the undercar kit because the control box I used the LEDs on the control Box wasn't the same as the modes on the LEDs under the car. So I'm currently rewiring the control box that came with the kit and it's harder than I thought.
 
ICE Facia Painting

Well as some may know by viewing my Blog is that I'm trying to colour code my interior, well I have done my centre console but the stereo looks out of place, as it's second hand rubbish I thought I'd dismantle the Head unit and paint it. So what do you think guys n' gals?

Pictures attached are (in order):

Before Photo
During Photo
After Photo and After Photo.

I will later upload a picture of it fitted once I've sord my UCK and center console etc as my car is looking butt ugly on the inside, lol.
 

Attachments

  • Before Painting.jpg
    Before Painting.jpg
    17 KB · Views: 411
  • Stereo Repaint.JPG
    Stereo Repaint.JPG
    140.9 KB · Views: 439
  • S After Painting a.JPG
    S After Painting a.JPG
    144.3 KB · Views: 470
  • S After Painting b.JPG
    S After Painting b.JPG
    128.9 KB · Views: 488
Status
Not open for further replies.
Back
Top