Hi Guys,
My daughter has a 2010 K12. As far as I know it's all standard. I was wondering if there is a worthwhile upgrade available which will perform better. Probably they could do with replacing anyway I've tried polishing the plastic which is a bit scratched and a little discolouration. Not the worst I've seen but but not great results. Any advice appreciated.
Mine were an advisory last mot..
I took off and replaced but also polished the old ones and they now look acceptable.
The finish does not last long tho imo.
I used 2000 - 2500 grit sand paper wet n dry mainly 2500 and up will help.
Then I polish em with a drill and mop with metal polish I'm using a turtle brand one it gives a good shine and they look clear again.
The next set would be to either coat them with a headlight seal probably best measure or use a 3k clear coat.
This would then seal the finish and they should last longer time.
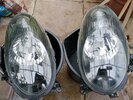
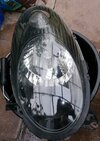
As I've only got upto the polishing stage this is what mine look like and the completed process will look slightly better than this especially if you use higher grit sand papers 3000+ wouldn't be over the top here.
My results are show in this image but as I said I replaced mine but would still consider replacing these back now I'm seeing that I could potentially make them nicer with higher grit and another polish.
This is what I've tested so far and they were yellow and dull.
The advisory stated they have.
(Slight deterioration)
But after the sand and buff I think they look okay..
I now have tyc face-lift lights installed and decided those give out better light so safer and be seen better on the roads at night.
A before shot would be nice but I think most people have seen yellow or hazed plastic headlights before..
I have not tried them as yet but am certain they will be much brighter.
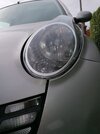
My main issue with yellowing was at the top and this part does not really light up very much.
If your after removing scratches the best way is with wet n dry sand paper then a metal polish to buff them afterwards.
The only down side is you then need to seal them as the old seal gets removed in the sanding process along with the scratches.
I usually do side to side the up and down motion for each grit and rotate the angle when moving up to the finer one.
This is something you probably can avoid by just using the metal polish but won't be able to remove deeper scratch with that method.
I've tried most other methods and they do work but the best ways usually have more stages giving a better finish.
That comes off easy usually with the polish.
Are you using a buffing tool of some sort or just a cloth?
Here is what i suggest
Step1
Sand by hand don't use a machine sander..
Take time with each of the wet n dry paper dry and check for missed areas before moving up.
Step 2
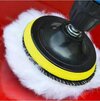
Drill and buff wheel buffing pads and or foam pads.
I usually use the foam pads.
Use a polish compound or metal polish of choice. (Dab it on the light cover it and let it dry before buff)
They may not be the same finish but will do the job.
I used a full 3 ah makita battery and ran down to one bar in this process to achieve that shine.
Between both headlights.
Dry the headlight
Step 3
Use a Hydrophobic compound ceramic to coat the finished product.
Enjoy the reflective surface that should resemble near to new shine if not better depending upon your skills with sanding and buffing ect.
Time required was around 2 hours but can be done quicker.
The preferred method would be done off the car this way spots are not missed.
Removing the headlight you may find in search if required.
Kits can also be used if you prefer this method they are called headlight restore kits one that come to mind is turtle wax brand.
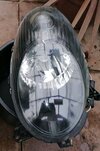
In the last images may be more clear how they are reflective once again or this was what I was trying to achieve with the led lights above it would have shown up better had it been darker.
Before this process they had once been buffed but this year seen very little attention other than being washed 2 time so were in a right state.
And to be honest they now look better than the ones I bought and installed as those have a slight scuff but look newer overall.