Interior Part 3: Dash console...

micra man

Golf GTi Turbo
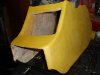
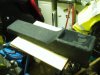
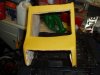
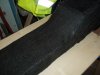
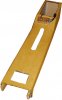
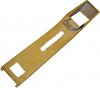
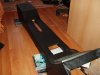
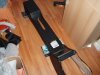
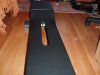
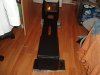
Well I started remaking the centre console I had in the car today so it can house one of my tv's. (I now have four going in the car :S ) I decided to make it in two seperate sections this time so it is easier to get in and out. Got quite a bit done and this is the first section. Still needs tidying up and a way of securing the tv in, but quite happy with the progress so far. This will also house all of the buttons for neons, electric windows etc. Will see if I can do the second part of it on monday I think. :) Opinions and other ideas welcomed. I have also extended this one to the back of the dash which the other one did not do, so should look a little smarter there also. :)

5-P2180022.JPG
 
is it me or is it cockeyed? should look good when u have all this done like - cant help thinking pimp my ride ha ha
 
Lol, it is ever so slightly off, however the dash on the k10 is off centre anyway so when it is fixed you won't even notice it. Decided to fibreglass it rather than material so still quite a bit of work to do!!! :)
 
Yeah no worries. Been on with it again today but its pretty tricky and has been stressing me out quite a bit. There is a hell of alot of things to think about when doing it!!! Still coming on ok though. Next bit, fibreglassing which should be fun lol, and then making the second piece. :)
 
that will be good when you do it in fibreglass, i would just take a mould off of youre finished wood one
 
ohc_turbo said:
that will be good when you do it in fibreglass, i would just take a mould off of youre finished wood one

Not a bad idea that!!! You think that would be better, and easier to work with?? I know it would certainly be lighter lol. :) I was just gunna fibreglass it over the wood originally but I think that that may work better actually. :)
 
id do something like cover the wood with a tesco bag the fibreglass over the bag then pull the wood out when set the pull the bag off
 
Well I got a layer and a half of fibreglass on it the other day. Gotta finish off the 2nd layer of fg when I get chance but will probably just leave the wood in now as it seems to have stuck, won't make much of a difference, its super strong now anyway. Then will put a skim of filler sand it and spray it, should look pretty kool. :) Then I gotta make the 2nd part of it lol. :D So much to do before April and no time to do it!!! :|
 
A few updated pics, still needs trimming and smoothing spraying etc, but its starting to take shape. :) May just leave the wood in for now, as it will make it stronger and may be a ##### to remove!!! Anyway, what do you all think?? :)

30-P2240031.JPG


25-P2240034.JPG
 
looking good dan keep up the good work should look nice when its finished.
i was thinking of playing aorund with fibreglass and some old door cards i will post some pictures up when i start on them.

also is there enough clearance for the gearlever moving forward looks kinda close in the pictures?
 
Fordy said:
looking good dan keep up the good work should look nice when its finished.
i was thinking of playing aorund with fibreglass and some old door cards i will post some pictures up when i start on them.

also is there enough clearance for the gearlever moving forward looks kinda close in the pictures?

Yeah, it looks tight there but it needs trimming back at the back where I overlapped the fg. Once its trimmed it should fit snug. :D Yeah wanting a computer in eventually but a ps2 will do for now I think lol. :p Thanks for the comments.
 
Had the chance to do a bit more today until it started raining. Got the console shaped and got the tv fitting snug. :) Also planned the 2nd part of it properly, so gunna build that bit next.

9-P2270106.JPG


24-P2270109.JPG
 
methinks a more removable option would be better, to stop pikeys taking advantage of low security !
 
Lol, theres certainly a lot of security on my car mate. :) Plus I can easily pop the tv out anytime I want to anyways. Will only really be in there for the shows etc.
 
Managed to drag myself out into the cold today and got quite a bit of the 2nd part of it done. :) Here are the pics...

28-P3010112.JPG


17-P3010116.JPG


15-P3010128.JPG


1-P3010129.JPG


24-P3010130.JPG


13-P3010131.JPG


:)
 
your doing a grand job dan! and to think only a few years ago you prob wouldnt even have attempted half the stuff you can do now! :D center console looks ace!!!
 
I know, tis quite scary to think a few years back now lol, and how much I've learnt over the time, its good though. Even since building the last console I made I have learnt loads, this one is much better than the last one though!!! Spent alot of time planning this one so its all coming together quite quickly luckily hehe. :D ;) As I don't have much time. :|
 
best way to learn mate by doing. i have mates who have mechanics qualifications and they are clueless sometimes compared to me and everything i know i taught myself :D yet who would a garage employ to fix you car lol crazy world sometimes :p
 
This is taking far too long now due to not having much time and sun to do it... but seems to be getting there. Messed up with the 2nd part of the console but fixed that problem now and its coming on ok. A few latest pics. First part is nearly there, just needs a little bit of touch up in places with the filler and a bit more sanding and should be done, and hopefully 2nd but shouldn't be far behind. First part is in filler primer at the mo. Here are some pics anyways... sick of the smell of resin!!! :eek:
 

Attachments

  • P3130142.JPG
    P3130142.JPG
    142.7 KB · Views: 280
  • P3130147.JPG
    P3130147.JPG
    145.1 KB · Views: 222
  • P3130143.JPG
    P3130143.JPG
    146.4 KB · Views: 241
  • P3130140.JPG
    P3130140.JPG
    142.8 KB · Views: 231
Getting there... :| Still needs a bit of smoothing to do on it, and now got the electric window switches in the 1st part which looks smart. :) Not far to go with it now anyways. :)
 

Attachments

  • console1.jpg
    console1.jpg
    95.1 KB · Views: 208
  • console2.jpg
    console2.jpg
    110.5 KB · Views: 191
:) First part pretty much done. :D Decided to material it due to time constraints. Think it looks nice anyways hehe. Still needs other electric window switch inand a few other little tiny bits. Was a ##### to material cos of the shape of it, but eventually got it perfect, no bubbles in it or anything woo. :D

29-P3210171.JPG


12-P3210173.JPG
 
Thanks mate!!! :D Should go nicely together with the second piece I think. The buttons need cleaning up where Wayne sprayed them lol, and got the LED buttons etc to go in the middle of them two buttons when I get round to wiring them in so should hopefully look pretty darn neat.
 
Yep... just been told by them that the paint is just flaking off, so they are gunna have to use paint stripper to take it all back before they can even touch it... much fun!!! :(
 
micra man said:
Yep... just been told by them that the paint is just flaking off, so they are gunna have to use paint stripper to take it all back before they can even touch it... much fun!!! :(


looks like youve been stitched up too mate! i bet thats put you well out of pocket
 
looks good, that would be a pita to get completely straight and ready for paint, imo that looks better now that it ever would painted, will match a black interior nicely.

its a pain though, ive done the same in the past kinda, i bet it took ages to get up to the finish you had it, and if you though of covering it in the first place all it would need is the edges smoothed off but still its all learning
 
Lol, yeah took a while, but well worth the effort though. Just hope it will squeeze in between my seats still with the added width of the material lol. :) Managed to get the 2nd bit done and its looking pretty s####y now hehe. :D Will post pictures up in a bit.

Yeah not so kool!!! The bodyshop reckons they can sort it out ok, just may take a few extra days, which doesn't help the deadline for Donny!!! But we will see... :)

Also, when I said the paint was flaking off, I meant on the car lol, not the console. :)
 
Here are the pics. What do you all think??
 

Attachments

  • P3270182.JPG
    P3270182.JPG
    188.8 KB · Views: 218
  • P3270183.JPG
    P3270183.JPG
    194.7 KB · Views: 223
  • P3270184.JPG
    P3270184.JPG
    186.3 KB · Views: 184
  • P3270187.JPG
    P3270187.JPG
    186.9 KB · Views: 211
Also I should add that the little compartment at the back is the perfect shape and size for CD's hehe. ;)

Cheers Speedle. Also can't wait to see all of the interior finished... not much left at all now woo. :D
 
Back
Top