• Please only use these forums for blogs, they are not a discussion forum

Wagoneer's K11

Hello folks,
Being new here, and new to Micra's, I thought it best to get a blog thread started on the changes I make and how I make them.

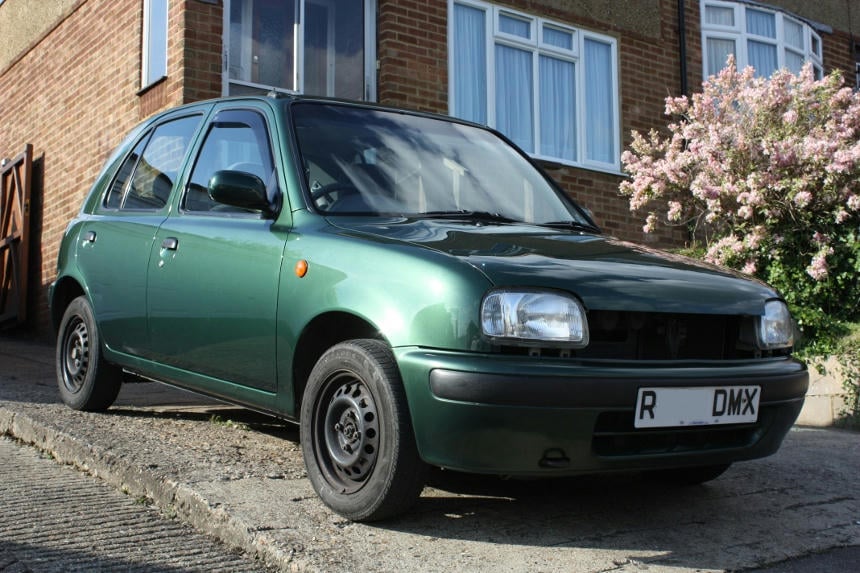
The car: 1997 Micra pre-facelift model 1.3 slx 4 door (I refuse to call the hatch a door, it's not 5 doors!).
The mission: To do do everything I can to differentiate it from the 'Twister' my neighbour owns. She's in her 70's and thinks I've joined her car club!
The method: High quality modifications based on research and competent tweaking.
The promise: I hereby do solemnly promise to share everything I do with you good people.
A shiny new camera is winging it's way to me tomorrow so I can document my progress with photos too.
 
Well then, some things will remain secret until I've achieved them, mostly because I'm not sure and partially in-case I totally get them wrong....but for starters, I've already painted the third brake light surround matt black, removed the stickers off the back and fitted a better stereo.
Having washed and polished it, the dark green metallic looks pretty nice but I have a few small dents to remove so I'll have to get some paint mixed. Whilst I get to the dent fixing I'll also bin the Nissan hatch and grille badges, welding the holes up as I go.
As for stance, after the hard ride of my outgoing Cinquecento I wish to keep a little bounce in the Micra so will be thoroughly digesting the lowering thread to weigh up my options. But it has to be lower and corner better. Some alloys are on their way to me too although they're not designed for the Micra, they are 4x100 so some engineering magic will be used to make them fit. Or Clarkson's 'cure all' hammer method ;)

I've also got designs on the roof. My last car had a lace painted roof due to one drunken night with some tape, a net curtain (I was at school with Annette Curtain...) and some rattle cans saw to that. The Micra is going to be done much better. For those of you not familiar with the concept:

422dbd36f350cd92a1489aa12f2afa945152bb1fef69c02461d381312e8ce8246g.jpg


There's more. I've just taken delivery of some dark orange leatherette. Rather than make the Mrs some sexy underwear, I'm going to have a go at upholstering some interior parts...wish me luck. Don't tell anyone though, but I have my own sewing machine.........shhh.....
Don't worry mate I am seamstress ;) as well. Live a decent sewing machine. Used to make horse rugs and tack. Miss the days of the heavy duty machines from the business unit.

signature...please ignore anything I say...when using my phone it is either bad grammar or rubbish spelling.
 
Anyone been outside recently? The weather has been against us somewhat! My friend who's a body man is up for doing the roof with me, I have the curtain material and a colour scheme to match some other ideas.

Yesterday I took the grille off, the picture shows it masked up ready for cutting. As for springs, that's hopefully a job for next weekend if my friend's working as I can use his nice flat workshop. My driveway is about 30° which makes any kind of jacking procedure challenging!

Now I've just switched from my 10 year old iMac that struggles with MediaFire picture hosting (as well as having really rubbish broadband here) I can show some pictures!

utmkbmv9e523mld6g.jpg

The yellow highlight shows where some material has to be removed so the wheel fits onto the Micra hub. I either have to get it professionally machined or I grind a bit away, carefully.

Masked ready to cut. I fancy using some fibreglass mat to strengthen the opening as all the returns are being removed. Then I can mount some suitable mesh.
 
More progress. Here's the grille pre attack!
o11rwe5dw3tbdsx6g.jpg


l8a56ws17ffz7c96g.jpg

My weapon of choice, a razor saw. This is the large one, I have a much smaller toothed saw too, next step is photo etched size! I used this to cut along the masking tape guide to remove the parts I no longer wanted.

yglob1szwj0y57z6g.jpg


Careful cutting results in a very clean and accurate line cut into the plastic.

4vbnmyb5cn77k8n6g.jpg


That's the whole centre cut out leaving the outside and the mounting points.

xwj1bhph8foaudd6g.jpg


Then I cut here on each side.

x219wdbkedcxd796g.jpg


Here's the part I cut out moved over 30mm and taped into it's new position.

1g9jt986uf9gdbd6g.jpg


Some fibreglass mat and resin fills in the gaps. This is really easy to use and dries hard in 20 minutes. Preparation is the key, I pre-cut the mat to size for each part I was going to use it on so that the resin didn't go off.

2c3d06lbj5a2www6g.jpg


Here's the centre where the vertical join (and the Nissan logo) used to be. Just bridging the gap with fibreglass.

1w5b01ifa1z8kuo6g.jpg


Ordinary body filler makes it look better. There's still plenty of sanding and a bit more filling to do before I commit to undercoat and topcoat. At this point I might pass it on to my friend who is a panel beater. He can get the paint matched and spray it for me as this colour isn't available in rattle cans off the shelf. As there's more than a few favours owing I figure this is the easy route. After all, I did help a bit with the preparation of this:

tpp7kh1a0j57ic26g.jpg
 
Polish time! Not an exciting thing to watch, so here's one picture of the result. My friend lent me his pro polisher which made the job easier.
3757d0kwiu0idy06g.jpg


Needless to say, I sprayed polish everywhere..it's going to take a while to clean it off the trim. Hey ho.

Then we have the dreaded fried egg syndrome:
3fhjex8fxto36jx6g.jpg


Now, we can't have that can we. So:

22xez64splcx3kp6g.jpg


Hello Mum! Still, it's very hard to photograph reflective surfaces without the proper light tenty thing. Next step, apply knuckle scraping technique to get indicator holders out of the car.

The result, much nicer looking front end. Now, where's that grille got to?
0ao2iiuzmbcaqam6g.jpg
 
Next job. having scoured the nearest breakers for a replacement number plate light bar, all the good ones had gone and all that was left were broken. Never mind. At least I spotted some Matiz struts for another day. They have them rather cheap too and all the cars are propped up nicely so I can get them off easily! So, repairs for the number plate thingy were in order.
ukgycki3ygcugoe6g.jpg


A piece of aluminium was cut to size, bent about a bit and then glued into place. I'd filed the plastic down to allow for the thickness of the ally then filed the slot to fit the original bolt.

Not content with this, I then removed the original number plate light fittings and used the LED strip from up there somewhere ^^, made some aluminium bridges to span the gaps that the original number plate lights were in and popped it on!

sh0nbaxwkbdx3gl6g.jpg


Wired in to the existing loom they work fine. The only problem I see is that they might be a bit bright, but if that's the case, I'll tape over a few in the centre leaving those that are over the original place of the bulbs. These LEDs are rather good so I'm going to order some more for use as footwell lighting seeing as the Micra has a pretty poor ceiling mounted single bulb for the interior. My friends huge wafty Lexus is so well lit inside I feel like I'm driving a cave in comparison.
 
Hey, I did the shiny thing again.
m7du3ha3uagln7d6g.jpg


Mrs Wagoneer says I spend more time cleaning this than I do the house. Well, the kids wreck the house quicker than I can make it look nice but at least with the Micra they're not allowed to play with it!
You may notice the cheeky wind deflectors too, I got them on at last and think they work quite well. Now, I must get the paint mixed for the grille then it can be painted and popped on as I'm fed up looking gormless!

Something else I tried was this:
asb0sri4jnrsvbr6g.jpg


It's only loosely wrapped around at the moment to see if I like it, and I do so out with the fabric glue and a bit more careful covering will see it done. I might go over the nasty '80s old people carpet door panels too :)
 
I kinda like the cloth around the pillar trims ;)
...that particular pattern/colour is not to my taste but the idea can definitely work...

Chogy has been helping refresh JonnyZombie's "Celebration" interior with Marvel comics bedding ^_^...looks ace IMO ;)
http://www.micra.org.uk/threads/red-celebration-revamp.56202/#post-593322

I don't see why you couldn't do the door cards and pillar trims in a nice cloth trim to have a coherent theme/colour coding throughout ^_^

ETA: Shiny.....shiny is good :p
 
Looks smart. It got me thinking that this could look good, particularly with your lace paint plans...

386429_10151561097135921_1441198246_n.jpg


...maybe with the wheels painted the same contrast colour you use for the lace work.
 
^^ that's what I was thinking too. The cloth was left over from some occasional seats I made. A trip to Dunelm Mills will be made to see what other options I have.
I've some alloys being painted at the moment but long term is for some painted steels, 14" ones. The alloys are going to be cream, and I will probably do the roof in the same colour then lace over the top in another colour! The chrome wheel trims would work nicely, plus I'd love some whitewalls too :)
 
Back
Top