Don't know if this is the right section but here goes anyways! Thought I would post up a thread on my latest project which happens to be on my wife's first car, a mint K11 1.0 which has been waxoiled every year since she got it with 20k miles on the clock 9 years ago. Thought I would modify and keep it instead of selling and upgrading, there's some sentimental value in it! Been working on it the last few months so there's a back log of pictures to upload in due course. Its getting a complete MX5 drivetrain using the MX's chassis legs without standing out like a sore thumb, needs to be a daily driving, comfortable sleeper that'll go sideways all day long! Keen to stress its a budget build, its not my dream car and thus it is not a demonstration of perfection especially as i don't plan on working on it forever. Hope to get it going within a year.. We'll see!
You are using an out of date browser. It may not display this or other websites correctly.
You should upgrade or use an alternative browser.
You should upgrade or use an alternative browser.
Zzz Micra
- Thread starter WilliamH
- Start date


OP
OP
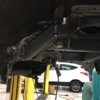
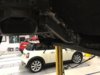
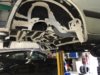
Made a frame up to hold the subframe / suspension on a pneumatic axle stand to allow me to raise and lower it up into the car
Cut the boot floor out of the Micra along with the lower half of the chassis legs and then set the MX5 chassis legs on the MX5 subframe and positioned it up into the Micra a ridiculous amount of times until i had trimmed enough of the Micra away to allow the MX5 legs to sit where they needed to be.
The height of the subframe was set by having the suspension arms sitting level where they should be when the car is rested on a level surface and then putting the wheels up into the arches where I wanted them to be when the car is sitting level. I can then adjust the ride height with adjustable shocks down the line.
Attachments


OP
OP
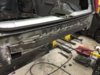
Few photos show there joining the MX5 legs to the Micra Legs with box section, the MX5 legs are narrower so it allowed me to run the box section up the side of the MX5 legs for more strength just a butt welded joint. Made the rear crossmember out of more box section that i found lying around, be strong enough anyways!
Got the floor panels then set in with cross folds to stop them flopping about
Got the floor panels then set in with cross folds to stop them flopping about
Attachments
-
 IMG_3060.jpg232 KB · Views: 254
 -
 IMG_3054.jpg310 KB · Views: 248
 -
 IMG_3068.jpg418.2 KB · Views: 251
 -
 IMG_3069.jpg353.9 KB · Views: 267
 -
 IMG_3074.jpg338 KB · Views: 247
 -
 IMG_3028.jpg346.6 KB · Views: 262
 -
 IMG_3122.jpg307.1 KB · Views: 265
 -
 IMG_3118.jpg233.8 KB · Views: 237
 -
 IMG_3135.jpg241.6 KB · Views: 246


OP
OP


OP
OP
Got the rear panel painted the delightful green color lol
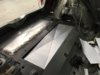
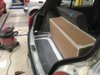
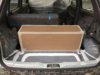
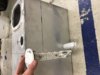
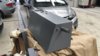
The driveshaft and PPF go right through where the original fuel tank is so i set about making a cardboard template tank that would fit in the boot - not ideal and i don't like it there encase of a rear impact but there really is nowhere else for it. Its to be a daily driver so I wanted a decent sized tank (45 liters) so i don't need to stop for fuel on the way home from work every day! I don't aluminium weld unfortunately so I had to make everything out of cardboard first and sent it off to an engineering company round the corner to get made in 4mm aluminium. Seriously fiddly to get the fuel filler exactly where it would have enough of a drop for the fuel to fall into the tank but not so low that i wouldn't get enough fuel in the tank. I then had to cut and weld on a new fuel fuel filler pipe from the fuel flap on the Micra to meet the fuel filler pipe on the tank.
Got a VDO fuel level sender to match the original VDO fuel gauge in the car and dialed it in to read the appropriate min and max fuel and a flange made that'll accept the MX5 fuel pump. I didn't want an inline pump for the extra tat underneath the car and it would probably be noisier. So once the fuel filler pipe, fuel breather pipe, fuel vent valve, fuel pump and fuel sender was all sorted i got it painted a nice dull grey so it wouldn't stick out too bad come MOT time. This all takes a serious amount more effort to get everything fitted in without interrupting the OEM seats and trim without anything sticking out to give away that its a completely modified beast!
Attachments
-
 IMG_3230.jpg338.8 KB · Views: 223
 -
 IMG_3231.jpg336.7 KB · Views: 236
 -
 IMG_3273.jpg354.7 KB · Views: 230
 -
 IMG_3289.jpg359.8 KB · Views: 269
 -
 IMG_3353.jpg321.9 KB · Views: 247
 -
 IMG_3354.jpg252 KB · Views: 233
 -
 IMG_3406.jpg226.8 KB · Views: 236
 -
 IMG_3407.jpg221.7 KB · Views: 235
 -
 IMG_3410.jpg244.9 KB · Views: 253


OP
OP


OP
OP
I really don't have any fancy tools, this is being done with basic tools unfortunately so out with the trusty spirit level, measuring tape and a few hundred diagonal, horizontal and vertical measurements later i got the MX5 chassis legs where they need to be and tacked in
Attachments


OP
OP
Got the strut towers welded in and some gussets to mate the Micra and MX5 legs and then chopped the bulkhead out and test fitted the engine and box which i had been tinkering with on the side hence the green rocker cover lol why not
Attachments


OP
OP
The MX5 inlet manifold uses a VICs system on some of the later cars which uses an actuator to adjust inlet runner length, the plan here is to get some decent power so i gutted these runners out in exchange for an open plenum chamber. I should have said earlier, its being turbo charged..
Attachments


OP
OP
People say i have too much time on my hands but really i just use my time productively and seeing that engine in there that far back... beats sitting at home watching tv
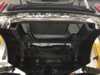
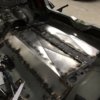
Cut a serious chunk of floor out of the car to make way for the engine and gearbox and then got making the Sherman tank inspired bulkhead. When in doubt, make it stout!
Cut a serious chunk of floor out of the car to make way for the engine and gearbox and then got making the Sherman tank inspired bulkhead. When in doubt, make it stout!
Attachments


SirChris
Educated Bodger
Hello Chap, sorry you had to wait! Much like I can see on your build thread, you are just as busy as we are with work and modding! Also its the weekend, we need beer time too26 hours later and still waiting for a moderator?! I may move this thread over to a different forum at this rate

OP
OP
I'm new to forums but I didn't think that was normal lolHello Chap, sorry you had to wait! Much like I can see on your build thread, you are just as busy as we are with work and modding! Also its the weekend, we need beer time too
OP
OP
No just a road car, I would have done a brave few things differently if it was for the track. Hunting down civic type r's with silly exhausts will be its main persuit!wow !

OP
OP
With 250hpAs Frank says Wow, amazing skills there. A Micra shaped Sunbeam Lotus
OP
OP
Much slower progress now obviously but here's the last Saturday and a couple of evenings progress.
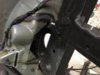
Picture shows the subframe bolted onto the chassis leg and the upper and lower suspension wishbones. You can see where the new chassis leg meets the bulk head there is a gap underneath, this needs a good bit of strength put back in.
Picture shows the subframe bolted onto the chassis leg and the upper and lower suspension wishbones. You can see where the new chassis leg meets the bulk head there is a gap underneath, this needs a good bit of strength put back in.
Attachments

OP
OP
The answer I came up with was to get a heavy big lump of box iron and cut a strip about 45cms long to leave a flat bit of steel with 2 round edges that matches the chassis legs profile perfectly. i then bent this flat strip to go from the underside of the chassis leg to the bulk head and curl around the suspension mounts and tie into the floor to really get some strength built up. I then cut bits of steel to fill the gaps.
Pictures a bit dark, took on an iphone so not great
Pictures a bit dark, took on an iphone so not great
Attachments


OP
OP
The subframe also has a couple of mounts further down the car underneath the floor so I cut these mounts off the MX5, tacked them onto my floor and again filled in the gaps with sheet steel. Now just need to finish the other side to match and then I can finish making the tunnel up
Attachments


Ciao William.
This is one of my favourite topic.
What can i say :
Woooowww. Great ( and a lot of..) job.
I'm so courious to see the next step.
Sent from my SM-J500FN using Micra Sports Club mobile app
This is one of my favourite topic.
What can i say :
Woooowww. Great ( and a lot of..) job.
I'm so courious to see the next step.
Sent from my SM-J500FN using Micra Sports Club mobile app
Hunting down civic type r's with silly exhausts will be its main persuit!
A few of us are already guilty of that little pleasure
*cough* *cough* @SirChris
Dude.. You build a total concept car !!
Good Job . Good Though . Good Project !!
Keep us updated !
Good Job . Good Though . Good Project !!
Keep us updated !
OP
OP


OP
OP
The real progress over the last few days is the tunnel, its shaping up rightly now. Also got the seat positioned back in and mounts welded on to the tunnel, just need to finish the other seat. Had an engineering place bend me some steel to get a nice round edge.
Attachments


OP
OP
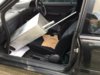
Also set the brake and throttle pedal in to see how much space id have for the clutch seeing as the foot well is a bit smaller now, seems ok and the gearlever isn't that badly far back, will just put a kink forward in it.
Attachments


OP
OP
The progress from now on is going to be more fiddly and tedious seeing as the big fabrication work is more or less done. Next few jobs on the list-
Get the other seat mounted up
Get the brake servo mounted up, bit awkward since there's little space but don't fancy not having it
Go to an engineering place and get them to make me a spacer up for the prop shaft, would save me having to get the whole thing re-tubed.
Once the prop shaft and seats are in ill be able to see where the hand brake cables and handbrake will fit....
Just needa keep the head down!


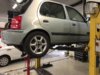
OP
OP
That's the car on the truck off to the tuner. He told me the alternator will need a voltage regulator putting on as the MX5 one doesn't have one. If that's the only teething problem ill be laughing!
Just waiting for him to let me know its running. Lets hope the scrap yard engine is ok.
Once its running and tuned I can start worrying about getting it MOT'd, the current MOT is still valid until the start of October odd so atleast I can use it for a while. The Northern Ireland test centres will be baffled by this thing lol
Attachments

OP
OP
That's the car up and running, daily driving it to work and absolutely loving it! Made a few flashy cars look a little sluggish, had it weighed recently and it comes out at 1025kg with half a tank of fuel, not bad at all. Just building a proper plated Kaaz diff for it now seeing as the standard mx5 lsd can't seem to cope with the power. The 4 year odd dream is finally a reality and took about a year to build in evenings and weekends.
Happy days!
Happy days!