Rob's boot install blog

Robert

Ex. Club Member
Decided to put this in the ICE section rather than my car's blog cuz i think it fits better here, and i didn't want to fill my blog up with what are sure to be fairly boring pictures of wood.. Lol.

So I'm on no time scale for this, I'll just add bits as and when they get done, if the rain stops long enough to get the wood to the shed, there may even be an update later today ;)

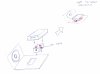
So to start with, my install is of two 10" subs (JBL GT4's) and an amp (JBL something.. 4channel amp gto-1004 maybe, i can't remember) to power them ibnto the boot, hopefully leaving some sort of boot space! I'll be making up a false floor, then fibreglassing around the sides of the boot to fit a sub either side in custom 'stealth' boxes.

Here's a rough design:

scan.jpg


Ignore the plastic cover bit for now.

So I got the subs, amp and wiring kit for christmas, and now I've been out and bought everything i need, consisting of:

12mm MDF
Fibreglass matting, resin and hardener
Masking tape
Screws, glue, etc for joining
Spray adhesive
Carpet


That's it for now, hopefully not long til an update!
 
The main floor bit is all cut out now :) Rain's put a hold on it for now, but i may make a start on the amp section in a sec as i can do that without getting wet!

Pictures!

The floor in place (not finished or fixed, just the basic shape):
IMG_0593.jpg


Now, i think I overestimated the size of the boot/underestimated the size of the amp in my design:
IMG_0594.jpg


I don't think there's going to be enough room to fit the amp on a seperate piece of MDF to the floor, so instead I'll mount it to the floor like this:
IMG_0595.jpg

And just cut out a hole under the amp to allow access to the wheel well. I'll be ditching the spare wheel, but need somewhere to keep my cans of tyreweld, and it'd be no good if i couldn't get to them!

Downside to this way rather than mounting it on a seperate piece of MDF is that I'll have to unscrew the amp to get to the wheel well..
 
Floor'as in properly now, just needs to be carpeted.
Put some padding in the wheel well to stop stuff from rattling:
IMG_0596.jpg


And the floor in place:
IMG_0597.jpg


Hopefully starting on the fibreglassing tomorrow, weather dependent of course..
 
I have nowhere else to put it for a minute lol, I'll take it out once it's all in properly i expect :)
 
Started work on the fibreglassing today :)

Blanked out over the strut tops/seat belts etc:
IMG_0599.jpg


Masked it all up:
IMG_0602.jpg


First layer of FG down:
IMG_0604.jpg


Hopefully gonna put a second layer down tomorrow then take it out of the car to build up a few more layers next week i expect
 
Took them out of the car and put a third layer of fibreglass on, two more tomorrow and that should be it hopefully, and can start the fronts/sides of the boxes :)
 
You can get a kit from hellfrauds or most motor stores. The most common one I've seen is the Davids fibreglass kit. You'll get a stiff brush, the matting, resin, hardner, a little mixing pot, and some lollypop sticks, and some gloves. There's a small kit, and a big kit, the small one going from £7 to £10, and the big one going from £10 to £15. But you'll need to buy some Acetone (nail polish remover) or Cellulose thinners, to clean the brush and your hands with.

I'm betting rob's used the david's kit because when you mix the resin with the hardner, you get an orangy/pinky mixture.

Looks good though. Using the bin bags and the masking tape is something I wouldn't of thought of.
 
I'm kinda half using a guide on talk audio, half making it up as I go along.. Lol, the bin bag protection came from there though!

I didn't get a kit, and bought everything seperatly instead cuz it worked out cheaper at Trago (some big department store that sells pretty much everything cheap). I think it was like a quid for tube of hardner, £4ish for 500ml of resin, and £2.50ish for 4ft square of matting. Already gone through 2l of resin and 5 packs of matting!

Trago mills in falmouth?

Ahh. I've always found it works out a bit cheaper to buy the kits for small bits of work, because you get the brushes and little tubs with them, which come quite useful. But I guess it's cheaper to get everything singularly in bulk for a large project.
 
So are you making these removable? I must say im quite interested in this project and that guide is very usefull. I work with fibreglass and wood alot but not for things like this. If i were you i would extend the wires from the boot lights and attatch some LED's into the side of each box so you can see inside the boot.

Also are the boxes going to be ported? I dont know much about sound systems but im sure enclosures need a port on them?
 
No, these will be sealed boxes.

I measured and cut side sections and glassed them on today, should hopefully start the front panel tomorrow. Lost the camera though!

I'm not sure what I'm doing about a light yet, might just relocate the standard one somewhere..
 
Trimmed roughly, last layer of fibreglass and side pieces in place:

100_0071.jpg


100_0072.jpg


100_0073.jpg


I've had to make the boxes angle like that to leave me some boot space!
I measured the part that sits around the sides, coming out as far as the parcel shelf support to hold about 7.5 litres. Each sub needs 21.24litres, I used a volume worker-outer online and the total volume of the box should be about 21litres, which is close enough for me.
 
Got the front panels cut out today:

100_0076.jpg


Need to cut the speaker holes, then stick them on! Maybe tomorrow, but if the weathers nice enough I have a manifold that needs swapping!

Ordered a new light too! I've -doubtingly- gone for a red strip light, I was going to go for white but... didn't. I'll mount it in the center under the parcel shelf, where you won't see the light, just a red glow. Yes, I'm a chav.. But I couldn't resist.
 
OOoooooooooooo, I'm liking this blog, not because of the boot install (Though it is looking ACE so far), but the step by step of using the fibreglass and how to do it. Looks great Robert, looking forward to some more updates, definately subsribing to this thread.
 
Cheers for the comments guys!

1.3 GX, still no luck with the seats! But i'm getting the brackets they clip onto and thwe plastic parcel shelf support that surrounds it from a March, I'm hoping I can swap them over and it'l solve the problem, if not, I don't know what to do!
 
well im gonna try and do somethin with mine aswell, gonna go raid a scrappy over the weekend see what i can come up with...
 
If you can weld, i think just extending the brakcet it clips to by 5mm or so should do it! That's gonna be my next option.
 
ah i have a friend that's a dab hand at welding might ask him to see what he can do...

damn japs have to have everything different lol
 
Cut out the speaker holes, would've been rude not to test fit one!:

100_0078.jpg


And fixed them to the boxes:

100_0081.jpg


Need that to dry, then seal up the edges from the inside, then bridge the gaps at the frontmost sides of the boxes with some fabric/FG.
 
That looks bl**dy nice Robert, good job. Shame you've got a red car otherwise I would have tried to fob you off with some Speaker Neons that flash to the bass, lol. Were you good at CDT at school?
 
Cheers :)

I was alright.. :p I think it was more the fact that i enjoyed it though lol. I did graphics at GCSE then went on to do a general DT course at Alevel too. But I've always messed around with MDF, fibreglass is still pretty new to me - I'd only done a set of light brows previously!

As for the lights, my one red neon is chavvy enough for me thanks!
 
this is looking nice mate but are the subs going to face each other or are you putting one one side like next to the seat and the other next to the boot of you get me
 
yea i know that i ment the other way mate do both subs are going to be facing each other as im sure i have read some wheer that they will cancel eachother out as its the air they are vibrating so if they are straight and facing each other when the bass kicks in and the air hits each other from the subs force it will cancel it out but again like i said before dont quote me on it lol
 
Yeah they'll face each other. I spoke to Pete a while ago about it and he said it won't be a problem, and he seems to know what he's talking about :) With the angle the subs are sitting at they won't be properly facing each other anyway.
 
Lol nah all will be good, fingers crossed!

I'm hoping by the end of next week to have it finished :) Need more resin first though!
 
Rob, once you've finished Fibering, what colour are you painting it? RED?

You have to excuse my chavyness, but LED's and Neon's is my thing, I have an unused set of LED Spots if you're interested and a quick design of what it could look like.

If you're interested the LED's can either be directly wired to the boot light, or the other option is that it comes with a control box where you can have a music function so it pulses to the music.

As I said, you have to excuse my chavyness, but I ain't no chav.
 

Attachments

  • LED Spot Lights.JPG
    LED Spot Lights.JPG
    34 KB · Views: 315
  • Boot Subbage.jpg
    Boot Subbage.jpg
    506.9 KB · Views: 275
What i really wanted was a 15cm LED strip, about an inch wide with an adhesive backing either red or white.. I had a look on ebay but could only find neon tubes, but I'm sure I've seen them before.
 
If you have adobe acrobat reader on your computer have a look on Ring Automotive website, you'll see a column on the left, on that column should be "Vehicle Lighting" click, a menu should come up, you should then see "Styling/Prism Bulbs" click, the page should change and you'll see a link called "View PDF Catalogue" clikc, once opened on page (3) is a 30 x 1cm strip, page (6) is a 6" (15cm) Cold Cathode, 9" (23cm) Cold Cathode or there is something not in there yet but a 4" (10cm) Cold Cathode with music function, you can view this one on Halfords website Click Here for the page.
 
All sealed up, and speaker cable has been put in and sealed too.
I'm just popping out to post something and pick up some more resin, then I'll crack on with bridging that gap! I'll leave uploading pictures until this evening.

Getting close now!
 
Fabric stretched into place to cover the hole, and fibreglass resin left to soak in to stiffen it up:
IMG_0609.jpg


Couple of layers of fibreglass:
IMG_0612.jpg


Also realised the sub doesn't sit right in the passenger side box, it hits the back! So I'll cut out some rings tomorrow to space it out a bit, not really what i wanted, but oh well!

And started on the amp cover:
IMG_0614.jpg


Still needs bending into shape..

Should have the cover finished and everything carpeted tomorrow, then wire it in wednesday so long as all goes well :)
 
If you have the time, try and make that spacing ring flow into the design with the fibre glass. Might be tricky, but it'll be worth it visually.

Looking awesome though.
 
Completely missed this thread, no idea how!

Top effort and really like it. I had planned to do this a couple of years back before going for a big ported box instead (and completely filling my boot, doh!).

Are you going to be filling/sanding the boxes until smooth?
 
Cheers pete, I was hoping to hear something from you, glad it's good! :)

The box's are gonna be carpeted, mostly so I don't need to bother with the filling and smoothing! :)

I'd like to smooth the spacer rings in, but I'm not sure how I'd carpet it smoothly?
 
Back
Top