Replacement of Power Steering and Alternator Belt

Well, after 17 years, our K11 Micra has just passed another MOT, and is fit to drive on the roads for another year :)

The certificate does however give an advisory notice that the alternator and power steering belts are worn.

Are they essential, or can I wait for them to 'go', and then worry about the repairs? (I expect the alternator belt failing would result in a flat battery, but what about the power steering? Heavier steering or worse?)

As I'd prefer to have these issues fixed, how difficult this would be for a novice to carry out these replacements? Alternatively, what would you expect a garage to charge to do this work?
 
This is a complete no-brainer. Get the belts done before they snap. Its not worth the inconvenience of a broken belt, and if you are unlucky one of them drives the water pump so you could end up killing your engine in the process..​
Garage would probably charge an hours labour + belts to do both. So looking at say £40-60 inc parts.​
 
Well, after 17 years, our K11 Micra has just passed another MOT, and is fit to drive on the roads for another year :)

The certificate does however give an advisory notice that the alternator and power steering belts are worn.

Are they essential, or can I wait for them to 'go', and then worry about the repairs? (I expect the alternator belt failing would result in a flat battery, but what about the power steering? Heavier steering or worse?)

As I'd prefer to have these issues fixed, how difficult this would be for a novice to carry out these replacements? Alternatively, what would you expect a garage to charge to do this work?

Do it yourself mate, only a single bolt on the tensioner for the power steering and loosen the alternator OR tensioner for that (depending if you have A/C or an idler) slip old ones off, new ones on, tense up and go :)
 
Thanks for the replies.

Are the two belts specific to the car, and something I need to order from Nissan, or are they more generic (i.e. should Hellfrauds or even a local auto-shop stock them).

Gonna get me a Haynes Manual and do it myself :)
 
Should this be a single belt or two separate belts?

I just spoke to a local motorfactors, and they seemed to think the alternator belt was responsible for the power steering too.

Does anyone have a haynes or service manual they could look it up in?

The car is a (1996 N Reg) 1.3 GX with no Air Con, if it makes a difference.

There are two belts, one from the crank pulley to the alternator and back, and another belt from crank pulley, water pump and Power steering pump.

If your looking to replace both you need two
 
Ok, so I failed at the first attempt (in fact I didn't even start).

The Haynes manual suggests before starting, I need to jack up the car, put it on axle stands, remove the wheel, remove the plastic behind the wheel, and do the job that way.

Nothing I have read elsewhere suggests this (unless everyone just assumes the person doing it would know to do this), though if I do it with the wheel in place, access to everything looks to be a bit cramped. i.e. how on earth do you loosen the bottom alternator bolt. without doing this.

I'm concerned I'll get the belts off, but not be able to get them back on. Especially when removing the water pump/power steering belt.

Am I going to have to get some axle stands to do the job, or give up and take the newly purchased belts to a mechanic with my head down in shame!! :oops:
 
There is a tensioner bolt which you have to access from underneath the vehicle. The alternator one can be accessed in engine bay.
 
1. apply handbrake and loosen the front right wheel nuts

2. jack up the front and support the chassis on axle stands via the sills or via the box-chassis rail running under the floorpan, preferably supported on left & right sides to stop twisting the chassis. never get under a car without proper support cos jacks will fail or slip off.

3. remove front right wheel

4. if fitted, remove the front right undertray (to access under the alternator) and the right wheelarch splash guard (to access the auxilary belt tensioner and hook the belts over over the crank pulley)

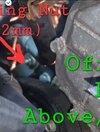
5. from under the alternator loosen the 2 bolts on both sides of where the alternator meets the lower mount so its unlocked and can pivot freely

DSC07970.JPG


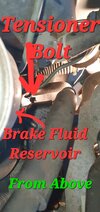
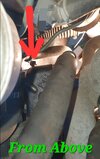
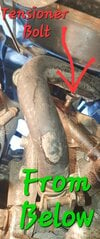
6. from above the alternator, loosen the 14mm upper bolt (#1) that secures it to the upper tensioner mount, then unscrew the 12mm tensioner shaft (#2) to allow the alternator body to pivot back and relieve tension off the belt until its slack and the alternator can't move back any further

alt.jpg


7. while holding the alternator back, unhook the belt off the pulley and drop it down

8. in the wheelarch, unhook the alternator belt off the crank pulley

9. now with the first outer alternator belt off, we can take the inner auxilary belt off.

10. loosen the auxilary tensioners axle nut (#1) to unlock and allow the pulley to slide up/down the mount

DSC08517.JPG


11. screw the 12mm tensioner shaft (#2) clockwise to pull the tensioner pulley down away from the belt and relieving tension.

DSC06391.JPG


12. unhook the auxilary belt off the tensioner, PAS, waterpump and over the crank pulley.

13. fit the new belt over the crank, waterpump, PAS and then onto the tensioner pulley (make sure the belts are on the pulley grooves fully)

14. unscrew the auxilary belt tensioner counter-clock to push the pulley up against the belt to apply tension until you can only deflect the long side of the belt by few mm (between the waterpump and crank)

15. tighten the tensioner pulley axle nut to lock its position

16. now hook the new alternator belt over the crank pulley and upto the alternator pulley

17. screw the 12mm alternator tensioner shaft clockwise to pull the alternator outwards to apply tension until you can only deflect the belt by few mm

18. tighten the 14mm upper bolt to lock its position

19. tighten the 2 lower bolts to lock its position

20. refit the splash guard and undertray if you want

21. refit the wheel & nuts

22. lower onto ground

23. tighten the wheel nuts to 108Nm
 
Last edited:
Wow! Thanks for that :)

I certainly feel confident enough to do the job now (once the car's securely on the axle stands!). Which leads me to my next question.

I've now realised I'll need a trolley jack and axles stands to do the job safely (not a problem, as it will only amount to what the labour charge would have been anyway - and they'll come in handy in the future).

Can I confirm that it's both the left and right side of the front of the car that the axles stands go on (and not both on the side where I'm removing the wheel)?
Also, do I need the axle stand adapters mentioned in the Haynes manual (I'm planning on using the jack points on the side sills - as I definitely know where they are) rather than anywhere else.

In terms of safety/best practice, is it just a case of:
  1. handbrake on, in gear, bricks behind back wheels,
  2. jack up from front (front centre, under bonnet/bumper, as per Haynes manual),
  3. insert axle stands under the jack points on the sills (EDIT: The set I'm looking at has flat not v-shaped axle stands - is this ok???),
  4. release jack/ lower car onto stands,
  5. (at this point is it wise to shove/shake/rock the car to ensure it's stable???)
  6. remove wheel and put that under skirt as backup
  7. start job as described above?
 
imo I'd try to avoid jacking up from:
-middle of the front crossmember (cos they're not that strong and could buckle and affect the radiator & bonnet position plus the likelihood of rust further weakens it),
-sills (especially the rear end cos sunroof water drains down the A-pillar into the sills towards the back and can't escape so it rusts inside out and weakening the sill jacking points)

scissor jacks are limited to use on sills (which could be weakened by rust)

trolley jacks are faster and more stable and can locate under more robust points of the chassis.

When jacking up the front or sides, I prefer to place the trolley jack under the lower wishbone rear rubber mount, jack it up, then position and lower onto an axle stand on the chassis box-rail that runs just behind the mount (careful that the V-shape of the stand runs along with the chassis rail or it'll dig n ruin ur chassis). one axle stand per side.
 
one more i found when heaving and man handling? the car when on axle stands = DONT DO IT the car nearly fell on me :) (k11 hug)
 
imo I'd try to avoid jacking up from:
-middle of the front crossmember (cos they're not that strong and could buckle and affect the radiator & bonnet position plus the likelihood of rust further weakens it),
-sills (especially the rear end cos sunroof water drains down the A-pillar into the sills towards the back and can't escape so it rusts inside out and weakening the sill jacking points)

scissor jacks are limited to use on sills (which could be weakened by rust)

trolley jacks are faster and more stable and can locate under more robust points of the chassis.

When jacking up the front or sides, I prefer to place the trolley jack under the lower wishbone rear rubber mount, jack it up, then position and lower onto an axle stand on the chassis box-rail that runs just behind the mount (careful that the V-shape of the stand runs along with the chassis rail or it'll dig n ruin ur chassis). one axle stand per side.

This is where I get confused. I know where the sills are (;) ), but have no idea as to where the "lower wishbone rear rubber mount" is, or the "chassis box-rail". Can you offer any more description on positioning, or does anyone have any pics?

Also, is it going to be the two front wheels I'll be jacking up, or the two side wheels (on the side that I'm working on)?

I'm fairly confident I can do the job now, but am just terrified in case I jack it (or place the axle stands) under a part that can't take the weight, and break something (or me), if the car falls off!

I'm planning to pick up axle stands (definitely) and most probably a trolley jack too?
 
I position my trolley jack under the wishbone rear mount here arrowed red.

DSC06115.JPG


note some trolley jack heads can swivel, I turn mine till the grooves align with the cylindrical shape of the rear mount bracket.

then i lower the car on the stands as shown

k550i (603).JPG


preferably only jack up one end of the car at a time,
with the other end touching ground,
handbrake on and in-gear,
preferably wheel-choked (especially front wheels cos an open-diff, even in-gear won't prevent the car swivelling to one side n falling off the stands [found out the hard way at one point]),
the floor is flat n solid,
the axle stand pegs are fully inserted with the lock-clip inserted.

also check the edge of the LH stand doesn't clip the bolt on the inner side of the chassis rail that holds the fuel/brake line support bracket as shown here. place it abit ahead or behind that bolt so it doesn't snap off

C725UZ (141).JPG
 
Last edited:
ive just got two new belts from shop are they both the shame length but ones wider?

That sounds about right if you have no air con. My alernator is top mounted because I had air con.
The 4 rib belt is 725 mm as standard, I fitted a 728 mm one as that's what they had in stock. and my 6 rib belt ended up being an 818 mm one with the air con compressor removed.
 
The shop gave me gates 4PK725 alt belt but when I check up online it says the belt is for a dacia and that I need 4PK728.

Am I right in thinking the last three numbers 728 on part is length?
 
Loosen power-steering pulley nut from the top, loosen the two lower power-steering mounting bolts at the hinge point underneath, then slacken off the adjuster, again from underneath, remove old belt, fit new belt, tension belt, tighten bolts and pulley nut. Your alternator belt will be similar.

ETA I see Polly has edited his posts to ad the details too.
 
Thanks pollyp for the info above. Ive just done my belts on a 2002 face-lift k11, 1.0L with power steering, no air con. CG10DE engine. The water/PAS belt that was on was a Nissan part no. 11950-1F700 which is Gates' 6PK725, but i struggled for hours trying to get it on, wish id bought a 728mm long belt for sure. The alternator belt was correct fit, nissan 11700-1F700 (gates' 6PK678) this was easy to do from above, i only loosened the locking nut and top mounting bolt. The new belt went on easily after id got the H²O/PAS belt on. The bolts to release the PAS/ water pump tensioner were slightly different than in pollyp's photos, both 12mm and shown in photos. I had to get underneath to reach the tensioner bolt, i could just get my hand up and reach the 12mm nut with a socket on a short extension to reach over a rubber pipe thats up near it. The locking nut I could get to from above with a small socket, but long reach 12mm in line ratchet spanner is the way to go if you have such a thing, i didnt. I could see the locking nut looking over the offside wing sideways into the engine. Its under the PAS reservoir tank. But its next to the pulley not in the centre as in pollyp's picture above. (SEE POST/PHOTOS OF PULLEY BY CMF-FRANK2 https://micra.org.uk/threads/removing-water-pump-drive-belt.78183/post-830785 ). Hope this helps someone else. The hardest thing is seeing which nuts to undoo apart from having to lever the 6PK725mm belt on. I deffinately recommend a 728mm, it would've saved me a lot of hassle, swearing and hard graft. Maybe even 730mm. Thankfully it wont need doing again for a long time, the belt that was on looked like the original nissan put on and was starting to crack along the inside, but i dont know the service history. That car has done 75k miles!
 

Attachments

  • 20240114_183541.jpg
    20240114_183541.jpg
    2 MB · Views: 28
  • Screenshot_20240115_085201_Gallery.jpg
    Screenshot_20240115_085201_Gallery.jpg
    817.9 KB · Views: 32
  • 20240114_182006.jpg
    20240114_182006.jpg
    1.8 MB · Views: 37
  • Screenshot_20240114_181951_Photo Editor.jpg
    Screenshot_20240114_181951_Photo Editor.jpg
    596.3 KB · Views: 22
  • 20240114_183019.jpg
    20240114_183019.jpg
    1.5 MB · Views: 28
  • 1705311928943.jpeg
    1705311928943.jpeg
    628 KB · Views: 23
Last edited:
Back
Top