• Please only use these forums for blogs, they are not a discussion forum

Project SR

A few months ago I decided I needed a new project since my 1997 FHK11 1.3i March Cabriolet is now in near mint condition and my 2002 (Nov) 1.4SE+ is only needing minor paint work touch ups! Earlier in the year I was offered a 1996 Gold 1.3i SR with disc brakes all round, ABS the engine and running gear was good but the bodywork needed attention, owner was asking £800 so I rejected it! A few weeks ago I had a phone call from a guy who had bought it but wanted to sell it asap because he was going to university so knowing the car I put in a very cheeky offer of £120 and he accepted it! B-)
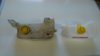
The first task was a engine service including new oil, oil filter, magnetic sump bolt and new air filter, spark plugs and broken coolant expansion reservoir bottle and clean the engine bay. Pics of the first time I saw the SR in May 20015.
1475395492824.jpg
1475395557659.jpg
1475395592279.jpg

At present parked up at my workshop.
1475395902141.jpg
1475395938479.jpg
1475395973884.jpg
1475396024859.jpg

The work begins starting with the engine and engine bay!
1475396153437.jpg
1475396181796.jpg

Treated and repainted the battery tray!
1475396297042.jpg

1475396495786.jpg

1475396548773.jpg

Next task was to sort out the rust in the passager side roof gutter!
1475396696462.jpg
1475396743708.jpg
1475396794067.jpg
1475396847209.jpg

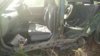
The poor donor car I removed parts and bodywork from R.I.P.! :-(
1475397116710.jpg
1475397141890.jpg
1475397193500.jpg
1475397206092.jpg

Prepping the part (still needs trimming)my mate will weld on the SR!
1475397322022.jpg
1475397338862.jpg

The corrosion on the rear roof boot gutter! :-(
1475397463866.jpg
1475397498030.jpg
1475397526471.jpg

Starting to prep the corrosion for treatment before welding.
1475397622787.jpg
1475397636245.jpg

Trial fit of panal (still needs trimming).
1475397814794.jpg
1475397852071.jpg

To be continued! :-S
Cheers
Andy B-)
 

Attachments

  • 1475396426994.jpg
    1475396426994.jpg
    22.4 KB · Views: 214
Yesterday I removed the roof liner to expose the underneath of the roof to prep to treat any corrosion. Also exposed the 4 sunroof drainage hoses terrible design fault! :-(
Front drainage pipes going into the A pillars feeding water into the sills! :-(
1475398319559.jpg
1475398359728.jpg

Rear drainage hoses!
1475398507174.jpg
1475398534326.jpg
1475398556967.jpg

After removing the roof liner and trims I decided to clean them! B-)
1475398667925.jpg

Removed the steering wheel airbag to check the horn switch.
1475398753940.jpg
1475398768335.jpg
1475398783517.jpg

The to do list includes:
Complete refurbishment of the brake system including caliper strip down, new piston seals, nipples, pads, discs and hoses. New front struts and maybe fit a Almera N15 airbox with a Pipercross performance air filter!

Cheers
Andy B-)
 
Hi Andy,
Fantastic effort to restore your SR, looks like you have quite a bit of work ahead of you, but as you say, your other cars are pretty much sorted now, and well us chaps must have our "projects" .
I'm happy taking on most mechanical jobs on my cars, like engine/gearbox/brakes/running gear ect. Electrics not so much although I do dabble, body work would be my weakest area so props to you for tackling your SR's problem areas.
What are your plans for the finish, as I would imagine colour matching on an old metallic would be nigh on impossible ( I had a silver car once that I had panels re sprayed and in some light it didn't look too bad but in others ( like sodium street lights ) it REALLY stood out like a patch work quilt.
Certainly a good idea to clean the headlining while it is out just in case any previous owners where filthy tobacco addicts. I notice that there are in fact four drain tubes for the sunroof but when yourself ( and pollyp )did your external drain mods you only did the driver side. Also, how does the sunroof actuator handle come off, as there are no visible screws or clips. Do you just prize it away carefully ( I'm concerned I might break mine as if I did I'd never be able to get a replacement ) ?
Anyway, keep up the good work, and I look forward to your next instalment, wish we lived a bit closer I'd love to drop round and give you a hand.
Steve
 
Hi Steve I actually only discovered there was passager side sunroof drainage hoses a few weeks ago! :-S The sunroof handle is attached by a screw underneath the black plastic which in turn is only held by 4 little plastic tabs so you can easily remove it by carefully prising it with a small screw driver see pics, also the grey plastic surround is only held by small tabs!
1475502364582.jpg
1475502376905.jpg

The SR project only happened by chance due to it only costing me £125 and I have always wanted to tinker with a Micra with all round disc brakes and also the SR is quite rare. The amount of work needed to get her up to scratch doesn't matter because it's a long term project the important priority is to arrest and prevent further corrosion then I will move onto the brake system and front struts so a respray is my last priority at the moment! B-)
 
Thanks Andy, they say a picture pains a thousand words, I can attempt to remove my headlining without going in completely blind now.
Not sure if you are on the Nissan Micra UK Facebook page but someone tagged you because a guy on there is parting out a gold SR, might be some parts there you need ?
 
I couldn't find a way to share the link Andy so I added you to the page ( it's a closed group ) once you get admin approval you should be able to find the post on the page
 
Today I started to trim the replacement rear roof boot gutter. At the weekend I will be extending the sunroof A pillar drainage hoses outside of the side sills! B-)
 
Good luck with the roof panel! Putting arches on the rear quarter panel can cause a bit of warping, I imagine the roof will be a challenge. Maybe you could tap the weld down a little and get a smooth finish with body filler?
 
I presume you have checked already Andy, but I know the doors on preface lifts at least (Maybe facelifts) But they tend to rot I the front bottom corner where I live, I've only worked on 4 Pre faces but all had that problem, where as all the facelifts I've done have been fine for it
 
I presume you have checked already Andy, but I know the doors on preface lifts at least (Maybe facelifts) But they tend to rot I the front bottom corner where I live, I've only worked on 4 Pre faces but all had that problem, where as all the facelifts I've done have been fine for it

Hi mate yes I have a bit of corrosion on the inside front corners of both doors. I have wet and dried as much corrosion and treated with Hammerite Kurust and coated everything inside and out with Autotek zinc primer then I will repair with P40 and P38. Like you I have never encountered this corrosion problem on 1st or 2nd facelift models! :-S
1475941469919.jpg
 
Today I prepared the drivers side rear side sill for repair. First I used a wire wheel attached to my cordless drill to remove surface rust, vacuumed inside of sill then applied Hammerite Kurust inside and out then sprayed Autotek zinc primer inside and out! Tomorrow I will pressure spray Waxoyle inside the sill and then apply alloy mesh with P40 and then finish off with P38! B-)
1475942469868.jpg
1475942483170.jpg
 
Today I prepared the drivers side rear side sill for repair. First I used a wire wheel attached to my cordless drill to remove surface rust, vacuumed inside of sill then applied Hammerite Kurust inside and out then sprayed Autotek zinc primer inside and out! Tomorrow I will pressure spray Waxoyle inside the sill and then apply alloy mesh with P40 and then finish off with P38! B-) View attachment 51621View attachment 51622
You are seriously repairing a sill with filler?!!! Surely it is a structural box section and should have a welded repair?:eek:
 
Last edited:
I would weld too, do your mot centers put the car up on sill jacks for inspection? Body filler will probably give way under the weight of the car. I know patches aren't pretty, but the car will be strong and safer
 
You are seriously repairing a sill with filler?!!! Surely it is a structural box section and should have a welded repair?:eek:

Have done a full survey of the box and sill section with my fibre optic camera and the supporting sub frame, fixing points including internal skin are sound so the structure and integrity of the vehicle is not compromised! B-)
 
Have done a full survey of the box and sill section with my fibre optic camera and the supporting sub frame, fixing points including internal skin are sound so the structure and integrity of the vehicle is not compromised! B-)
But it's a welded box section, which gets its strength through being a complete steel box.
 
The sill has also been examined and deemed structurally sound by a friend who is a mechanical engineer and a qualified welder! :)
 
The sill has also been examined and deemed structurally sound by a friend who is a mechanical engineer and a qualified welder! :)
Well as he's a qualified welder, instead of farting about with filler, get him to weld some steel patches over the holes, if Nissan thought that aluminium mesh and body filler was strong enough they would surely not bothered to make the sills out of an enclosed steel box section. (I speak as a mechanical design engineer having worked for many years in the automotive fastener industry.)
 
Tbf, I would weld it too, if done properly you wont be able to notice it, my white one had been welded on the n/s/r sill, was all done perfectly and all smoothed off on the outer sill, only reason I noticed it was because of the inner sill part.
 
I have spoken to my friend this morning and he said he is quite willing to weld plates onto the sills thank you for your suggestions and input! B-)
 
I would weld too, do your mot centers put the car up on sill jacks for inspection? Body filler will probably give way under the weight of the car. I know patches aren't pretty, but the car will be strong and safer

We do not have mot's in the Channel Islands! :-S
 
Today I visited my poor donor car to remove a side sill section which was in mint condition and rocker cover! B-)
 

Attachments

  • 1476023687641.jpg
    1476023687641.jpg
    64.8 KB · Views: 246
  • 1476023742260.jpg
    1476023742260.jpg
    64.8 KB · Views: 246
No mot's here in South Australia { which is nice } though no real rust to speak of either. Though if you get pulled by the cops and get your car defected you have to get it fixed then checked out before the defect is lifted and that process can be difficult, so many things here are deemed illegal, coilovers, open air filters, wheels a certain size bigger than stock, strut braces, aftermarket steering wheels and gear knobs that don't have the gate and gear numbers on them, i kid you not ! { and probably lots of other things i'm not aware of too } young guys { which thankfully i;m not one } in souped up cars get picked on mercilessly by the cops { excellent source of quotas and revenue } a good reason i never go to car meets.
As for your sills Andy, yeah, best to replace rather than bog i think, especially considering the high level of refurb you are putting into your SR.

Once the sills and doors are done will get onto my speciality the complete refurbishment of the all-round disc brake system! B-)
 
The brakes on my Super S have always felt lacking compared to those on my LX so I while ago I put Goodridge braided lines all round with fresh fluid which has improved things somewhat.
A few weeks ago I got some AD22V front callipers off a Pulsar SSS at the local wreckers and I am going to have them professionally stripped cleaned and refurbished then get some drilled slotted and vented discs to go with another set of Goodrige lines I've just bought that I will put on my LX, they will probably have to scrape me off the inside of the windscreen after that little lot !
I didn't know you can get braided lines for cars, I recently fit 4 new flexie hoses and it was Great to finally have confidence braking:) I use braided hoses on the "88 zx as 1 of my concessions to upgrading from stock original
 
Last edited:
Have a bit of a dilemma once the sills are repaired what colour do I spray them? I will never match the original gold till the whole car is resprayed at a later date so should I spray them a different colour perhaps black?? :-S
 
Have a bit of a dilemma once the sills are repaired what colour do I spray them? I will never match the original gold till the whole car is resprayed at a later date so should I spray them a different colour perhaps black?? :-S
I went with etch primer, hammerite stone chip in black and 3/4 light coats of clear lacquer which seems to have give a good hard shell finish. but I have the black arches and bumpers on too so it all evens itself out, I think :)
 
At the weekend my mate welded in the sill patch I removed from my donor car. I applied a coat of zinc primer and I have applied P38 filler many times to achieve an acceptable finish. I then applied a primer and will apply several coats of paint to the entire sill! I will now tackle the other sill which only needs a small sill patch! B-)
1476809197978.jpg
 
Last edited:
At the weekend ny mate welded in the sill patch I removed from my donor car. I applied a coat of zinc primer and I have applied P38 filler many times to achieve an acceptable finish. I then applied a primer and will apply several coats of paint to the entire sill! I will now tackle the other sill which only needs a small sill patch! B-) View attachment 51822
nice work! looks original :)
 
Yesterday I applied another coat of paint to the entire nearside sill and also finished filling and zinc primed the welded patch on the drivers side! B-)
1477205358101.jpg
1477205374825.jpg
 
My mate welded pieces of sill from my donor car. Worked perfect having the same profile/shape only difference was the donor car's sill was made of thicker metal due to being a 1st facelift! B-)
1477248258870.jpg
 
Applied a 5th gold coat of paint to the nearside sill and also applied a 2nd coat to the drivers side sill it's getting there! I will apply a few more coats of paint to the drivers side sill and then it will be time to apply the clear lacquer coat! B-)
1477499752084.jpg
1477499767567.jpg
1477499788485.jpg
 
Over the weekend I removed the passager side door and removed and treated the corrosion on the front and rear inside corners also zinc coated the inside of the door, drivers door next! B-)
1477920057752.jpg
1477920086397.jpg
1477920136000.jpg
1477920145925.jpg
 
Last edited:
Started the refurbishment of the SR fog lights. Carefully removed the glass lens from the body and removed the existing mastic/sealant which was starting to fail and cleaned the inside of the lense and reflector. I will reseal the lens back to the body with a high quality marine grade sealant! B-)
1477941098569.jpg
 
This weekend I decided to do a detailed inspection of the cross member and front end. First I removed the front wheels and the the wheel arch liners, then the front grill to access the drivers side headlight to remove it. Once the headlight was removed I could access the windscreen wash reservoir bottle to remove it and access the leg end that connects the chassis to the bumper! I then removed the centre T Bar support and the 2 brackets holding the oil cooler pipe? The cross member had been replaced and was in mint condition but I applied Hammerite Kurust to some spots of surface corrosion and then applied several coats of stone chip paint! I then cleaned the front bumper and removed the rusty length ends which need replacing!
1479076874241.jpg
1479076892609.jpg
1479076927597.jpg
1479076950925.jpg
1479076969842.jpg
1479076996187.jpg
1479077010464.jpg
 
Back
Top