Just installed a pollen filter on my wife's Micra. Take's 10 mins max.
Tools: Stanley knife, Philips screw driver, string/ zip tie(s) some decent hand / wrist strength.
Step 1.
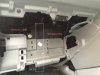
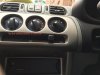
Remove Glove box. Lay in the foot well and look up with a torch.
On each side you will locate a plastic 10mm latch pin. rotate the pin and using some pliers slowly with force edge the pin out. Get out of the foot well and simply pull the glove box out by opening then twisting as you pull up.

Step 2: Cut down the left side along the perforated holes/moulding The plastic is soft enough to cut through with some steady and slow pressure. You have to cut through here unless you want to remove the complete dash moulding ( 2 hrs worth of work i assume)
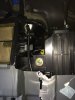
Step 3: Turn the air flow switch to external.
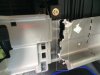
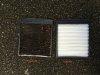
Step 4: Unscrew the filter cover, it should slide down and out easily.
Step 5: Pry open the back panel to the right enough to keep it held with your elbow, adjust the airflow cable with your left hand and pull the filter out with your right ( this worked for me). Repeat in reverse to replace the new filter
.
Step 6. you can either screw a plate into the back panel to hold it together or use some string or zip ties to hold and anchor the panel .
Step 7: put everything back together and you are done (don't forget the plastic latch pins) i found it easiest to insert the glove box and have the clip latch hold it in place while inserting the pins.
Voila.
Tools: Stanley knife, Philips screw driver, string/ zip tie(s) some decent hand / wrist strength.
Step 1.
Remove Glove box. Lay in the foot well and look up with a torch.
On each side you will locate a plastic 10mm latch pin. rotate the pin and using some pliers slowly with force edge the pin out. Get out of the foot well and simply pull the glove box out by opening then twisting as you pull up.

Step 2: Cut down the left side along the perforated holes/moulding The plastic is soft enough to cut through with some steady and slow pressure. You have to cut through here unless you want to remove the complete dash moulding ( 2 hrs worth of work i assume)

Step 3: Turn the air flow switch to external.

Step 4: Unscrew the filter cover, it should slide down and out easily.
Step 5: Pry open the back panel to the right enough to keep it held with your elbow, adjust the airflow cable with your left hand and pull the filter out with your right ( this worked for me). Repeat in reverse to replace the new filter


Step 6. you can either screw a plate into the back panel to hold it together or use some string or zip ties to hold and anchor the panel .
Step 7: put everything back together and you are done (don't forget the plastic latch pins) i found it easiest to insert the glove box and have the clip latch hold it in place while inserting the pins.
Voila.
Attachments

Last edited: