-
Please only use these forums for blogs, they are not a discussion forum
You are using an out of date browser. It may not display this or other websites correctly.
You should upgrade or use an alternative browser.
You should upgrade or use an alternative browser.
My facelift K11
- Thread starter euro_micra
- Start date
I've only read the figures, I have no idea if it's huge or not as it's the only 'box I've used.
Here's a quick graph I've put together showing the speed you can achieve at 8krpm for each of the gearboxes:

Full data can be found below on a spreadsheet(if my upload works, damn PDFs):
mate, your a star. but maybe higher speed are partly due to a power increase eh?
.Also do you know of any more information any where?? sorry to change the subject away from your motor lol.
OP
OP
euro_micra
Matt :)
How have I only just seen this? This fitment is perfect.
It rolled over onto page 4 in the blog section, far too busy with other things, so not much happens. It's not bad eh, would like a little more tyre though. Next time.
mate, your a star. but maybe higher speed are partly due to a power increase eh?
Also do you know of any more information any where?? sorry to change the subject away from your motor lol.
erm.. nah, if I put the 1.3 box on my 1.0 litre I'd achieve the same rpm-to-speed as the 1.3 litre? But the max speed in any gear would be limited due to engine performance, that goes for the 1.3 too. I'm not the one to talk to about gearboxes though!
I got most of my info from Haynes, K11wiki and MSC
OP
OP
euro_micra
Matt :)
The negative camber was killing the front tyres. So I've put the stock steels on the front for now, running some tuck-poke. And I'll have to adjust the camber next week when I have some spare time.

I got punished with a £25 parking fine for overstaying a few minutes:

Bent the bumper and put a hole in the exhaust after going over a couple of oversized speedbumps. I remember the council paying twice as much as what they cost to lay down, to remove the top 2" off them, but I think they missed this street!
Insurance time. Bloody expensive, but kind of got a good deal I guess for three people on it, including current mods and a turbo.
So yeah, time to put the turbo on finally. Not expecting much with it on the 1.0, but the 1.3 will go in when uni is done and dusted.
Still have a few things to sort out with the turbo build. Such as the exhaust, as I'm not covered for a performance exhaust. And fuel adjustment, the tricky bit.
Hopefully the next update will be better:
New tyres.
New wheels.
New exhaust.
More civilised ride height.
Micra badges back on.
OP
OP
euro_micra
Matt :)
New wheels courtesy of Frank. Thanks again mate
It was inevitable that I would go banded at some point, but these are a little different from the usual. Got some cheap almost-new partworn Falken 165/65/13 put on, thanks for sticking at it Frank They're same diametre as stock, so I've lost the super quick launches from the 165/55/13, but acceleration at speed is better.
13x6.5, front ET3, rear ET-3 (give or take)
Sprayed some nuts with chrome paint to match the locking nuts.
And fitted them. Only got some quick pics as of yet.
Car now sits a little higher due to the tyres, I can now get a jack under without any problem. The rears scrub a little on heavy cornering, will raise it up a little. And could do with reducing the front camber and getting it aligned, the tyres that came off the front were shagged but the rears were great.
Nice and subtle I think
tempted to play with the nissan hub caps
It was inevitable that I would go banded at some point, but these are a little different from the usual. Got some cheap almost-new partworn Falken 165/65/13 put on, thanks for sticking at it Frank
They're same diametre as stock, so I've lost the super quick launches from the 165/55/13, but acceleration at speed is better.
13x6.5, front ET3, rear ET-3 (give or take)
Sprayed some nuts with chrome paint to match the locking nuts.

And fitted them. Only got some quick pics as of yet.


Car now sits a little higher due to the tyres, I can now get a jack under without any problem. The rears scrub a little on heavy cornering, will raise it up a little. And could do with reducing the front camber and getting it aligned, the tyres that came off the front were shagged but the rears were great.
Nice and subtle I think
tempted to play with the nissan hub caps
Dougyledds
Woopa Pandastyle!
nice mate! thats how im gonna do mine with some white nissan hubcaps!
Cool.
OP
OP
euro_micra
Matt :)
Thank you guys, I'll have to get some better pics up.
Cosmetic wise I think I'm done for now, looks a little abused which I actually like too, just going to be focusing on engine and performance from now on.
Cosmetic wise I think I'm done for now, looks a little abused which I actually like too, just going to be focusing on engine and performance from now on.
OP
OP
euro_micra
Matt :)
Got a pic today:
Only problem is the rear tyres scrub on the top of the arch on hard cornering or bumps. Could do with raising about 20mm.
Swapped the cut and ever-so-slightly uncaptive rear springs for Matiz rear springs.
Raised it a fair bit, would prefer it a little lower so I'll have to cut some more springs

Only problem is the rear tyres scrub on the top of the arch on hard cornering or bumps. Could do with raising about 20mm.
Swapped the cut and ever-so-slightly uncaptive rear springs for Matiz rear springs.


Raised it a fair bit, would prefer it a little lower so I'll have to cut some more springs
OP
OP
euro_micra
Matt :)
Repaired the hole in my exhaust today. The scrapping over speedbumps had worn through it, silly me.
Used exhaust putty to plug the cracks, wrapped with exhaust bandage, then exhaust heatwrap.
Quick fix, I wonder if that's going to pass the mot
While under the car though I spotted this:
the offside wishbone mount. It doesn't look good does it, looks like its had the join stretched out
still solid but may be putting the tyre out of alignment hence the uneven wear on that tyre.
and the n/s brake hose:
Only happened recently, but how, it doesn't touch anything?!
I dunno where to start that's two big replacement jobs.
Used exhaust putty to plug the cracks, wrapped with exhaust bandage, then exhaust heatwrap.


Quick fix, I wonder if that's going to pass the mot
While under the car though I spotted this:

the offside wishbone mount. It doesn't look good does it, looks like its had the join stretched out
still solid but may be putting the tyre out of alignment hence the uneven wear on that tyre.
and the n/s brake hose:
 Only happened recently, but how, it doesn't touch anything?!
I dunno where to start
that's two big replacement jobs.Whoo! Scarry!
Drive shaft on lock with suspension compression?
Drive shaft on lock with suspension compression?
Dougyledds
Woopa Pandastyle!
Someone has been under there with a black marker pen mate!
OP
OP
euro_micra
Matt :)
Whoo! Scarry!
Drive shaft on lock with suspension compression?
Something like that, you can see where its touched the cv boot. The drivers side brake hose is completely fine though. I guess it could be from roundabouts.
Will have to tie them further up the strut leg, obviously the chassis is lower which makes that side of the hose droop more than stock, which I didn't account for.
I can't find a replacement part with next day delivery without spending silly money, guess I'll settle with a fail and get some suprisingly similar priced stainless steel braided hoses fitted next week.
OP
OP
euro_micra
Matt :)
Someone has been under there with a black marker pen mate!
what do you mean? lol
Dougyledds
Woopa Pandastyle!
Drawing on your brake hose! lol no idea how its touched anything haha
OP
OP
euro_micra
Matt :)
got to fix the break line where the originals was,,,,,,,,,,,,,,,,,exactly where it was hook up
It's as close as you can get it with cable ties I believe and it's not that far off it either tbh. I didn't want to use cable ties, but no other purpose built clips would hold it at the angle it needs to be at. I guess welding the original bracket on to the coilovers may have been better
Had another inspection today, I can only assume that the bottom of the strut leg had snagged it and pressed it up against the gaitor, possibly while dropping the car after jacking it up at some point.
Shopped around and got a new Bosch one ordered relatively cheap, should arive early next week. Replacing it doesn't appear to be as big of a job as I had thought, so I should be alright there. Will see if I can jubile-clip a better hose-clip higher up the leg, don't want it to happen again!
OP
OP
euro_micra
Matt :)
Another day of maintenance.
Had yet another look at that brake hose, it definately had been trapped between the strut and cv boot at some point. Painted over the chaffed bit with rubber underseal just incase it was to rub again before I could replace it, not that I'm planning on driving it!
Found some adjustable hose clips with attached cable ties on a spare engine loom that worked well at holding the brake hose securely to the strut, and about an inch higher than before.
Also raised the front suspension again, about 2" higher than last month, it looks tall now
Wishbone now sits about horizontal
Front's still lower than the rear, will bring the rear down a little.
May remove those helper springs, they're doing nothing but firming the suspension up now, and it was allready quite hard.
Had yet another look at that brake hose, it definately had been trapped between the strut and cv boot at some point. Painted over the chaffed bit with rubber underseal just incase it was to rub again before I could replace it, not that I'm planning on driving it!
Found some adjustable hose clips with attached cable ties on a spare engine loom that worked well at holding the brake hose securely to the strut, and about an inch higher than before.

Also raised the front suspension again, about 2" higher than last month, it looks tall now

Wishbone now sits about horizontal

Front's still lower than the rear, will bring the rear down a little.


May remove those helper springs, they're doing nothing but firming the suspension up now, and it was allready quite hard.
OP
OP
euro_micra
Matt :)
Failed MOT. I was expecting it though.
Reasons:
01. Front Anti-roll bar missing.
(Remove it a while ago, I guess if it's there as standard it needs one.)
02. Offside front Suspension arm damaged and seriously weakened.
(Ah, that one's a bugger.)
03. Nearside Headlamp aim too low.
(Hasn't moved since last time.)
04. Offside Headlamp aim too low.
(Hasn't moved since last time.)
05. Nearside front Brake hose excessively chafed.
(New one came today, while I was at the mot station.)
Got given prices for replacement parts:
Front ARB £11 (cheap, but I've got one in garage)
O/S wishbone £40 (they admitted that was expensive and was told to source one myself)
N/S brake hose £15 (I paid £15, should be able to fit it myself tomorrow)
It could have been a lot worse I guess. No rust to deal with yet. Although I've spent the last of my money on the MOT test itself, looks like there's going to be a few things going up for sale this week.
OP
OP
euro_micra
Matt :)
did you leave the ARB brackets on the car?? cant see how its a fail if its completely removed, if parts of it are still there then fair enough, but if nothing remains they can not fait it for that
Removed everything relating to it, brackets, mounts, bushes, bolts etc. Only way you would know there was one would be from the bolt holes. Mentioned that some Micras don't come with them so I thought it would be fine, they said if it came as part of the suspension it needs to be there.
OP
OP
euro_micra
Matt :)
The brake hose still hasn't turned up, been a over a week now. Ordered it from micksgarage.co.uk, but turns out the items are based in Ireland with micksgarage.ie, and in thier T&C thier 2-day delivery doesn't apply to UK orders so it could take a couple of weeks Why do they have a separate UK website, with prices in GB£, advertising 2day shipping on all orders then?
Ordered a new brakehose from livingstonautoparts.co.uk with 48hour delivery, fingers crossed the brakehose is actually in the UK to start with.
Finally started work on the fuel rail. It's from a cga3, with the later-style top-feed SR20 292cc injectors. Plugged into the rail with the SR retainers with no problem, fitting the cg intake mani needs a little work, 15mm collars are needed I believe.
Removed the cga fpr. Ideally this would need to flow much more to lower the pressure while off boost(which I estimate would kick-in around 3000rpm), I think filing, or removing the gold nipple would allow for this.
The plan is then to fit a fmu, but they're not exactly adjustable so it's a bit hit or miss regarding the ratio, and possibly an adjustable fpr to allow for some scope, I guess it's like franks custom vacuume advance rrfpr but just independent and in a series.
Got the front arb out, painted over the quite heavily scratched parts, will reinstall soon, will be interesting to see what it's like again. I thought it was better without when I removed it, improved grip in corners, especially over bumpy ground and less understeer in the wet. And now I'm being made to put it back on!
Wishbone should hopefully be getting welded back into place by frank.
And I'm currently searching for guides on how to align the headlight beam.
Why do they have a separate UK website, with prices in GB£, advertising 2day shipping on all orders then?Ordered a new brakehose from livingstonautoparts.co.uk with 48hour delivery, fingers crossed the brakehose is actually in the UK to start with.
Finally started work on the fuel rail. It's from a cga3, with the later-style top-feed SR20 292cc injectors. Plugged into the rail with the SR retainers with no problem, fitting the cg intake mani needs a little work, 15mm collars are needed I believe.
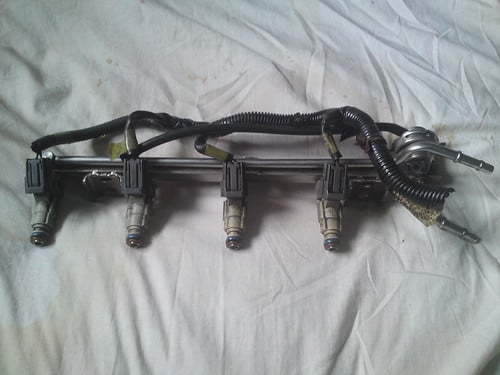

Removed the cga fpr. Ideally this would need to flow much more to lower the pressure while off boost(which I estimate would kick-in around 3000rpm), I think filing, or removing the gold nipple would allow for this.

The plan is then to fit a fmu, but they're not exactly adjustable so it's a bit hit or miss regarding the ratio, and possibly an adjustable fpr to allow for some scope, I guess it's like franks custom vacuume advance rrfpr but just independent and in a series.
Got the front arb out, painted over the quite heavily scratched parts, will reinstall soon, will be interesting to see what it's like again. I thought it was better without when I removed it, improved grip in corners, especially over bumpy ground and less understeer in the wet. And now I'm being made to put it back on!
Wishbone should hopefully be getting welded back into place by frank.
And I'm currently searching for guides on how to align the headlight beam.
OP
OP
euro_micra
Matt :)
The guys from micksgarage a quite good, mate. Have used them many times, never failed me. In Ireland they normally deliver next day if you place an order before 12am the day before. I say it was an exception what happened to you...
I enquired about where my item is on thursday, they said it had been dispatched on time and it has just entered the UK. It has now just arrived at my door today, so it'll be the shipping from Ireland to UK that took time(6days). Just annoying they advertise 2 day shipping with same day dispatch on thier UK website, I assumed there would be a UK side of the business with stock over here too.
Ah well, I better go put it on.
OP
OP
euro_micra
Matt :)
Brake hose went on relatively easy, no setbacks, no mess or anything. Just got to top up the brake fluid reservior. Was a surprisingly simple job
Putting the front arb back on was a pita though, it just didn't want to go back on! And I lost one of the 8 round bushes, damn. I've put it on, but got to find that bush so I can bolt it up that side.
Next up is the headlight beam and wishbone.
Putting the front arb back on was a pita though, it just didn't want to go back on! And I lost one of the 8 round bushes, damn. I've put it on, but got to find that bush so I can bolt it up that side.
Next up is the headlight beam and wishbone.
hi mate how did u fit the capri wheels to the micra hubs did you have to modify them ?
OP
OP
euro_micra
Matt :)
hi mate how did u fit the capri wheels to the micra hubs did you have to modify them ?
I think I've answered this question a few times on here in various places, but basicaly the wheels are redrilled to suit the Micra.
before(not the actual wheels used btw):

after:

ahh thanks mate ur car is awsome ive got a year or so b4i get mine but cnt wait to start modifing my own micra - did u drill these ur self
OP
OP
euro_micra
Matt :)
I've used Mick's Garage a few times and never had any delays - perhaps your part had been out of stock? Glad to see you're getting the car sorted
It did say it was in stock and ready for immediate dispatch(or something similar). It was all delivered in time according to them, just the time between leaving Ireland and entering the UK took the piss tbh. But no big deal, I'll still order from 'em again
I'll just check livingstonautoparts.co.uk first, delivered same day, but ordered one week later.ahh thanks mate ur car is awsome ive got a year or so b4i get mine but cnt wait to start modifing my own micra - did u drill these ur self
ta mate. SuperLS, a member on here redrilled and ran them on his micra before I bought them off him. I just gave the holes a 60° taper and played around with decals. I only used them for about 10months till I got a little bored, they turned too many heads for me
and I got videotaped while driving a few times which got annoying, I thought it looked subtle :s still haven't found any footage online though. Hence why it looks almost stock now. It still got photographed the other day mind you
OP
OP
euro_micra
Matt :)
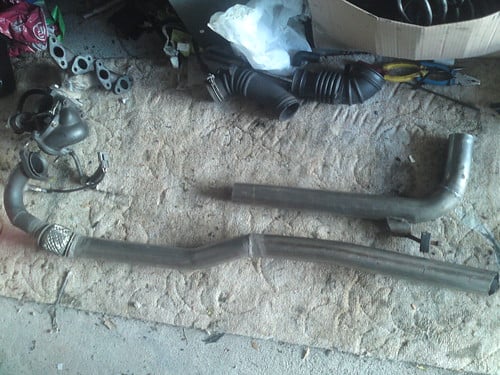
And while I'm bumped:
I had the majority of an exhaust built-up by our Frank a couple of weeks back. 2.25" side exit
Have also got a pair of 9mm lift cams, unsure about the duration, or even their origin, will have to measure them.
But nothing's going to happen for a while yet, too damn busy with study and moving house etc.
I had the majority of an exhaust built-up by our Frank a couple of weeks back. 2.25" side exit
Have also got a pair of 9mm lift cams, unsure about the duration, or even their origin, will have to measure them.

But nothing's going to happen for a while yet, too damn busy with study and moving house etc.

soare u sellin those capri wheels them coz i would be very interested save me drillin them my self
OP
OP
euro_micra
Matt :)
soare u sellin those capri wheels them coz i would be very interested save me drillin them my self
No sorry they won't be getting sold anytime soon, I'm going to be giving them a light refurbishment, and probably be put on a family members car, or my future car, whenever or whatever that may be.
okay mate
Belly93
to turbo or new lump :/ hmmm
did you use the rear springs in the kit? and is this the kit you used?I got lowz
They're FKautomotive Corsa B Street coilovers
Adjustable, so I can lower it so low its undriveable! but I settled for a little higher than that
So now the top of arch is about 30mm above the rim on the stock 13"s steelies. But with them being tucked in so far you can still turn like regular. Corners now don't exist as there's very little to no body roll, so that's fun! Ride comfort at the minute is bad as the springs on the rear are far too long and the shock sits at it's highest. Comfort from just the front coilovers alone is really good, not bouncy as it was on stock shocks as there's little movement, but it's still soft and glides over most bumps. I'll be cutting the rear springs in about half, they should still be captive and should lower to about the same as the front hopefully.
To fit the fronts first I had to remove the original shocks, and retrieve the topmount.
Had to then remove the thrustwasher from the coilover spring mount.
And place back onto the coilover, important note is this top spring mount is to sit over the rod and not sit ontop.
Need to space the top of the shaft, I used m12 washers, I ended up needing another 4.
Over them was the micra thrustwasher.
Followed by micra top mount, after filed to 12mm.
tightened with m12 nut. Making sure the top spring mount is clear and over the shaft, and your spacer's big enough that you don't run out of thread.
Fastend with m12 nyloc nut on top.
Also needed to file the lower mount holes, I opted for the top one as to keep the bottom hole a solid unadjustable hole. I also went for the most camber given by these coilovers, athough it does look like more could be got from them if I filed outwards. Did need to file more off but did this on the car with the bottom hole bolted to the mount.
The rear dampers took a little longer, and again, neede to remove stock one for parts first.
Corsa damper from coilover kit.
Add the plastic disc it came with.
With the rubber cover and built-in bush, over the top.
Metal washer supplied.
Micra top.
One half of corsa bush.
Second half replaces micra bush within the boot. I'll be replacing the nuts with nyloc ones soon.
Damper extension.
But before I can fit them , the metal edges on the lower bush needed to be filed flat, and the m12 bolt replaced with a m10.
But now three wheels lift off the ground while jacking up one corner:laugh:
^^^^^^^^^^
All of this above is not a diy guide, the corsa coilovers I have and the stock dampers I have can and do differ to other peoples, so I do not recommend you copy the above, but I thought it would be atleast a bit more educational to those thinking of doing something similar. :blues:


http://www.ebay.co.uk/itm/280813109...AX:IT&_trksid=p3984.m1423.l2649#ht_1213wt_811
OP
OP
euro_micra
Matt :)
did you use the rear springs in the kit? and is this the kit you used?
It looks like a similar kit to what I have yes. And as Karl mentioned: no the corsa rear springs don't fit well.
I've tried a few springs out, currently I'm using matiz fronts iirc, and the front coilies adjusted to a similar height.
Not as low as before but I can go around corners and over speedbumps without having to slow down to avoid scrubbing the tyres or scrapping the chassis

Still have the front ARB fitted from the MOT, that needs to come off next. It understeers widely in the wet, and jerks the car about on bumpy roads, I don't understand why people fit stiffer ones :s Rear ARB only from now on.
Experimented on the CAI again while tidying the bay, reverted back from a 2" longish pipe to a 3" shortish pipe over the last few months but it was too loud for me and emphised the flatspot at 4krpm more.
Currently trying 2 2" pipes with 3" openings, feeding a 3" pipe before entering the airbox. It has quitened the induction noise down rather noticeably upto 4000rpm and at WOT. And the flatspot has gone. It also seems to pick up revs at higher speed alot better. Sounds rather fiesty above 6000rpm too.
Obviously it's still quite a timid result in comparison to other modifications.


Belly93
to turbo or new lump :/ hmmm
when you painted it did you just paint where you had filled and if so did it not stand out more than the rest of the boot?Yeah sure, it's quite easy and don't know why more people have done it, symmetry ftw. But this is what I did, I should have took pictures of the process but nevermind, got a couple from afterwards.
First thing was to remove the lock and connecting rod, which is pretty simple I forget how it comes off though.
Then before you close the tailgate!:
Fit a solinoid to the catch, I used a cheap ebay boot popper kit but throw the switch away as they're crap and will break. You'll need to run a 12v positive fused wire from the battery in to the tailgate, did it directly from the battery rather than cig lighter so I can open it without having a key in ignition. Trickiest part is getting the solinoid to pop the catch correctly.
You can make out where I put it here, as that's the mounting bracket bottom left.
But to open it from the outside, I installed a second wire from the battery (actually, a connection block from 1st wire in footwell) to a key switch, for security, that I positioned under the handle. But since I've installed remote central locking I just use the key fob instead.
Quick diagram of the wiring I used:
Then you've got to fibreglass or weld the hole, or holes as I did the wiper at same time. I used fibreglass, started with a couple of bigger bits from the inside then you can layer it on top from outside. Then it's filler, filler primer, primer, base coat, then laquer, with a hell of a lot of sanding in between!


OP
OP
euro_micra
Matt :)
when you painted it did you just paint where you had filled and if so did it not stand out more than the rest of the boot?
I prepped and painted the whole lower part of the boot and just blended it into the top half(window frame bit) Would be better to paint the whole thing but I was just experimenting.
OP
OP
euro_micra
Matt :)
i was thinking about doin it to mine but with it bein red i didnt know if it would be noticably different :s, and could i wire this up my rear wiper switch?
I've heard reds are prone to fading quickly so they can miss-match aye. Some people have wired solinoids up to the rear wiper yeah, should be relatively easy, I laid my own wires down instead and fitted its own switch on the dash.
Similar threads
- Replies
- 76
- Views
- 1K
- Replies
- 51
- Views
- 7K