• Please only use these forums for blogs, they are not a discussion forum

Mark's 1.0LX

markbognor

Ex. Club Member
Club Member
Here's the Micra that I have been using for commuting for the past year or so.
It's swmbo's car really but we now have a Stilo for her to use with the boy. I started using it daily when my old Merc went on a limited milage policy last year, when that was sold at Christmas it become "my" only car.

Here it is:

DSCI0499.jpg


Plans for it include, as permission is negotiated, some wheels and a drop. Pretty much all any car needs to look cool.

It has so far been treated to a de-sticker and de-rubbing strip. which has cleaned it up nicely, there are still a few window stickers to remove that are cluttering it up though. It's also sporting base spec center hub caps rather than the full wheel trims. All of which are evil and should be destroyed.


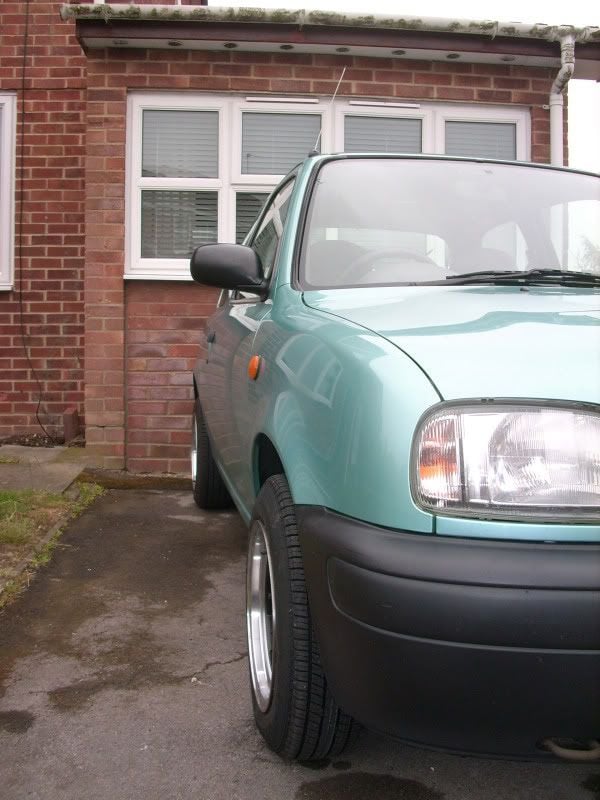
Things stayed much as they were for a long time, untill at Wheels Day on Good Friday I picked up some new wheels. Way too retro for most tatses but I have always loved them. 13"x6" and already re-drilled to 4x100 with a mahoosive center bore they are just the ticket.

I need to sort myself out with some tyres (155/65 R13 - to keep the tyre tread under the arch lip) and wheels nuts before I can run them though, and I might be needing longer studs, I'll have to see how many turns I can get on with the correct nuts.

DSCI0670-1.jpg


DSCI0671-1.jpg


DSCI0672-1.jpg
 
DSCI0198-1.jpg


Hmmm, longer studs a must then.

I'll get some studs ordered as soon as I know the full specs, and then I'll be good to go.

I've been producing CAD plot paths and cutting vinyl too.

DSCI0208.jpg
 
DSCI0226-1.jpg


All four are painted, still got two to polish. These could do with some more work really but I'm going to get all four to the same sort of level then decide if I want to do some more.

Studs have been ordered. The aim is to get them on for the Retro Show at Santa Pod. Then I'll have to roll the arches and get on with the lowering.
 
Cheers for the responses guys. Here's how I've been getting on with replacing the short studs. I posted this in my "Extended Studs?" thread but it's here to to keep the continuity of the blog.

Today I have mostly been, fitting longer studs to the rear.

Step 1:

DSCI0235.jpg


Loosen the rear wheel nuts,
Chock the front wheels,
Take off the hand brake,
Jack up the rear on the center of the axle,
Lower back onto axle stands.

Step 2:

DSCI0236-1.jpg


Remove the brake drum. There's probably a way to get in from the brake back plate to undo the adjuster to make it easier, but I managed to just wiggle the drum off. It didn't even really need a tap with a hammer to free it up.

Step 3:

DSCI0237-1.jpg


Remove all the brake parts so that you have clearence to work. I find its best to lay these sorts of parts out under the car in the order that you remove them to assist with getting them back in. I was working without a haynes and I've not opened a drum brake for a long time so I just made it up as i went along.

Step 4:

DSCI0240-1.jpg


Remove the first stud. Only remove and fit one at a time! You need the other studs in place to lever against when pulling the new stud into place.
A Household/DIY claw hammer isn't going to cut it here you want something with some weight.

Step 5:

DSCI0238-1.jpg


I thought at first the studs were too long to fit, but then with some giggling and wiggling I found that this part of the pressing gives just enough room for the +20 stud.

Step 6:

DSCI0239-1.jpg


Pull the stud into place by sliding a socket over it then tightening a wheel nut up on it to pull it through the hub. A washer between the nut and the socket would help but I didn't have any big enough. Also a good smear of grease between the nut and socket will reduce some of the friction and make it easier do up.

Step 7:

DSCI0241-1.jpg


Repeat steps 4 - 6 three more times. Put the brakes back together. If you cant remember hoe it went, get the drum off the other side and use that for reference.

Now here's where I ballsed up. I must have wound the adjuster further out while re-assembeling the brakes. The drum was an arse to get back on and now the brakes are binding. I did the same the other side too, I kindof hoped that they would free off after a drive but I need to take the drums back off and re adjust. I think I might also have to change the brake fluid, i suspect I might have boiled it.

The other issue I have is that the splined section is about 1.5mm longer on the replacement studs. I'm not sure if the drum has seated properly. There doesn't seem to be any vibration, but if there is an issue I will just drill a slight clearence on the inside of the drums.

So rather than getting on with the front, I'm still sorting the rear. Bumhats.
 
Those wheels look to be sticking out rather a lot? you may well need to do a bit more than roll the arches to get your desired ride-height and be legal as well.

I'd have been OK with those studs as they were, just enough thread used, are you sure your nuts have the same taper as the wheels?

Edit just seen you mention getting correct nuts
 
Those wheels look to be sticking out rather a lot? you may well need to do a bit more than roll the arches to get your desired ride-height and be legal as well.

i think only the top of the front wheels will protrude mark, which is easily cured with some negative camber :cool: (which has the added bonus of curing the inherant understeer that k11,s have)
http://www.micra.org.uk/attachment.php?attachmentid=13141&stc=1&d=1246798454
http://www.micra.org.uk/attachment.php?attachmentid=13142&stc=1&d=1246798454
 

Attachments

  • PICT0183.JPG
    PICT0183.JPG
    84 KB · Views: 1,010
  • DSCF0385.JPG
    DSCF0385.JPG
    80.9 KB · Views: 958
i think only the top of the front wheels will protrude mark, which is easily cured with some negative camber :cool: (which has the added bonus of curing the inherant understeer that k11,s have)
http://www.micra.org.uk/attachment.php?attachmentid=13141&stc=1&d=1246798454
http://www.micra.org.uk/attachment.php?attachmentid=13142&stc=1&d=1246798454

^ That is already set in the memory banks, I had another peruse of you blog friday and picked that up.

I was looking at the rear beam yesterday. I had hoped that the spindles were bolted onto the beam but it doesn't look like it. Shame as I'd hoped that some camber shims could br used on the rear. I guess if I really want some camber that I'll have to look into pie cutting the beam.

Those wheels look to be sticking out rather a lot? you may well need to do a bit more than roll the arches to get your desired ride-height and be legal as well.

I'd have been OK with those studs as they were, just enough thread used, are you sure your nuts have the same taper as the wheels?

Edit just seen you mention getting correct nuts

There's nothing like enough thread, the rule of thumb is 150% of stud diameter so I should have 18mm of stud protruding to achieve full strength. I think that the original studs gave me 8.5mm, so not even half!

I'm not going to get it as low as the 'shops, SWMBO's orders. The wheels will be wearing 155's so there should be a little stretch to keep the tread under the arch lip, with a little bit of rolling, and prehaps a slight flare to give some clearence.

Once the wheels are on the next project is a shortened or adjustable panhard rod, then I'm going to have a go at making an arch roller. Then I'll bring it down 50mm or so.
 
^

I was looking at the rear beam yesterday. I had hoped that the spindles were bolted onto the beam but it doesn't look like it. Shame as I'd hoped that some camber shims could br used on the rear. I guess if I really want some camber that I'll have to look into pie cutting the beam.

heh, i checked that out too (tho negative camber on the rear would bring back the understeer i think :doh:)
either piecut (there,s a "how to" on a jap site) or, my prefered method. a slow curve along the beam :)
 
Mark, post your stud how-to up in the guide section so everyone can find it easily, looks handy. Wheels are sexy too!
 
Cheers Rob, I will do when i find it - off to look now.

Frank, Its all about looks. How would you go about the shallow bending of the beam?

I know this is something that goes on, and must result in a stronger beam than one that has been cut and re-welded.

On that note i'm wonderin one peice of pie in the middle or a shallow peice at each end. Hmmm.

I know that some circuit and short oval racers used to heat and bend axle casings on Escorts and Anglias to achieve some neg camber. They used to get a couple of races before the half shafts checked out.
 
Cheers for that link Frank. I had a mental image of cutting slot/wedge in the top and closing it up, rather than the bottom and opening it. It just seemed to make more sense to me to leave the original material at the bottom where it is under the most strain, rather than the weld.


I pulled the drums off this afternoon and wound the adjuster back in. the droms went back on a treat, and a fast run up and down the bypass has shown that theres no vibration so everything is seating nicely. The brakes are a bit spongey though so it looks like i did boil the fluid. Ho Hum, need to get down to my folks now and collect the Gunsons Easy Bleed!
 
I tried a wheel and the correct nuts on the long stud this morning. With the closed nuts the studs are definately two long, so I had a few options. Take a grinder to the studs, buy new open ended nuts or modify the nuts I have.

I decided that I would take the tops off of the acorn nuts, because buying new nuts would cost money, and grinding the studs would cost time. I machined the nuts during my break at work.

So, take 16 of these:

DSCI0251.jpg


Let this ginger grinning bafoon loose on them:

DSCI0254.jpg


And end up with these:

DSCI0252.jpg


Yes I know the ends will rust, but I can blob a little paint on them and its not like the south east asia spec chrome was going to last long anyway.

Fingers crossed that it stays dry tonight and I can get on with the front studs.
 
I got the longer studs fitted to the front on Thursday, but no pics becasue I was in a massive hurry. There was the same problem on the front that the splined section of the stud was too long. I drilled a slight clearence on the rear of the disk to clear the splines, and this morning I pulled the drums off again to clearence them as well.

I wish I had got some pics to make this post more interesting.

There'll be some tomorrow though. Going to the tyre fitters first thing.
 
I'm well pleased. Ok so it rides so high sometimes I get a nose bleed, but I still think it looks the business, propper retro too. Got the same sort of feel to it aesthetically as a modded mini on wide 10"s.

If I could have afforded it I'd have bought a set of 155/65's there's a bit too much tyre wall with the 70's. The 6" width has a nice bit of stretch, and it keeps the tread under the arch lip nicely. The rears want spacing so that the wheel rim sits the same to the arch on the back, or of course I could hunt out some 7" wide slots.

DSCI0282-1.jpg


DSCI0281-2.jpg
 
Cheers Frank. Doesn't look like the camber is going to be needed at the moment. Will have a think again when it comes down a bit but thats not going to be very soon.:(
 
No progress, just enjoying having something a little odd. I spent last weekend at the Retro-Rides Gathering at the Haynes Motor Museum. Much fun was had. While nursing a quite horrific hangover on Saturday, this was tried, by a member of the welsh RR contingent.

3829831852_0a31e0e287.jpg


Total Prarie win - dont bother mentioning that it would render the rear doors inoperative, the wide slots do that already anyway. The theme for the car is going a bit boso, so they are just the ticket.
A chap at the show was selling the universal arches for £45 a set. Of course once they had been trialled on the Prarie I had a play too.

3829832118_cd7c7473f0.jpg


They would need pulling into shape a little, but that could be done when fixing. Designed to be blended (blurgh!) they also sported a lip round the rim for bolting on. I rather like it, but as theres no posibility of more mods 'till I renew the insurance I didn't buy a set.
 
Hi Mark !
Are you selling the 2 fronts mud flaps? Pretty interested in !

Cheers

Seb
 
jes for 45 quid mark id make em fit!!top find did you grab his number mate for future refernce?

The £45 was a show only offer, the normal price is £65 a set.

There's two members on RR selling the same sort of thing at the mo, Rangerbob, with these "JDM" style, with the cut outs for the fixings heads. I can't seem to find the thread for the plain style ones like I trialled at gathering.
 
I have finally got round to sorting out some centres for the slots.

I decided I would vacuum form some plastic caps, as I wanted the centers to be black to match the wheels anyway and the High Impact Polystrene sheet we use for forming comes in a nice gloss one side matt the other finish, just right for the wheels.

So first step was to make a former. I layered up some discs laser cut from 4mm MDF, this was much quicker than turning down a block.

DSCI0513.jpg


This had a slight draught angle sanded on in a lathe and the top corner radiused.

So then it was on with the forming,

DSCI0511.jpg


Repeat x4 and trim neatly,

DSCI0512.jpg


The lower disc on the former was sized so that the outside of the plastic forming was a nice tight fit on the bore of the wheels.

Before:

DSCI0514.jpg


DSCI0515.jpg


After:

DSCI0516.jpg


DSCI0517.jpg


Another small step forward completed. They do look a little bit like I've just used spray can caps but never mind.

I might stick a sticker of some sort on the centers, maybe an eight ball or rising sun, but I'll probably just keep it simple and leave as they are.
 
Thanks tweaker.

They need some 155/65s round em to reduce the side wall a bit, and of course all of that arch gap removing.
 
I turned up a gear knob last week. My first go was a bit rubbish so I had another look at it and finished it better this time. It's now residing on the end of my gearlever.

DSCI0572-1.jpg


More custom gear knob ideas are in the pipeline.
 
I've been playing with Knobs. Its just something that I like. I had an idea a while ago that a dinky 150ml pop can would make a fun gear knob. I had an idea that I would open from the base, empty out the contents and fill with fiberglassing epoxy resin. My first go was not brilliantly sussesful.

DSCN1764.jpg


I mixed the incorect ratios, I also think that the filler powder may have worked as a catalyst and set the reaction off quicker, because the second time I tried with simmilar ratios of resin/hardener but no filler it was fine.

DSCI0611.jpg


Part of the can was left open as a shoud round the gearleaver shaft, and to set the height of the can down slightly. The hardened resin was drilled and tapped to suit my gearleaver shaft.

DSCI0604.jpg


There it is in position, the Bitter Lemon was chosen to go with the girly turquoise car.

DSCI0610.jpg


The can isn't particuarly comfortable so after the novelty has worn off I'll probably use the ally one.
 
looks great though!

really love the stuff you do mark, its very original as far as te stuff on here goes (Y)

i hope you can convince the powers that be to let you lower the micra!
 
Clearence has pretty much been granted. Of course that does rely on me not doing anything retarded like crash the car or flood the bathroom in the forseeable.

The biggest issue I have is the insurance. With some mechanical and aesthetic mods it will be a bit more than it is now, so I will need to fund that outside the household budget, but that will be do able. The problem is the current insurer wont accept any mods on the policy (bar the aftermarket wheels) and I can't cancel the policy because I've made a windscreen claim. So I'm stuck with the gasser stance untill the policy needs renewing in March.

The actual lowering shouldn't be prohibitively expensive. After all, I already own an angle ginder fwn.

Come the springtime I will be entering a whole world of win.

Untitled-1-1.jpg
 
cut springs = fail. dont be a **** and do it. you are putting others at risk. lowering springs are cheap as chips tbh
 
Lolz.

I love the measured, reasoned and well argued responses that crop up on here.

I'm happy that if shortening the springs is the method I choose to lower it by when the time comes that it will result in a car that is perfectly safe.

Please don't call me names.(Y)
 
Ooops, I seem to have just bought a pair of ridiculously wide wheels.

!Bfm4h1g!2k~$(KGrHqUOKi8ErzSIKF)gBLCCG-w(cg~~_12.JPG


13x8 :p

I'm going to work with our technician on getting them drilled to 4x100 (ex-toolmaker - he knows a thing or two about accuracy) Then its a case of seeing if they will fit under the rear arches.

I have a suspision that the rear fitment will be great, and that the fronts will need a little spacing to bring them out to the same level relitive to the arch lip. There's unlikely to be any rubbing issues because she's still sky high.
 
they should re-drill ok mark, but they look like they,ll stick out on the front tho to me (you may need some camber up front to pull them in :cool:)
 
There's only a pair frank, they'll go on the rear, I'll keep a pair of the current 6" wide ones on the front, prehaps spaced slightly to even up the poke, untill I can find a pair of 7"s for the front. Its an even fitment of something like Crocains Drag Stars on the front that I'm after, hence the 8"s for the rear.
 
Mark they fit in the rear (Y) I had some 13x8 superlites but the Back will need spaced a little to bring them in line with the front

I just found them to be a little small even with a reasonable amount of slamage
 
Back
Top