My wife has been bugging me to sort out the rusty front wing on her 1999 1.0 K11, and after reading a number of the posts on here it persuaded me to give it a try. I found a place on EBay that would supply a painted aftermarket wing, and one that arrived, and the weather was fine I decided to get it done.
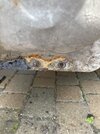
Before the change it looked like this…..

I could have cut it out and patched it but I decided it was easier just to replace the wing. It started out easy enough….
Using a 10mm socket and a 10mm ring spanner I got all the bolts out from in the engine bay, and from the door pillar…
You need to use a ring spanner for the door bolt as you can’t get a socket in there.
Then I needed to get the car on the jack and take off the wheel and the plastic wheel arch liner.

The liner is mostly fastened with Philips-headed screws into plastic bushes clipped into the wing- more on this later.
Moving into the two sill bolts, both of these sheared off when trying to loosen them with the socket.
However, the most difficult and time consuming part was removing the bumper-end bolts and unclipping the fasteners. There are three bolts/fasteners at the bumper end, plus the screw and clip into the headlight assembly.
The two shown below were the worst to remove - the nearest would not budge with the ring spanner and there was not enough room to get the ratchet socket wrench in between the bumper.
Finally I managed to pull back the bumper and get the socket in attached to the non-rachet handle
The far end bolt inside the black plastic clip would turn with the ring spanner but access is very restricted and I managed to get it out after about 10 minutes of tiny turns.
I thought that was everything, but there was still something holding onto the bumper.
it turned out to be the black plastic clip that was attached to the bumper and the wing - two plastic “splines” push into the wing and need to be compressed and pulled out before the wing can be moved. I was nearly resigned to having to take the bumper off, however my neighbour came to the rescue with a pair of L-shaped long nose pliers that we managed to get into the restricted space and could squeeze the splines. This is what the clip looks like when removed:
With that clip freed, the wing came free and we could remove it
Next, the sheared bolts needed to be drilled out - with a small pilot hole drilled, a 6.5mm high-speed steel drill bit drilled the remains of the bolts out ( running the drill slowly)
The new wing could now be fitted, using new M6 (16mm shaft length) bolts and nuts to replace the sheared bolts
before re-fitting the wheel arch liner, I needed to recover and fit as many of the plastic bushes from the old wing, using mole grips to push them out of the holes in the old wing - this is what they look like
After refitting the liner, the indicator repeater, getting the wheel back on, moving the 16V badge from the old wing, and applying a little underseal to the sill bolts, the job was complete.

In total, the job took about 5hours in total - most of the time was in removing the bumper- end fastenings and drilling out the sheared bolts etc. I’m pretty pleased with the result - the colour match is good, the panel gaps are a little wider than standard ( esp between the wing and the door) but I’m pretty happy as im not that experienced in bodywork repair. Most importantly the missus is happy that she now has her “Tidy little Micra” looking good again.
Before the change it looked like this…..
I could have cut it out and patched it but I decided it was easier just to replace the wing. It started out easy enough….
Using a 10mm socket and a 10mm ring spanner I got all the bolts out from in the engine bay, and from the door pillar…
You need to use a ring spanner for the door bolt as you can’t get a socket in there.
Then I needed to get the car on the jack and take off the wheel and the plastic wheel arch liner.
The liner is mostly fastened with Philips-headed screws into plastic bushes clipped into the wing- more on this later.
Moving into the two sill bolts, both of these sheared off when trying to loosen them with the socket.
However, the most difficult and time consuming part was removing the bumper-end bolts and unclipping the fasteners. There are three bolts/fasteners at the bumper end, plus the screw and clip into the headlight assembly.
The two shown below were the worst to remove - the nearest would not budge with the ring spanner and there was not enough room to get the ratchet socket wrench in between the bumper.
Finally I managed to pull back the bumper and get the socket in attached to the non-rachet handle
The far end bolt inside the black plastic clip would turn with the ring spanner but access is very restricted and I managed to get it out after about 10 minutes of tiny turns.
I thought that was everything, but there was still something holding onto the bumper.
it turned out to be the black plastic clip that was attached to the bumper and the wing - two plastic “splines” push into the wing and need to be compressed and pulled out before the wing can be moved. I was nearly resigned to having to take the bumper off, however my neighbour came to the rescue with a pair of L-shaped long nose pliers that we managed to get into the restricted space and could squeeze the splines. This is what the clip looks like when removed:
With that clip freed, the wing came free and we could remove it
Next, the sheared bolts needed to be drilled out - with a small pilot hole drilled, a 6.5mm high-speed steel drill bit drilled the remains of the bolts out ( running the drill slowly)
The new wing could now be fitted, using new M6 (16mm shaft length) bolts and nuts to replace the sheared bolts
before re-fitting the wheel arch liner, I needed to recover and fit as many of the plastic bushes from the old wing, using mole grips to push them out of the holes in the old wing - this is what they look like
After refitting the liner, the indicator repeater, getting the wheel back on, moving the 16V badge from the old wing, and applying a little underseal to the sill bolts, the job was complete.
In total, the job took about 5hours in total - most of the time was in removing the bumper- end fastenings and drilling out the sheared bolts etc. I’m pretty pleased with the result - the colour match is good, the panel gaps are a little wider than standard ( esp between the wing and the door) but I’m pretty happy as im not that experienced in bodywork repair. Most importantly the missus is happy that she now has her “Tidy little Micra” looking good again.